Running Android Unit Tests
Application tests are essential when it comes to improving and maintaining product quality and performing routine checks which are difficult for humans to perform regularly.
Unit tests are usually considered first as they run really fast and are relatively easier to write and measure.
We will create a local unit test here as an example and show you how to run the test during your build process.
Creating unit tests
First, please add test dependencies to your build.gradle file:
dependencies {
    // Required for local unit tests (JUnit 4 framework)
    testImplementation 'junit:junit:4.12'
}
Create your test file in your project’s module-name/src/test/java/ folder.
package com.example.appcircle_sample_android;
import org.junit.Test;
import static org.junit.Assert.*;

/**
 * Example local unit test, which will execute on the development machine (host).
 *
 * @see <a href="http://d.android.com/tools/testing">Testing documentation</a>
 */
public class URLValidatorUnitTest {

    @Test
    public void invalid_url_test() {
        boolean isValid = URLValidator.isValid("http:/www.google.com");
        assertFalse(isValid);
    }

    @Test
    public void valid_url_test() {
        boolean isValid = URLValidator.isValid("https://www.google.com");
        assertTrue(isValid);
    }
}
This example checks to see if the provided URL is valid.
Running your unit tests in Appcircle
To run your unit test during the build process, you can simply use a custom script in your build profile.
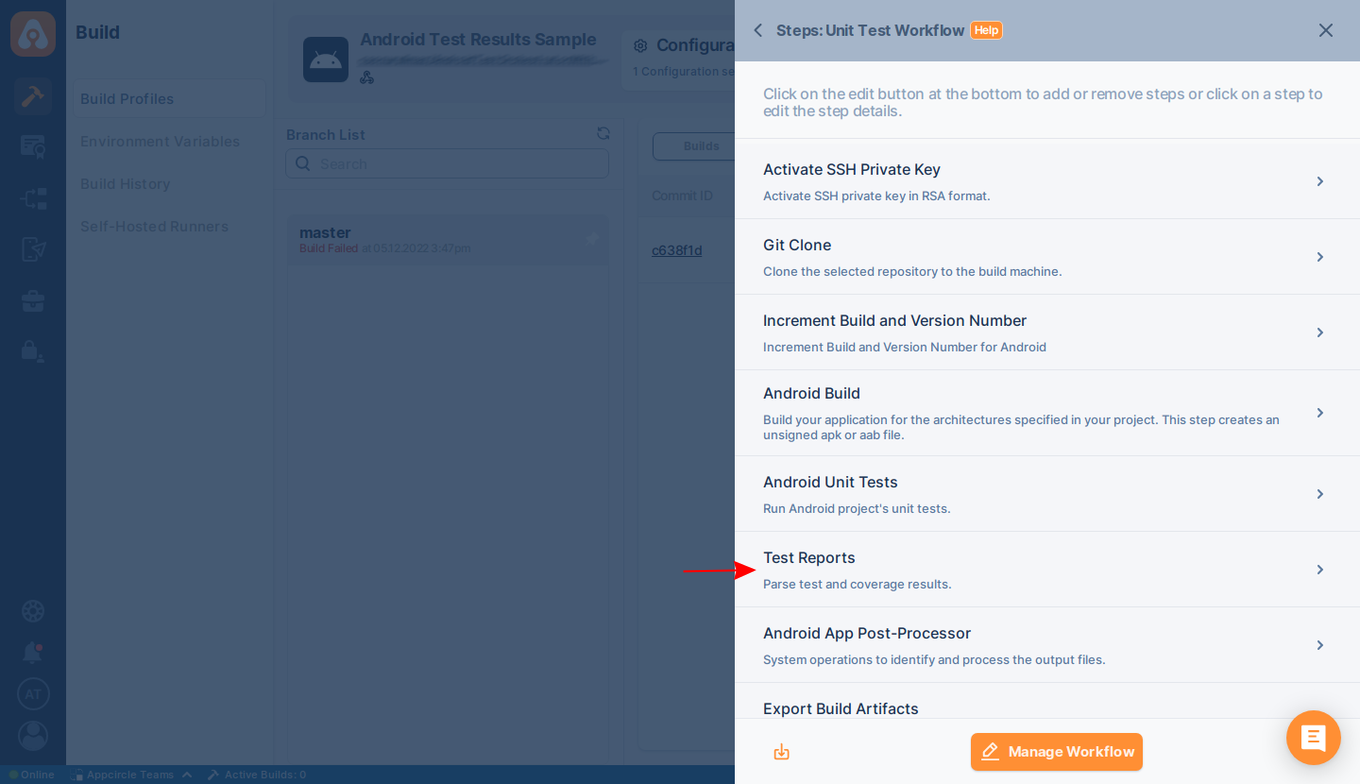
Simply go to your build workflow and add a custom script after the Sign Application step.
See the following page on our documentation to learn more about creating custom workflow steps:
Working with Custom ScriptsAdd the following Bash script to your custom script step:
cd $AC_REPOSITORY_DIR
./gradlew testRelease # or you can use 'testDebug'
mv app/build/reports/tests $AC_OUTPUT_DIR
mv app/build/test-results $AC_OUTPUT_DIR
This simple Bash script will trigger your unit test and output the test results to be packed along with your binary files. You will get the test results both in xml and html formats.
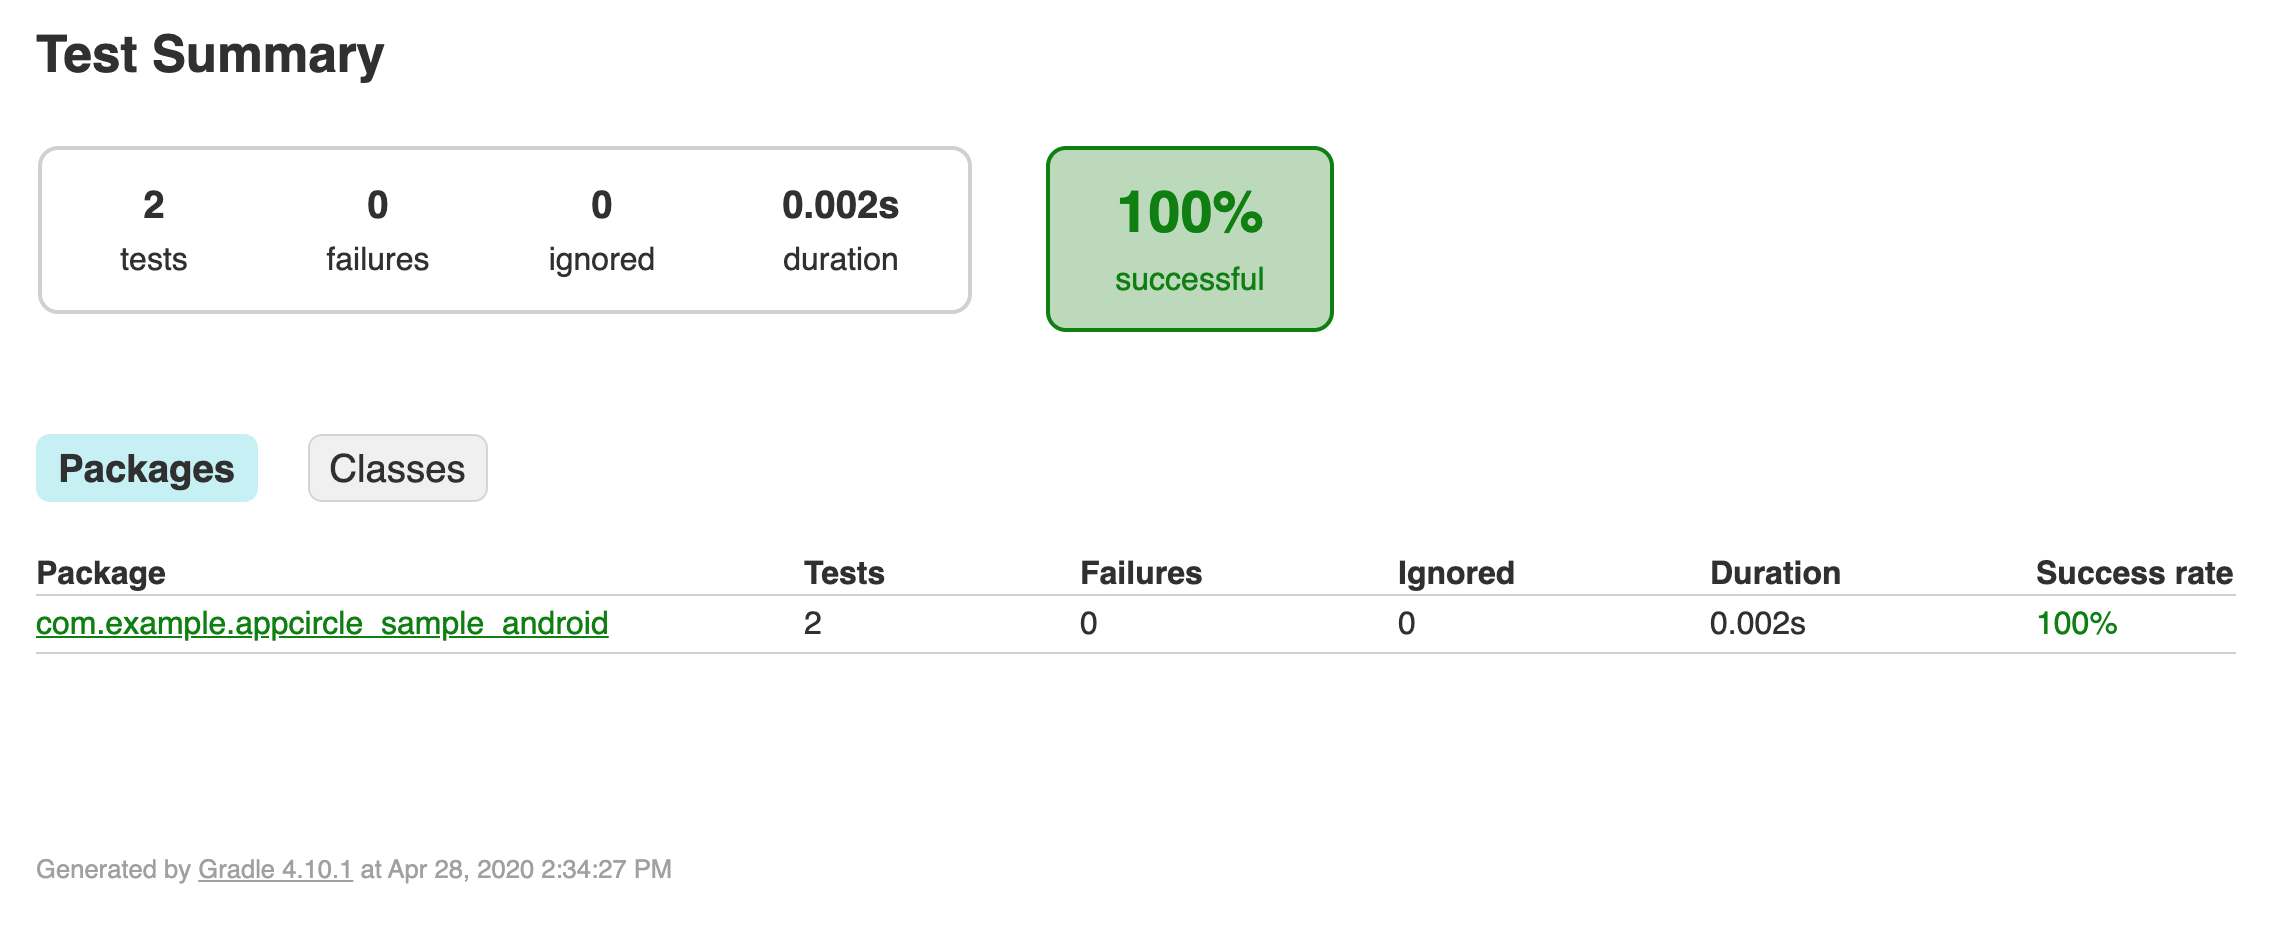
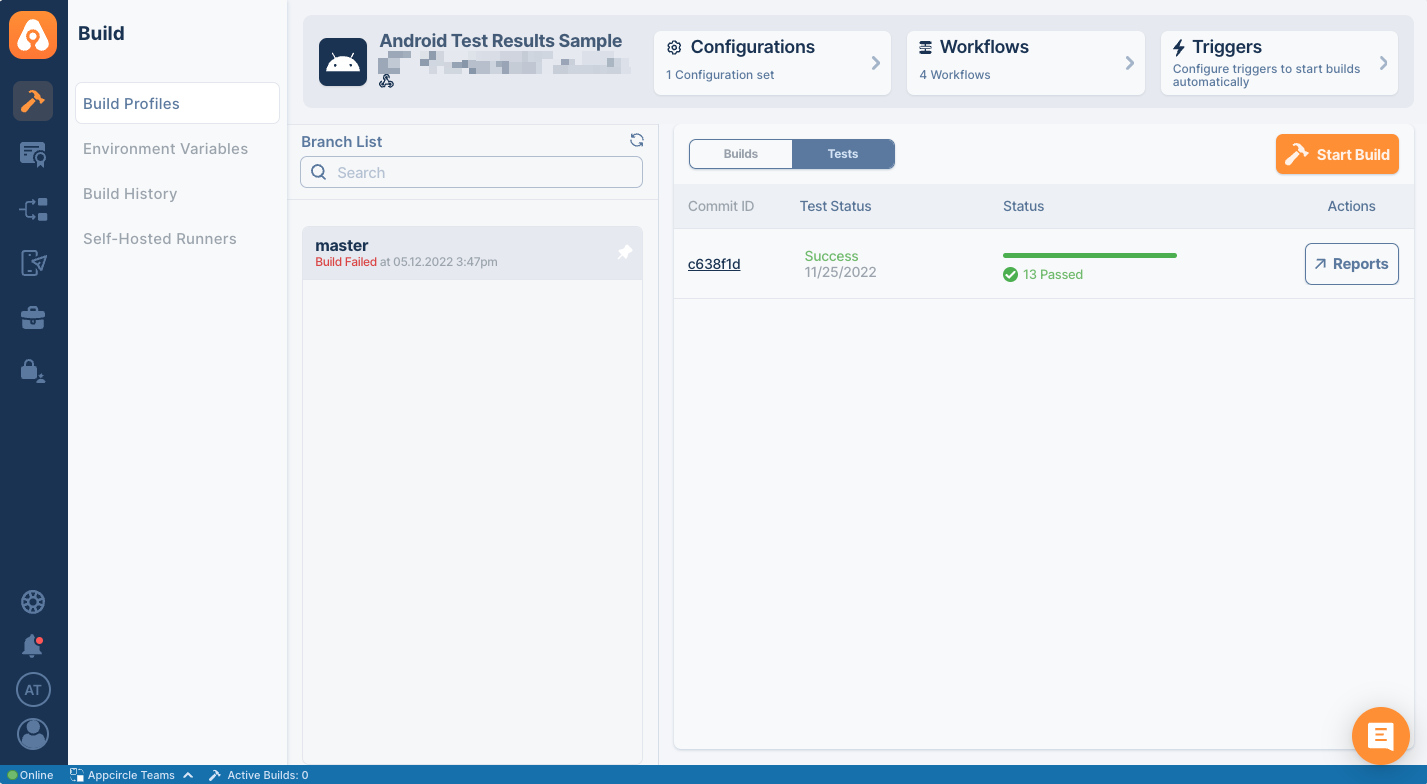
Generating Test Report
Appcircle has Test Report Component which can show the result of your tests and code coverage in a beautiful UI.
You must add this component after running your tests so that it can parse test results. Your workflow should look like the below.
Test Report Component shows both test and coverage results. This component supports the following test and coverage formats:
Please ensure the "Always run this step even if the previous steps fail" toggle is enabled for the Test Report step, so even if earlier steps fail you will still receive test results and reports.

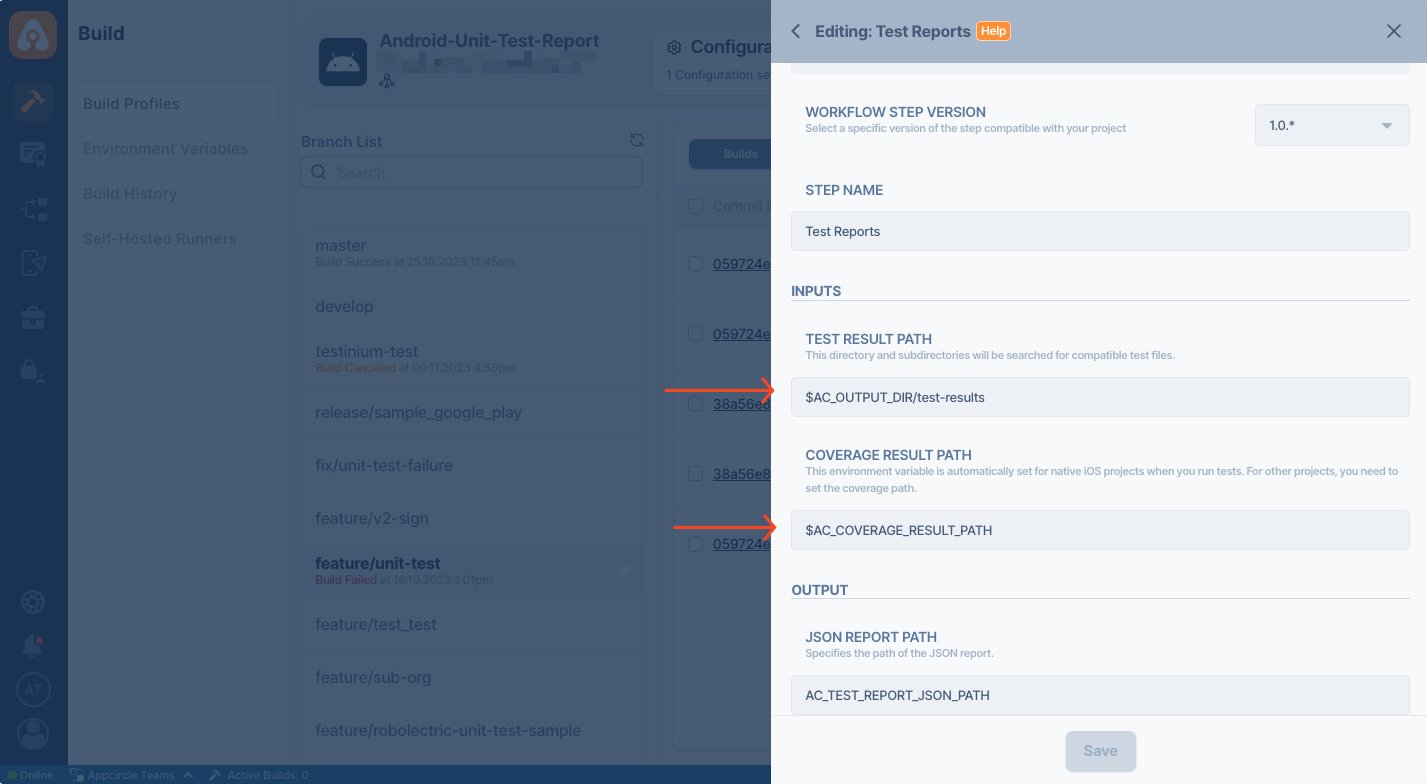
You must configure the Test Report Component and enter the path of code coverage and test results paths. For example, if you run your tests with an emulator, your files will be generated in the following folders.
- Code Coverage Files:
$AC_COVERAGE_RESULT_PATH - Test Results:
$AC_OUTPUT_DIR/test-results
You must configure the component to parse those folders.
If you're using UI tests with emulators, you must select an Intel device (Appcircle Linux Pool (x86_64)) since M-series virtual machines (Appcircle Standard macOS Pool (arm64)) don't support nested virtualization. Unit tests can work for both pools.
Jacoco Test Coverage
If you use the Jacoco tool for test coverage in your project, you can obtain coverage percentages from the test reports Jacoco generates. Jacoco calculates coverage percentages using six different methods, and the coverage percentage will be calculated based on the selected method.
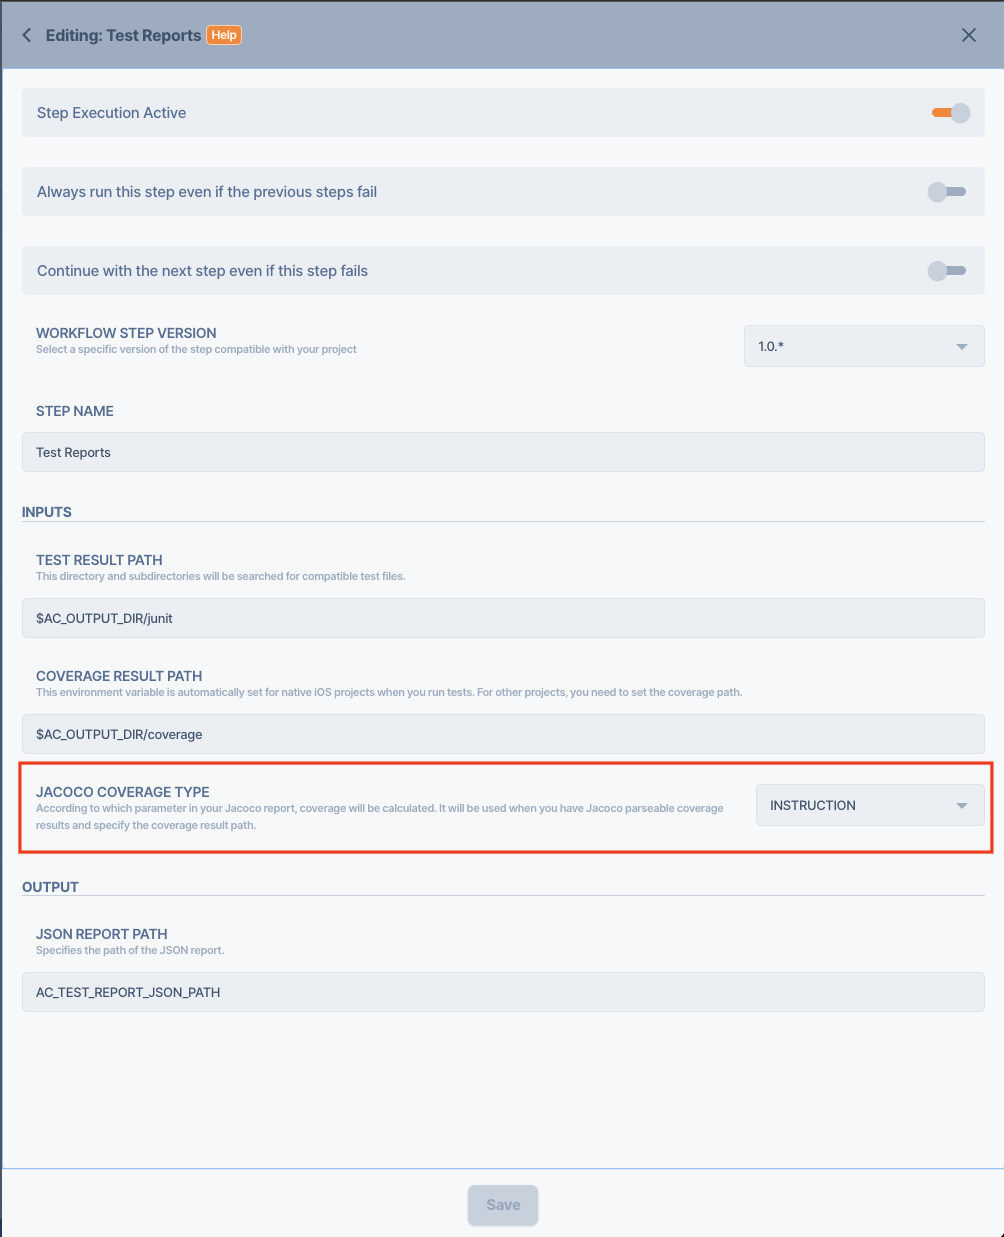
These methods range from the most detailed coverage percentage to the most general:
- INSTRUCTION: JaCoCo counts the smallest unit of single Java bytecode instructions.
- BRANCH: JaCoCo also calculates branch coverage for all if and switch statements.
- COMPLEXITY: JaCoCo also calculates cyclomatic complexity for each non-abstract method and summarizes complexity for classes, packages and groups.
- LINE: For all class files that have been compiled with debug information, coverage information for individual lines can be calculated.
- METHOD: JaCoCo considers a method as executed when at least one instruction has been executed. Since JaCoCo works at the bytecode level, it counts constructors and static initializers as methods.
- CLASS: JaCoCo considers a class as executed when at least one of its methods has been executed. JaCoCo counts constructors and static initializers as methods.
Each calculation type has different coverage percentages. This is because each type has its own level of detail. Therefore, the coverage percentages are different for each one.
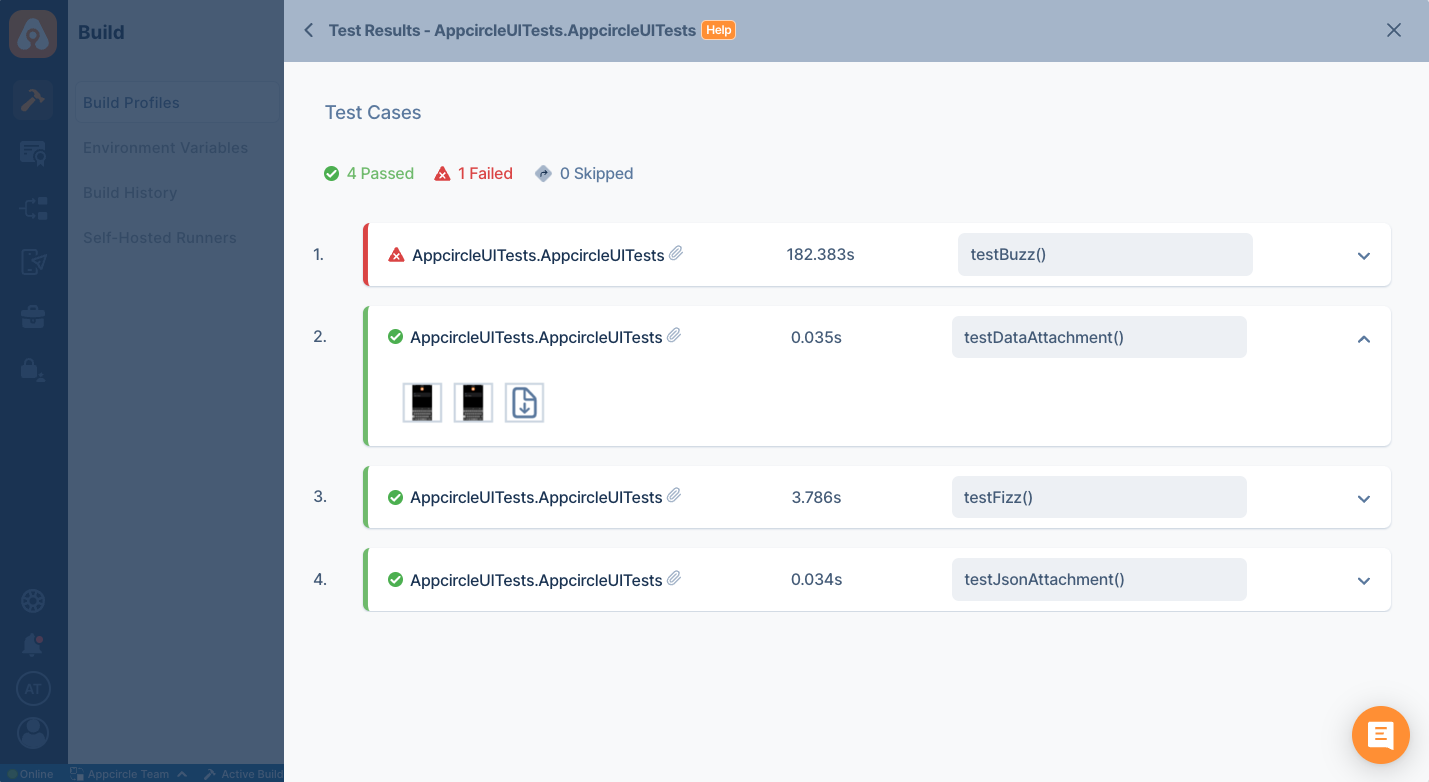
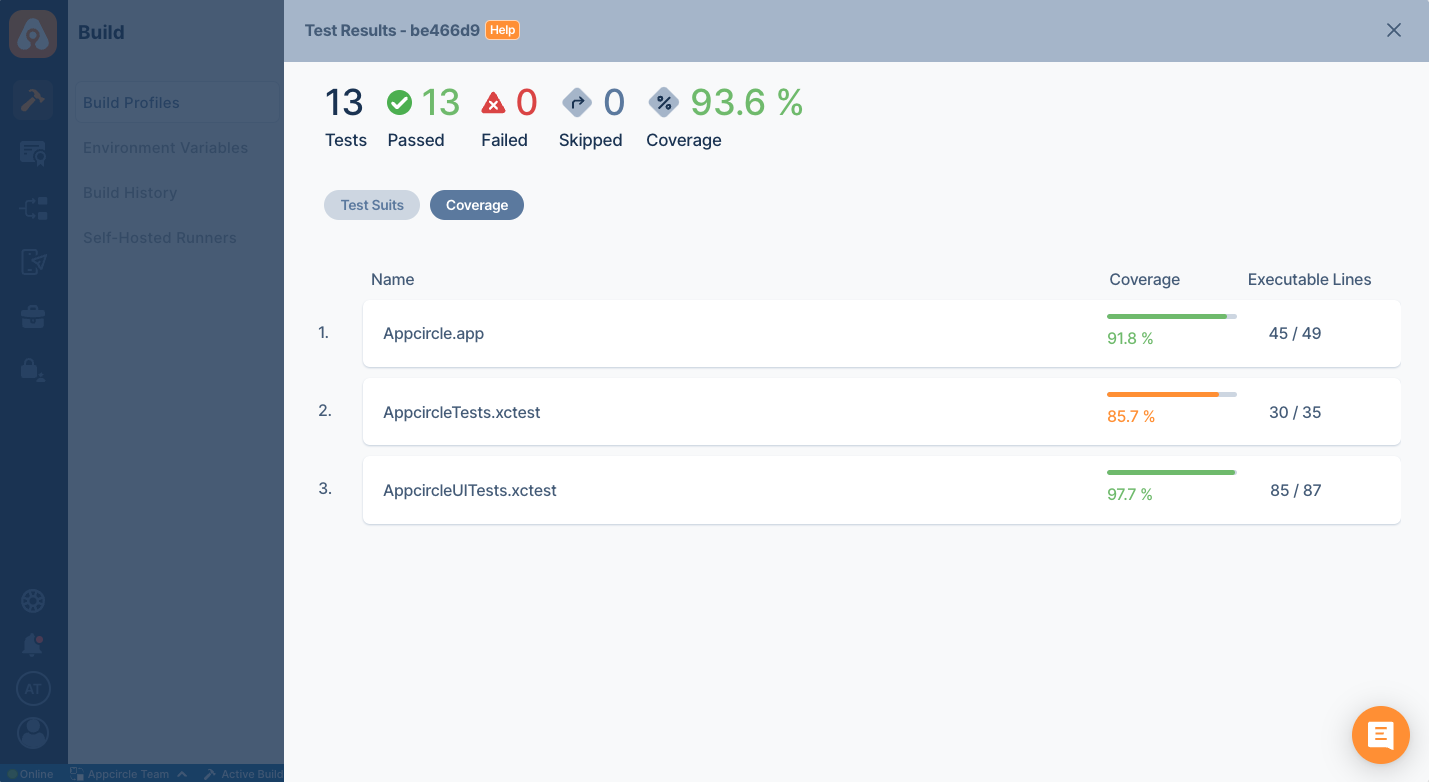
Showing Test Reports
Appcircle can show passing and failing tests in compact UI. If your tests generate artifacts, those artifacts are also displayed with your test cases.

Automated Tests
Appcircle currently supports the following mobile automation testing tools:
Each service allows you to run your tests on real devices, and test scenarios can be started with the artifacts created on Appcircle. Rich reports can be managed by visiting the web site of each service.
However, if your tool supports producing the following test report formats, you can also see the test results on Appcircle. Appcircle's Test Report currently supports the following test and coverage formats:
Test Format
- JUnit
.xml
Coverage Format
- JaCoCo
.xml - Cobertura
.xml - Lcov
lcov.info
For example, BrowserStack allows you to export test results as JUnit. You can get the results of your tests and code coverage results from BrowserStack by using a simple bash script.
curl -u "$AC_BROWSERSTACK_USERNAME:$AC_BROWSERSTACK_ACCESS_KEY" \
--output $AC_OUTPUT_DIR/myreport.xml \
-X GET "https://api-cloud.browserstack.com/app-automate/espresso/v2/builds/$BUILD_ID/sessions/$SESSION_ID/report"
Appcircle's BrowserStack App Automate - Espresso step already parses JUnit Test reports. The above code sample is only given as an example.
FAQ
Firebase Errors
Authentication Error: Your credentials are no longer valid.
Error detail:
Error: failed to upload release. Authentication Error: Your credentials are no longer valid. Please run firebase login --reauth
For CI servers and headless environments, generate a new token with firebase login:ci
⚠  Unable to fetch the CLI MOTD and remote config.
If you encounter this error message, please review the following two points:
- Verify Your Firebase Credentials: Ensure that your login information is valid, as per the token or service account you are using. You can test it locally using the same token or service account to confirm its authenticity.
- Check CA Certificates: If you are a self-hosted Appcircle user and you are certain that your credentials are correct, then you should also confirm that your CA certificates are properly defined for NodeJS. You can check CA certificates using the following command:
cat $NODE_EXTRA_CA_CERTS
Point 2 exclusively applies to users who have opted for self-hosted solutions. For those utilizing Appcircle from the cloud platform (appcircle.io), there is no need to consider this particular point.