Install Appcircle on Microsoft Azure
Overview
An Appcircle server image is a pre-configured template used to a create virtual server, known as "virtual machines", in the Microsoft Azure environment.
Think of it as a snapshot of a server that includes the operating system, necessary tools, applications, and any additional services needed to run the Appcircle server.
This documentation provides step-by-step instructions for configuring and setting up Appcircle Server on Microsoft Azure. Follow these guidelines to ensure a successful deployment.
Prerequisites
Appcircle Requirements
If you don't apply a license, you can go on with the package located in the server and use the Appcircle server as a "Starter Plan" user. But it's recommended to purchase a license from Appcircle that will increment the license limits and enable you to access the Appcircle resources for future upgrades.
If you are a licensed user, you should contact us about the licensed Appcircle server package that includes your actual license.
Technical Requirements
Before using the Appcircle server image, there are a couple of things that you need to handle.
Microsoft Azure Account
You should have an active Azure account with appropriate permissions to launch virtual machines and work with other related services.
Understanding of Azure Services
A basic understanding of Azure services, particularly Virtual Machines, is beneficial.
You should be familiar with virtual machine creation, networking, security groups, and storage configurations.
1. Networking and Security Configuration
You might need to configure networking aspects such as virtual networks, subnets, route tables, and security groups to properly integrate the instance within the network environment and manage access controls.
2. SSH Key Pairs for Secure Access
You need an SSH key pair to access the server that you will create securely.
3. Linux System Configuration
Basic familiarity with Linux system configurations and commands is essential since this document will use Linux commands.
Creating an Appcircle Server from the server image
After you meet all the requirements discussed above, you can follow the steps below to create an Appcircle server from the server image.
-
Log in to Microsoft Azure with your account.
-
Head to the Virtual machines menu to create a virtual machine.
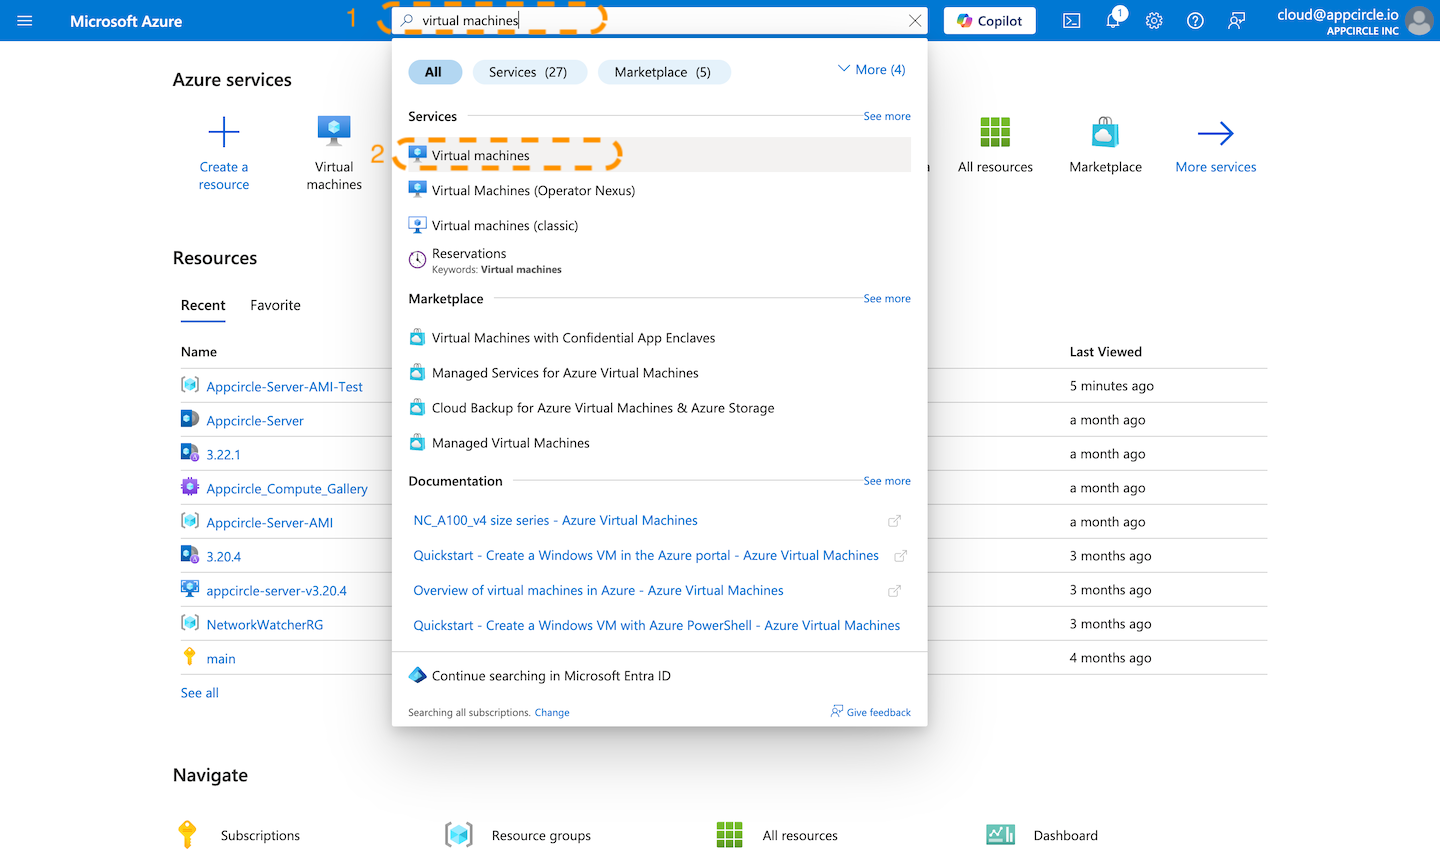
- Click on the "+ Create" button and "Azure virtual machine" from the virtual machines dashboard.
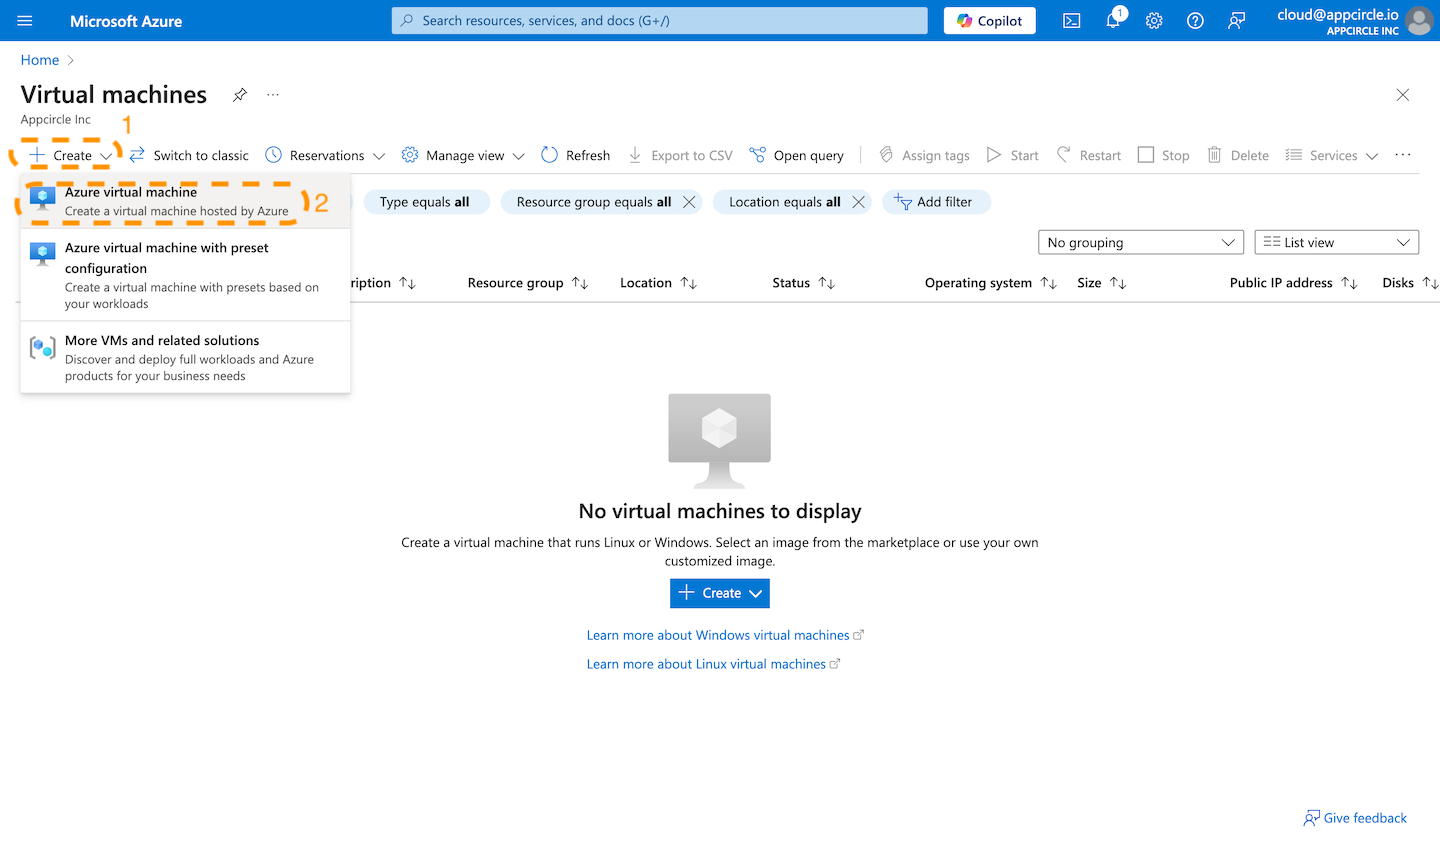
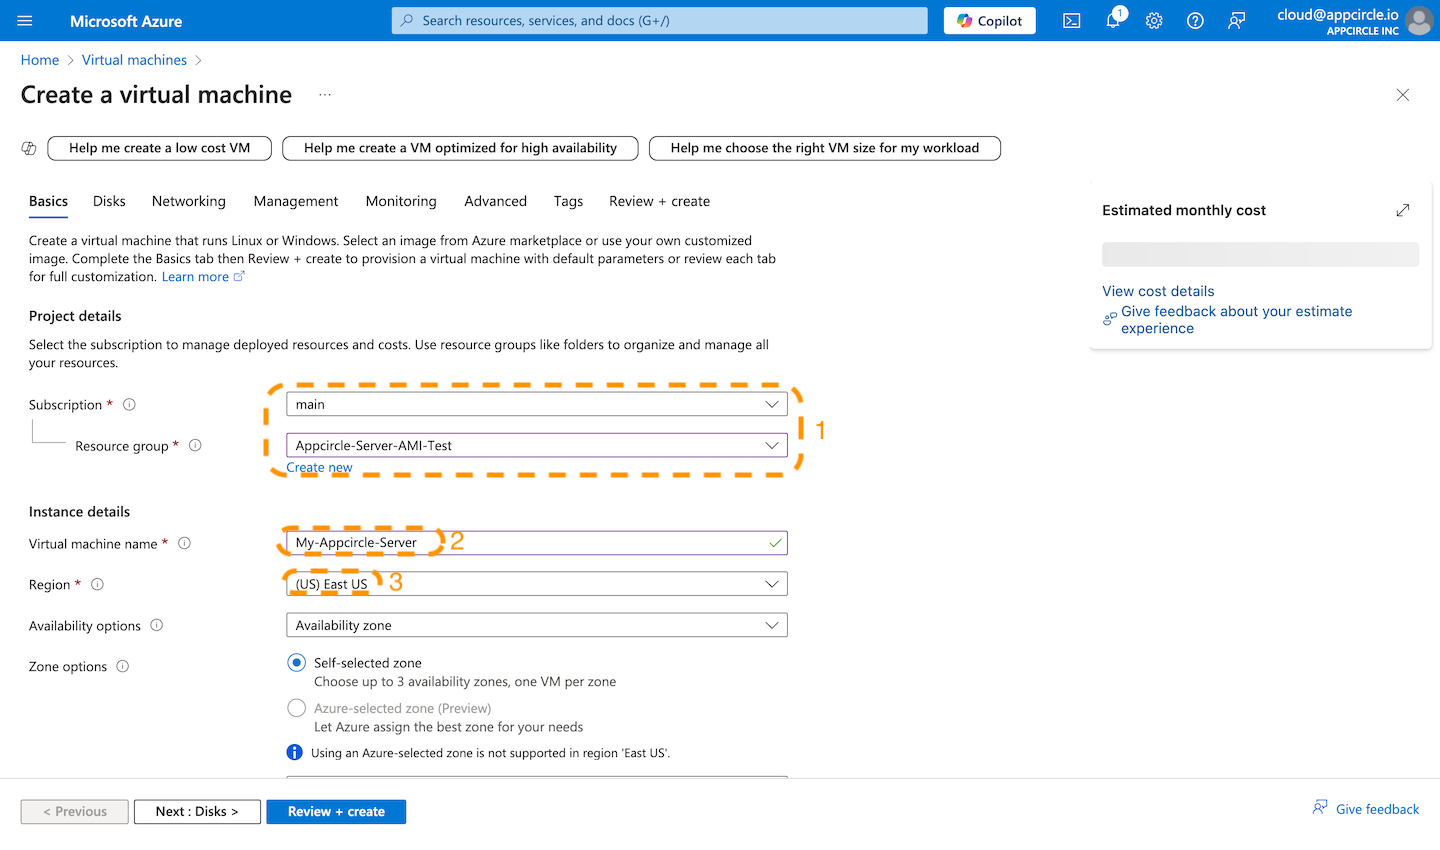
You should fill out the required fields as per your needs. Please follow the steps below for a sample instance configuration.
-
Select the Subscription and Resource group for your needs.
-
Enter a virtual machine name in the "Instance details" field. For example, "My-Appcircle-Server".
-
Choose which region you want the server to be in.
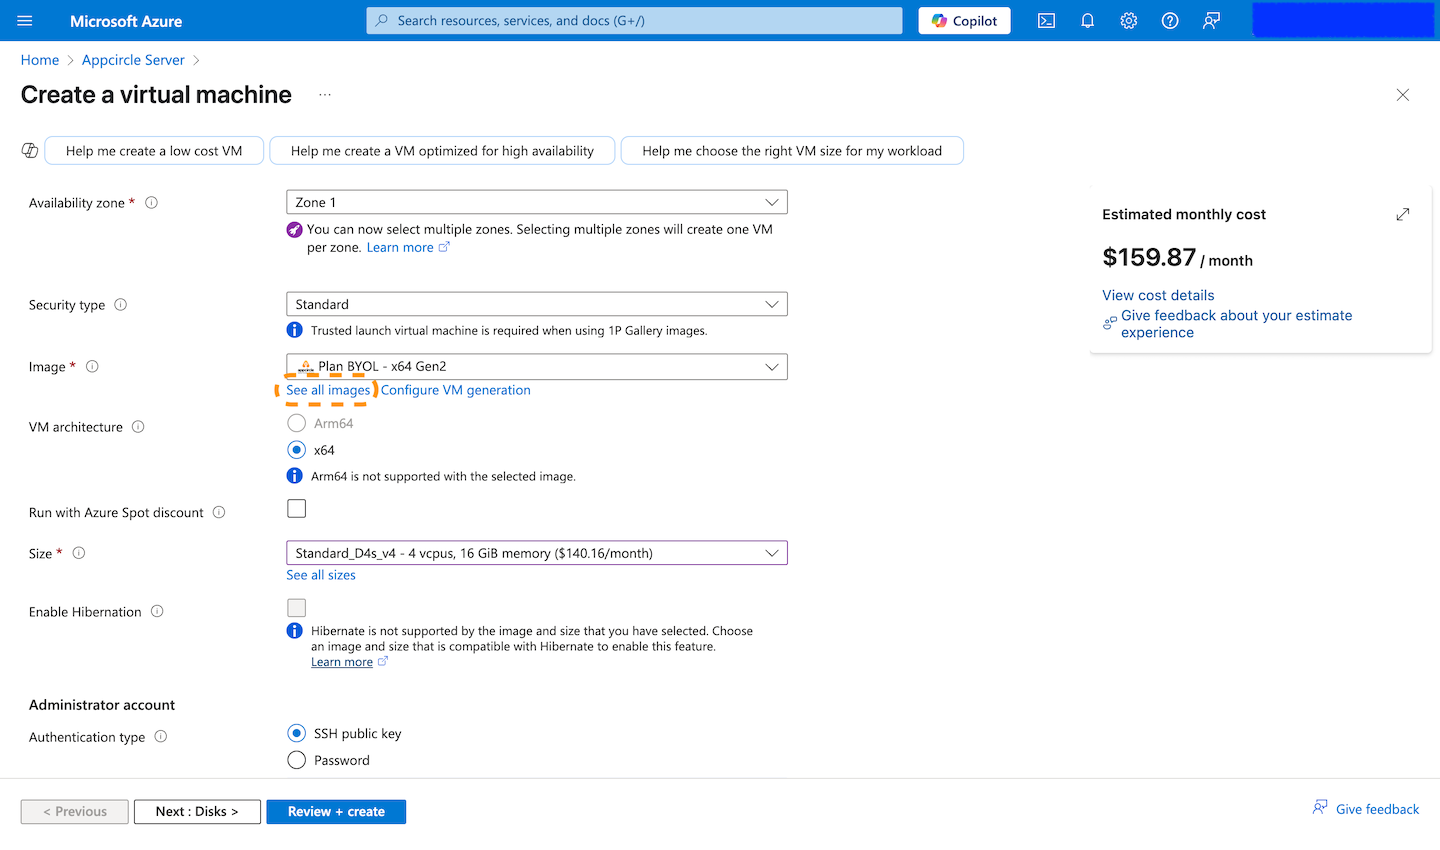
- Select the "Standard" option as the security type.
The Appcircle server currently only supports the "Standard" option as a security type, and other security types are not planned for the short term.
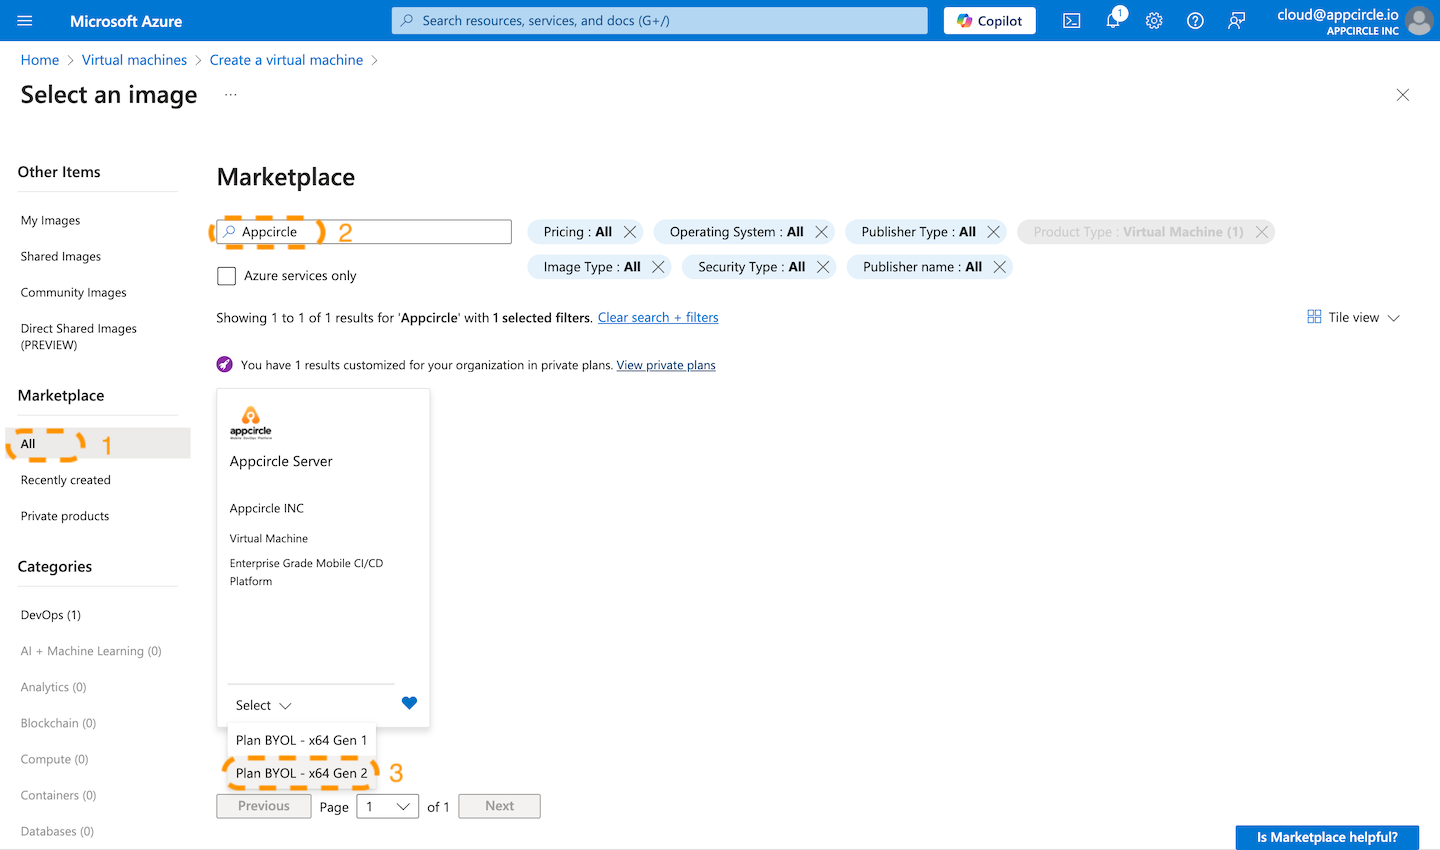
- In order to select the Appcircle server image, click on the "See all images" button and search for the Appcircle server image.
- Search for "Appcircle" in the "Marketplace" tab and click on the "Select" button for the server image and select "Plan BYOL - x64 Gen2".
Although we recommend selecting the Gen2 image for the Appcircle server by default, if you don’t need any additional features such as Secure Boot or TPM, you can also select the Gen1 image, and it will be compatible. Both options can be used for the Appcircle server.
However, please note that you cannot change the generation after the VM is created. For a detailed comparison between Gen1 and Gen2, visit the Microsoft documentation.
-
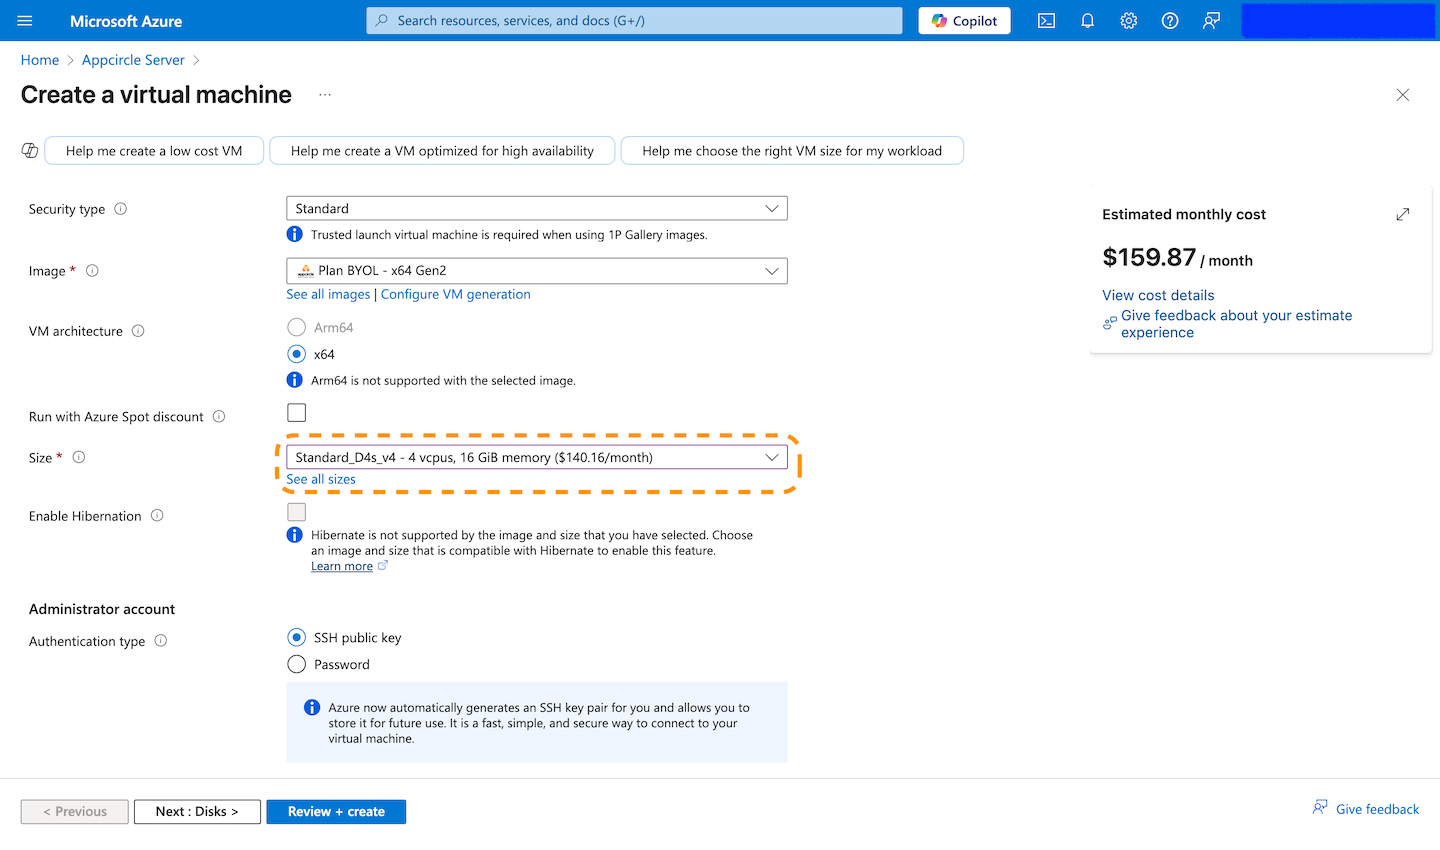
We will use the
Standart_D4s_v4size for our sample configuration since it meets the minimum requirements for the vCPU count and memory size.- Use the dropdown menu to view the recommended instance types for this image.
- To choose a different configuration, click on "See all sizes" to browse all available instance types.
For the details about minimum hardware requirements, you should see the Hardware Requirements section.
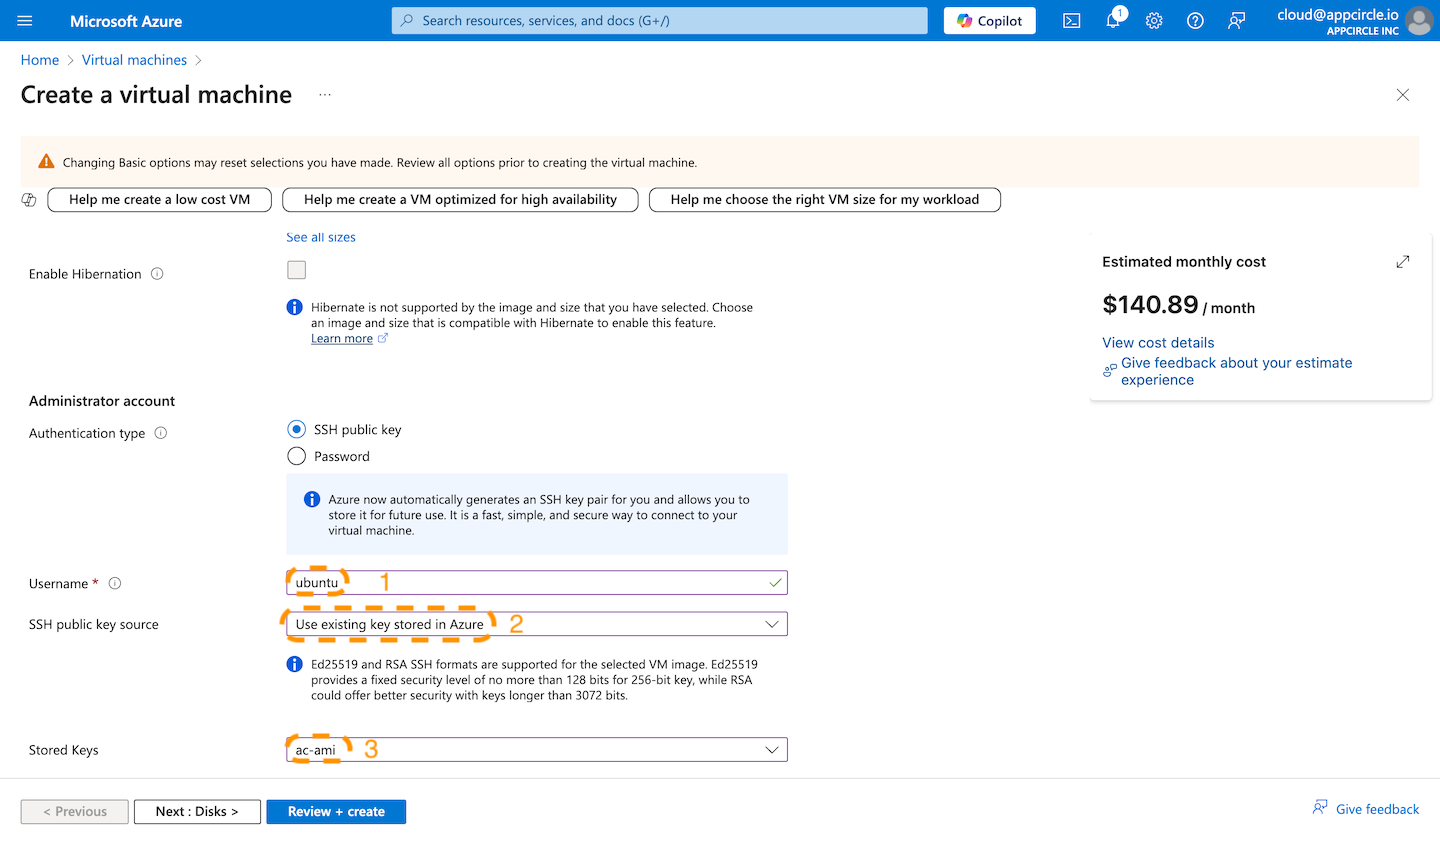
- We highly recommend changing the username to
ubuntu.
We strongly recommend using the default username ubuntu for the Appcircle server setup since the VM image and its associated documentation are configured with the username ubuntu.
If you choose to change the username, please be aware that additional steps are required after the image is created.
- Select an existing key pair or click on the "Generate new key pair" button if you don't have any on Azure. In the sample configuration, we will use an existing key stored in Azure by selecting from the dropdown menu.
-
Click "Next: Disks >"
-
From the Disks menu, configure the OS disk size. By default, the image comes with 100 GiB of disk space. You can increase that size for your needs.
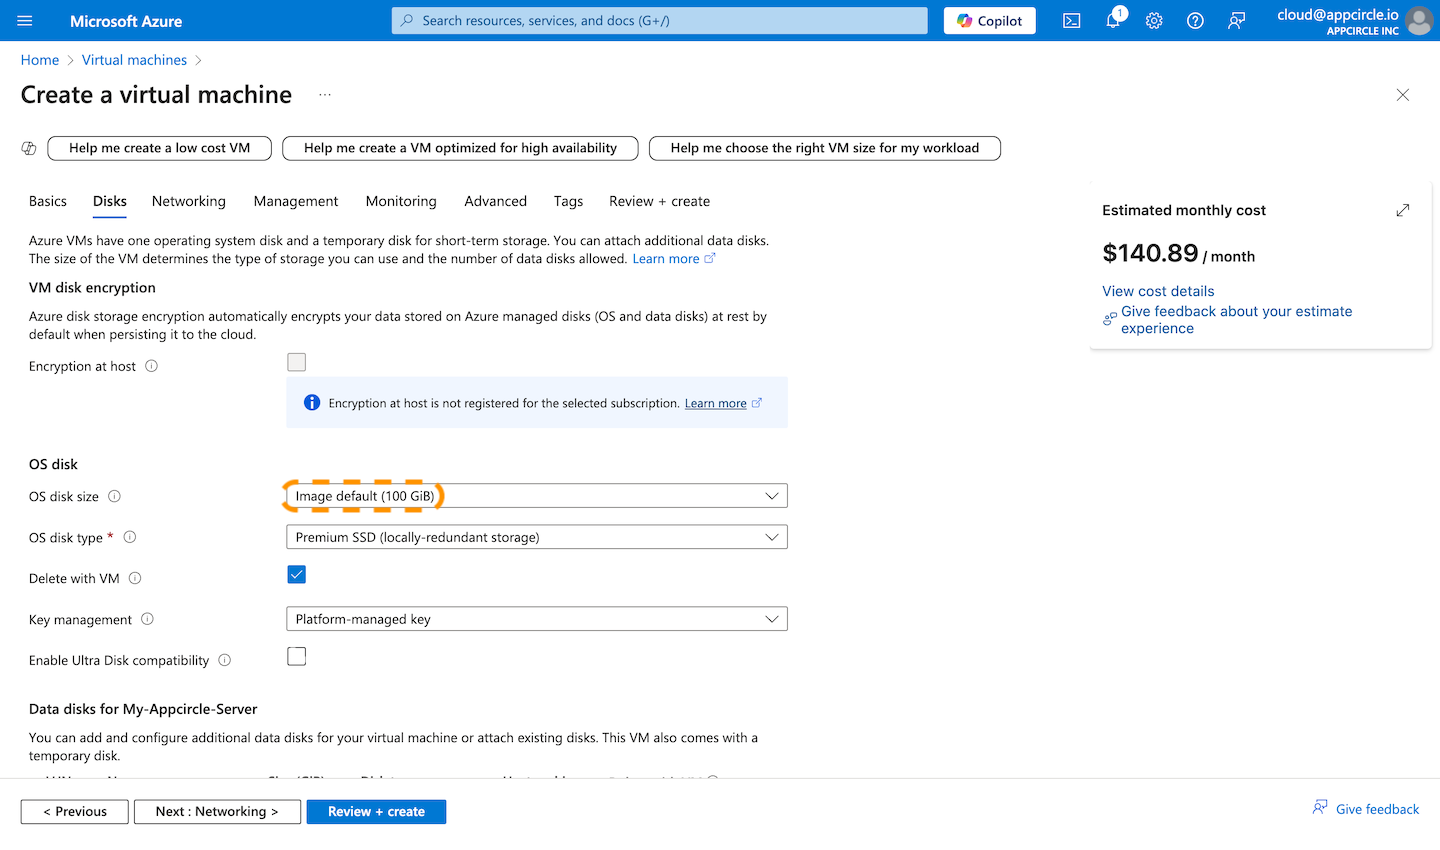
You should see the recommended storage sizes and other disk requirements in the Hardware Requirements section.
-
Click "Next: Networking >"
-
We will use the default Virtual network that Azure provides. You can customize the network according to your needs, such as limiting incoming traffic to known IP addresses for SSH connections.
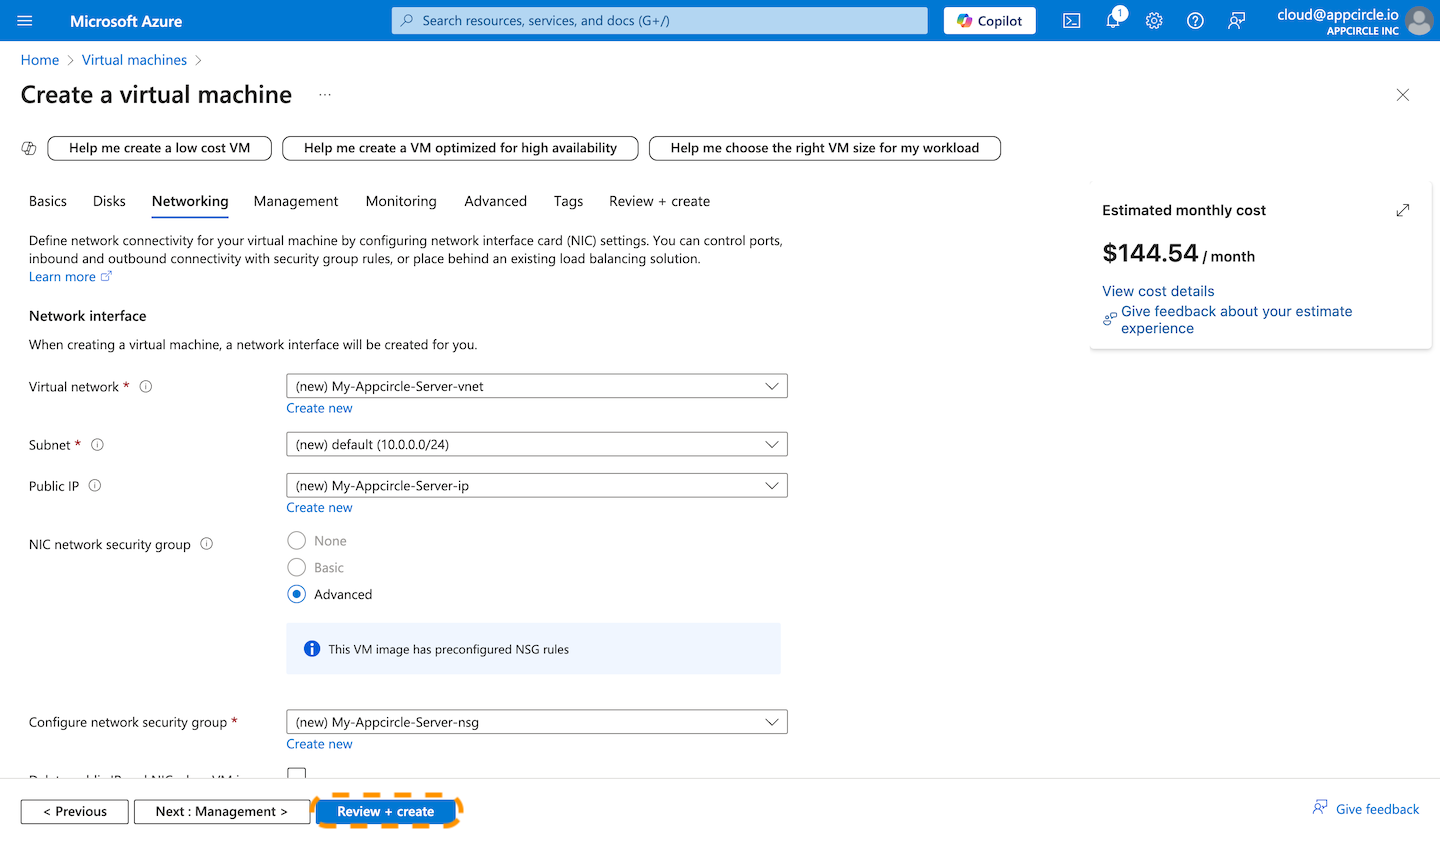
Now you're ready to create the virtual machine with the configuration you made. Click on the Review + create, then click Create on the next page.
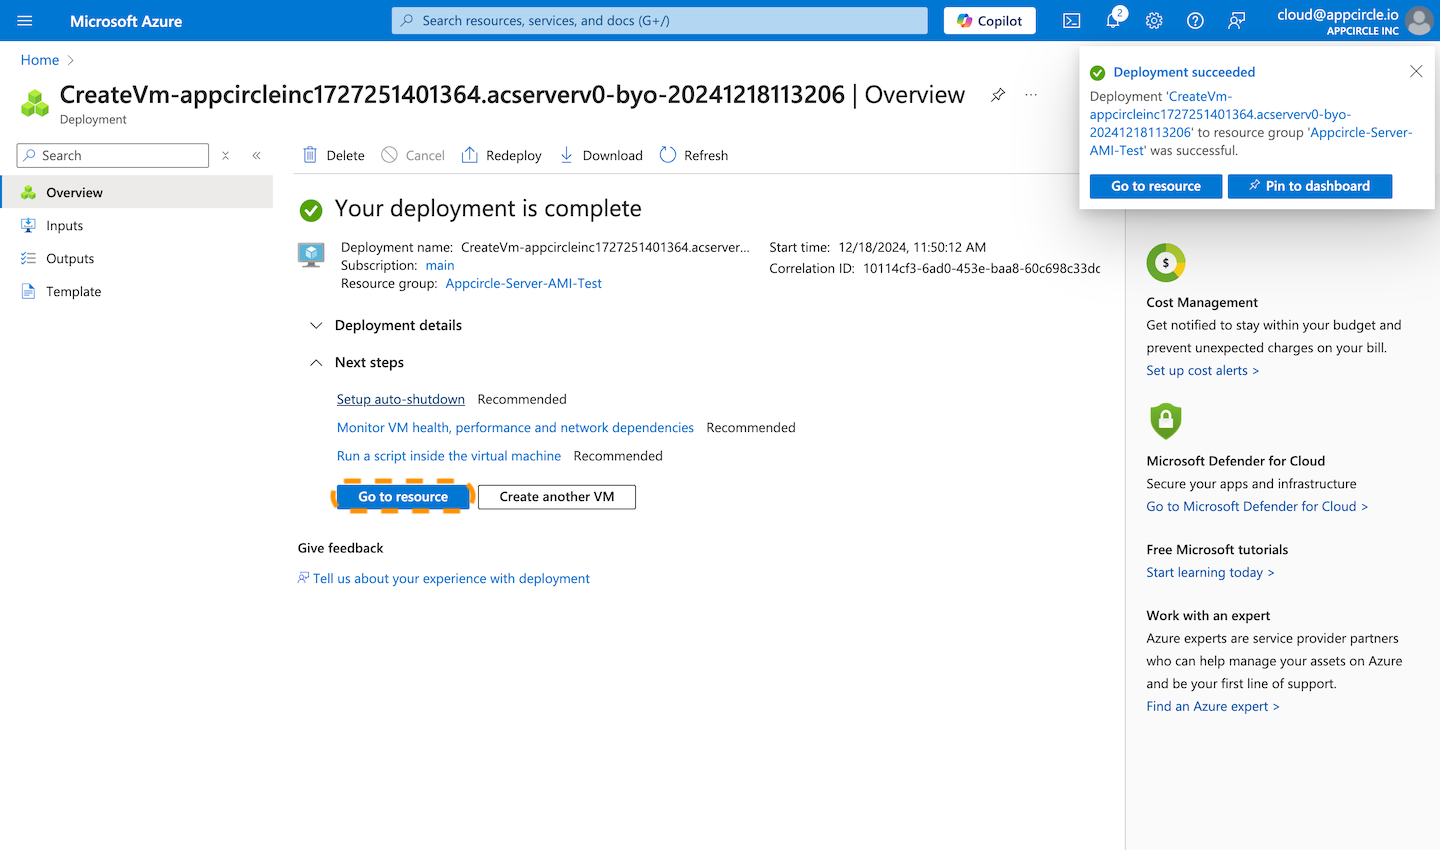
After the deployment is completed, you can click Go to resource button or head to the Virtual machines service to see the deployed instance.
By default, 80, 443, and 22 ports are allowed on the firewall.
If you want to send ping requests to the instance for health check purposes, you should add an inbound port rule with the protocol "ICMPv4" from the networking tab of the virtual machine.
If you plan to use the Appcircle server over HTTP, please note that TCP port 6379 is required for proper functionality.
Depending on your deployment, ensure that TCP port 6379 is open for inbound traffic.
Configuring the Appcircle Server Instance
Connect via SSH
After you have successfully created a virtual machine from the Appcircle server image, you can follow the steps below to configure it.
-
Get the IP address of the instance from the virtual machines dashboard.
-
Locate the SSH key pair, especially the private key, that you've created or used while configuring the virtual machine.
-
Get an SSH connection tool like
puttyon Windows orsshon macOS and Linux to connect to the instance.
The ssh command below is for macOS and Linux. The other commands are the same after you connect to the instance.
Using the private key and IP address, you can connect to the instance with SSH as seen below.
ssh -i "/path/to/your/private/key" ubuntu@ip-address-of-the-instance
The default user for the Appcircle server image is ubuntu if you have followed the Creating Virtual Machine section above. If you used a custom username while creating the VM, please use that user for the following steps.
So, let's assume that your instance IP address is 34.205.139.17 and your private SSH key path is /home/spacetech/.ssh/id_rsa.
You can connect to the instance using the command below on macOS or Linux.
ssh -i "/home/spacetech/.ssh/id_rsa" ubuntu@34.205.139.17
When you "Create new key pair" while creating the instance from the Appcircle server image, the downloaded private key might cause a permission error when you try to connect to the instance. For instance;
... Permissions 0644 for 'MyCICDSSHKey.pem' are too open. It is required that your private key files are NOT accessible by others. This private key will be ignored. ...
In this case, you need to change the permissions of the private key using the below command before connecting.
chmod 600 "/path/to/your/private/key"
It will be a one-time operation that should be done once per private key.
The SSH command may ask you to add this server to the list of known hosts. You should write yes and hit enter.

Configure Server
Custom Username
If you have changed the username of the VM during its creation instead of using the default one in the document (ubuntu), these are the additional steps you need to follow before server configuration:
- Create a directory at your desired location for the Appcircle server. For instance,
/app.
sudo mkdir /app
- Move the
appcircle-serverdirectory to the new location.
sudo mv /home/ubuntu/appcircle-server /app/
- Update the ownership of the directory with current the
$USER.
sudo chown -R $USER:$USER /app
- Add the current user to the
dockergroup for the Docker runtime.
sudo usermod -a -G docker $USER
- In order to activate group change, log out and re-login to the instance using an SSH connection or run the command below to go on with the current terminal session.
sudo chown $USER /var/run/docker.sock
Keep in mind that, for all subsequent configuration steps, the appcircle-server directory will be located at your new location, for instance /app, instead of the default $HOME directory.
After you successfully connect to the Appcircle instance, the first thing you should do is start a system update. Although the Appcircle server is up-to-date, it is recommended that you perform security updates again.
sudo apt update && \
sudo apt upgrade
The Appcircle server directory is located in the $HOME directory as the appcircle-server folder.
ls -l "$HOME"
Change the current working directory to that folder.
cd "$HOME/appcircle-server"
If you are a licensed user, please contact us to get the licensed Appcircle zip package. You should upgrade the pre-installed package in the instance.
Also, put the cred.json file you received from us into the appcircle-server folder.
Please contact us to purchase an enterprise license if you don't have one.
Now you're ready to configure the Appcircle server according to your needs.
- Follow the server configuration steps.
- Configure the DNS settings for your Appcircle server instance. Create
AandCNAMErecords for your instance. - Initialize the project.
- Run the server.
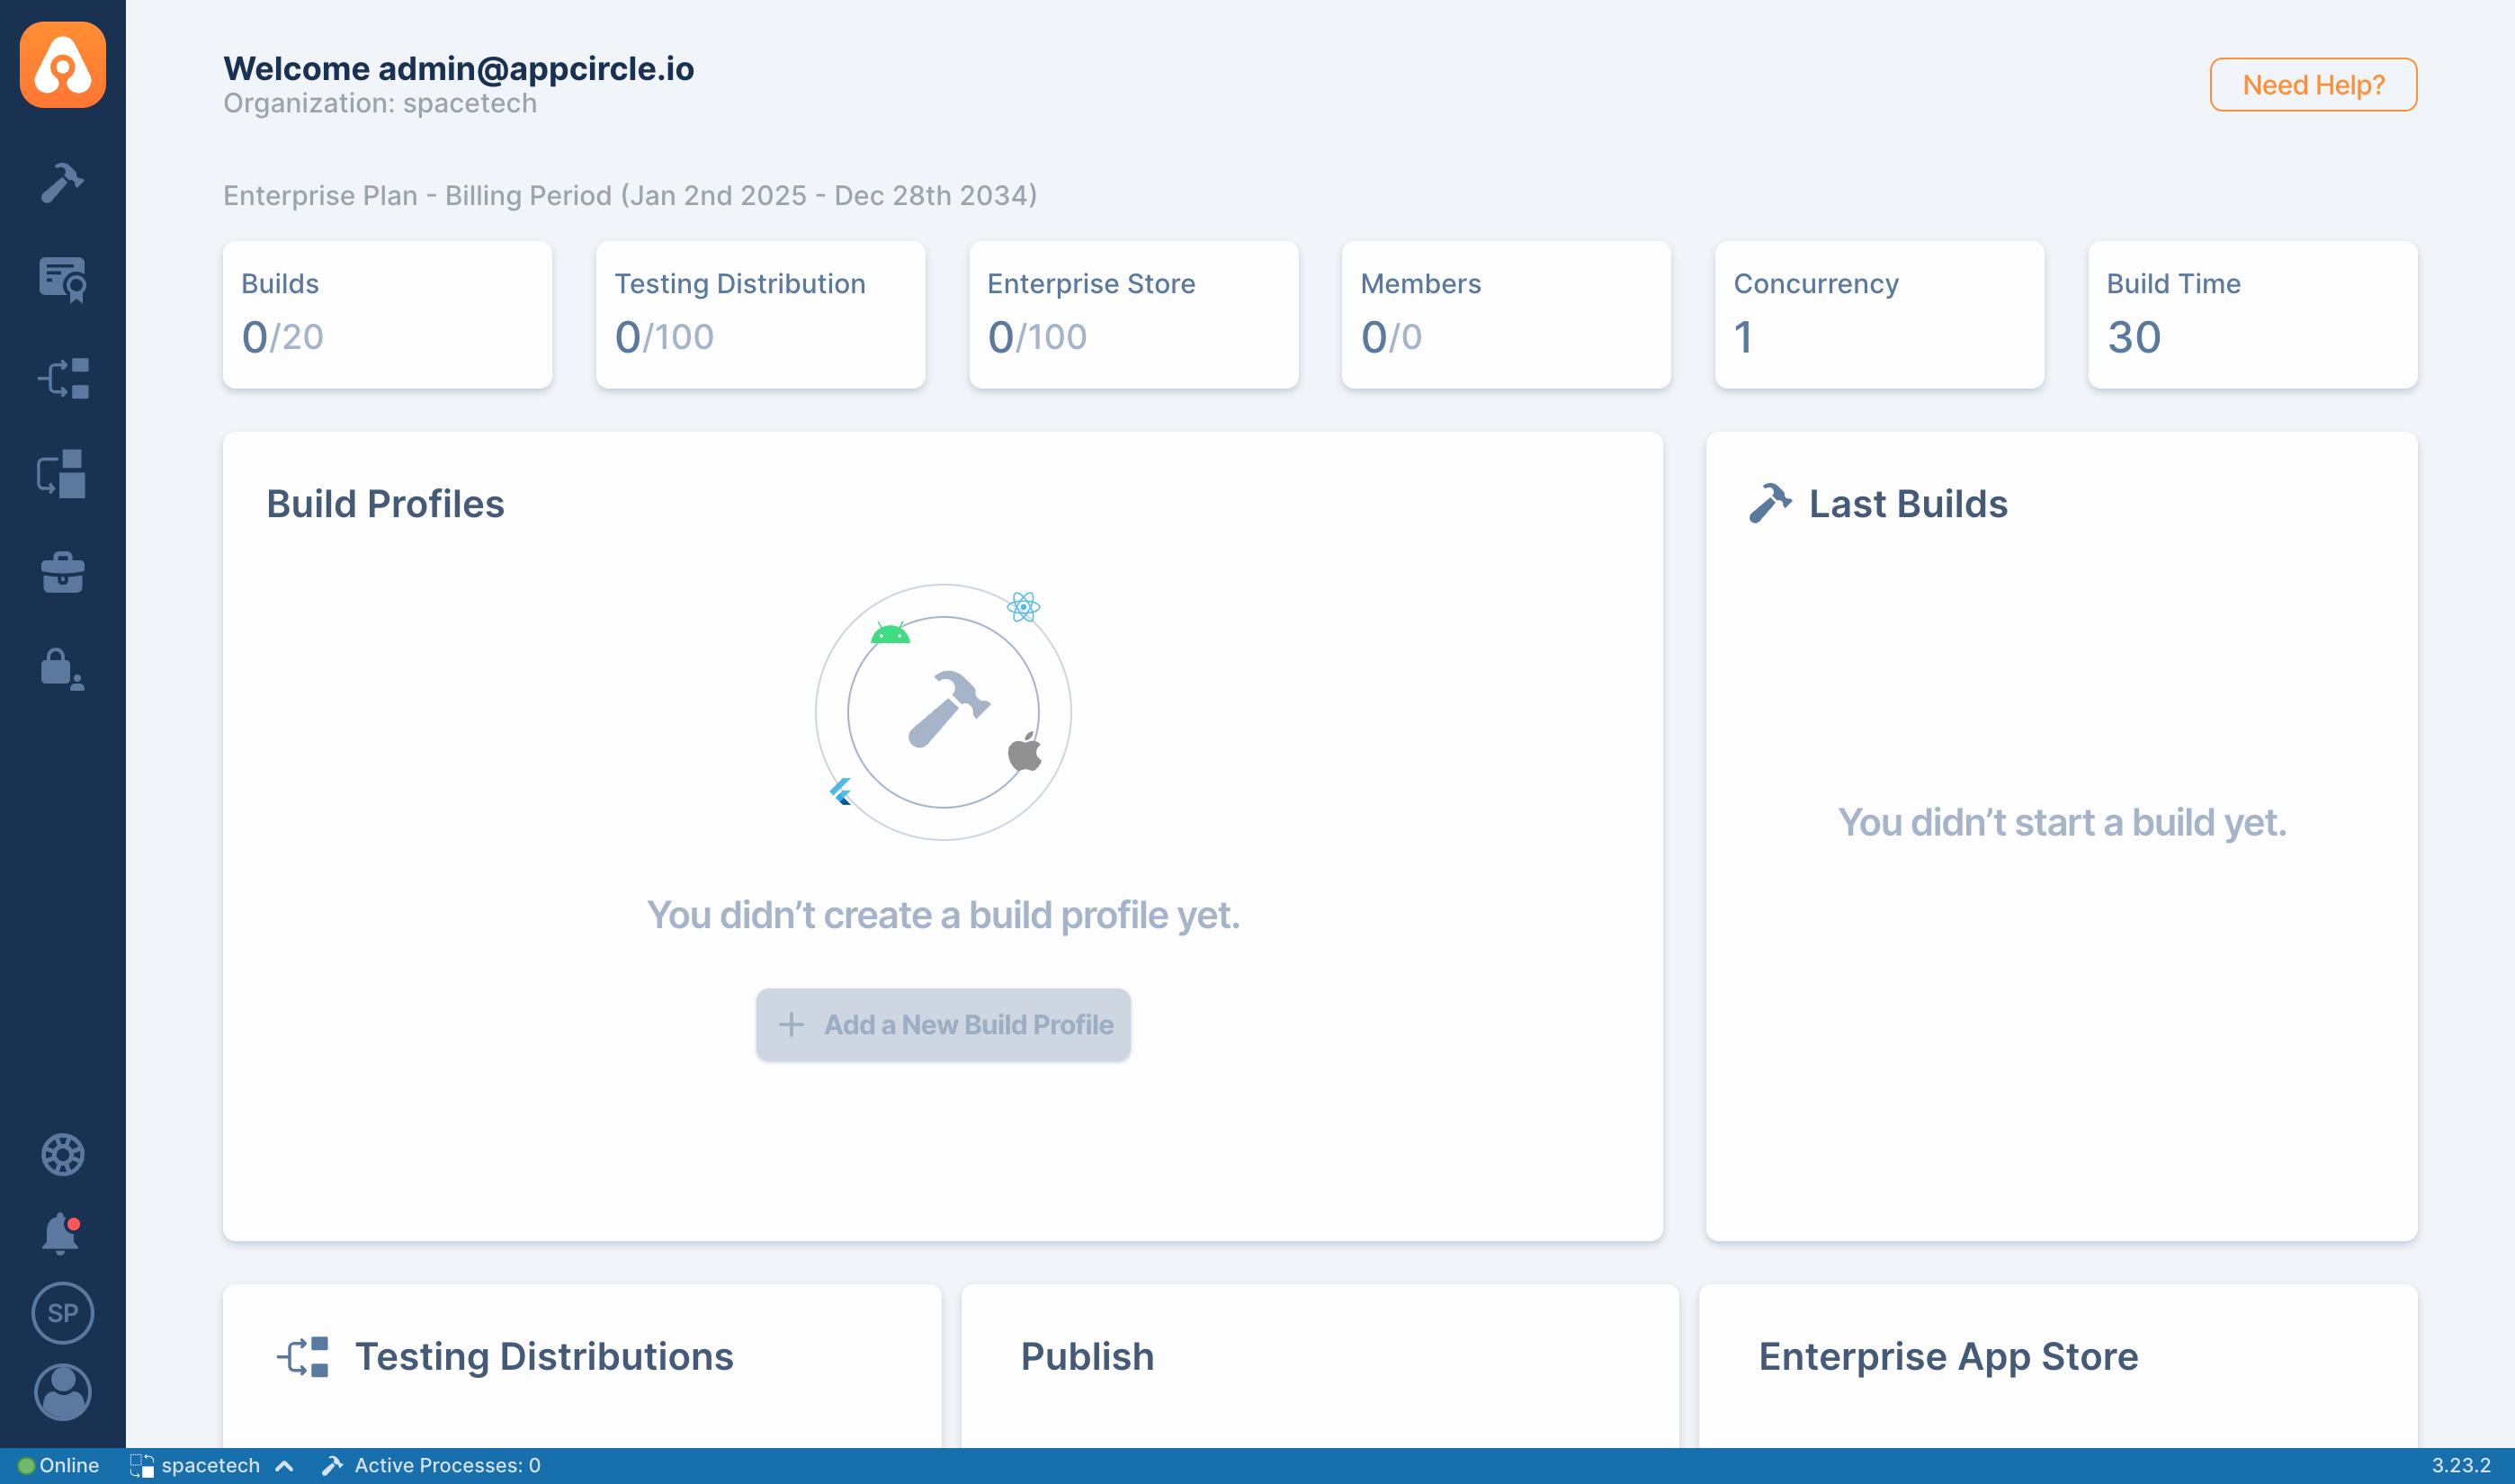
- Finally you can go to the Appcircle server dashboard using the main domain you defined.
Connecting Runners
When you complete installation successfully by following the above steps, you're ready for your first build. 🎉
But in order to run build pipelines, you need to install and connect self-hosted runners. We have a dedicated section for the installation and configuration of self-hosted runners. Follow and apply the related the guidelines here.
You can install the Appcircle runner on another Azure VM by ensuring the VM size meets the runner's requirements. Check the Appcircle runner installation page for detailed requirements.
The self-hosted runner section in the documents has all the details about runners and their configuration.
By default, self-hosted runner package has pre-configured ASPNETCORE_REDIS_STREAM_ENDPOINT and ASPNETCORE_BASE_API_URL for Appcircle-hosted cloud.
webeventredis.appcircle.io:6379,ssl=truehttps://api.appcircle.io/build/v1
☝ You need to change these values with your self-hosted Appcircle server's Redis and API URL.
Assuming our sample scenario explained above, these values should be:
redis.appcircle.spacetech.com:6379,ssl=falsehttp://api.appcircle.spacetech.com/build/v1
for our example configuration.
If your Appcircle server is running with HTTPS, then Redis and API URL should be like this:
redis.appcircle.spacetech.com:443,ssl=truehttps://api.appcircle.spacetech.com/build/v1
🎗 After download, open appsettings.json with a text editor and change the ASPNETCORE_REDIS_STREAM_ENDPOINT and the ASPNETCORE_BASE_API_URL values according to your configuration.
Please note that, you should do this before register.
Considering system performance, it will be good to install self-hosted runners on other machines. A self-hosted Appcircle server should run on a dedicated machine itself.
You can install any number of runners according to your needs and connect them to a self-hosted Appcircle server.
Need help?
Get help from Appcircle's support team, or see how others are using Appcircle by joining our Slack Channel.

Have questions? Contact us here.