Amazon Web Services (AWS)
Overview
In this document, you will see how to create a self-hosted Appcircle runner instance on Amazon Web Services (AWS).
By following the steps below, you will create a dedicated host, Sonoma macOS, from the base AMI, install the Appcircle runner, and make it ready to build Android and iOS applications, just like in the Appcircle cloud.
Pre-requirements
Appcircle Requirements
You can use a self-hosted Appcircle runner with your self-hosted Appcircle server or Appcircle cloud account.
The only requirement for using self-hosted runners is to be in enterprise plan.
See pricing and feature comparison table for details.
Technical Requirements
Before creating an Appcircle runner on AWS, there are a couple of things that you need to handle.
AWS Account
You must have an active AWS account with appropriate permissions to launch EC2 instances and work with other related services.
Understanding of AWS Services
A basic understanding of Amazon Web Services (AWS) services, particularly EC2 (Elastic Compute Cloud), is beneficial.
You should be familiar with instance creation, networking, security groups, and storage configurations.
1. Networking and Security Configuration
You might need to configure networking aspects such as Virtual Private Cloud (VPC), subnets, route tables, and security groups to properly integrate the instance within the network environment and manage access controls.
2. SSH Key Pairs for Secure Access
You need an SSH key pair to access to the server that you will create securely.
3. MacOS System Configuration
Basic familiarity with macOS system configurations and commands is essential since this document will use macOS commands.
MacOS is a Unix-like operating system, much like Linux, which means that many of the commands and underlying principles are similar.
If you have experience with Linux, installing the Appcircle runner on macOS should be a seamless process.
4. Dedicated Hosts and EC2 Mac Instances
While the process of creating an EC2 Mac instance on AWS differs slightly from creating a Linux instance, the key distinction lies in the requirement of a dedicated host.
After selecting a macOS image during the instance creation process, users must specify the dedicated host they have previously provisioned, as outlined in the AWS documentation for comprehensive guidance.
Furthermore, detailed instructions are provided below on creating a dedicated Mac instance, ensuring you have the necessary resources for seamless operation.
However, please make sure that you have a dedicated host service quota before proceeding to create a dedicated host.
For more details about the AWS EC2 Mac instances, you can refer to the documentation.
Creating a Mac Instance for the Appcircle Runner
After you meet all the requirements discussed above, you can follow the steps below to create a Mac instance for the Appcircle runner installation.
Creating a Dedicated Host for EC2 Mac Instance
-
Log in to the AWS console with your account.
-
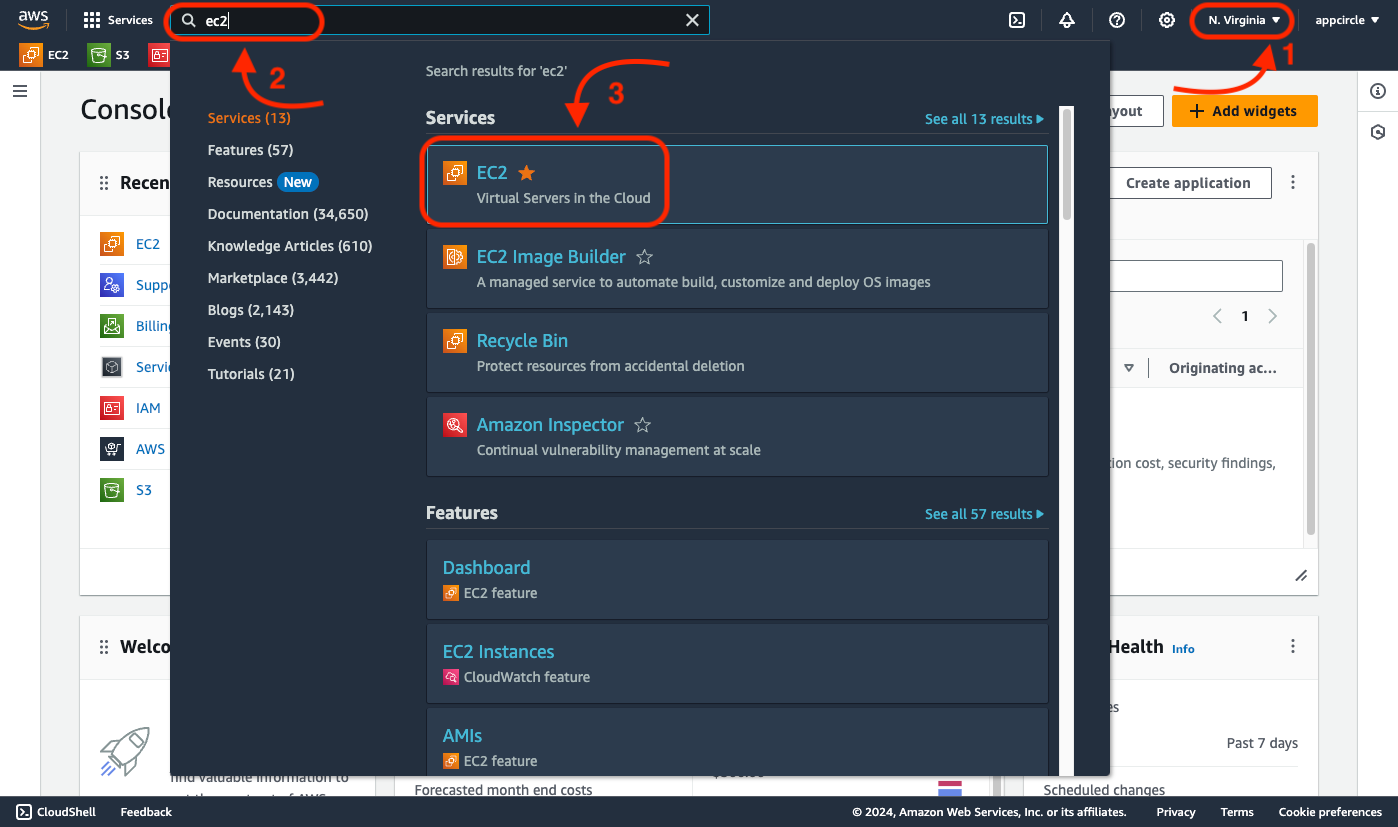
Select the region from the right upper corner.
If you have a self-hosted Appcircle server in AWS, it's better to deploy the self-hosted Appcircle runner in the same region as the Appcircle server.
This approach will reduce the latency between two machines.
Check and Request the Dedicated Mac Instance Quota
Before creating the dedicated host instance, you should check the dedicated service quota.
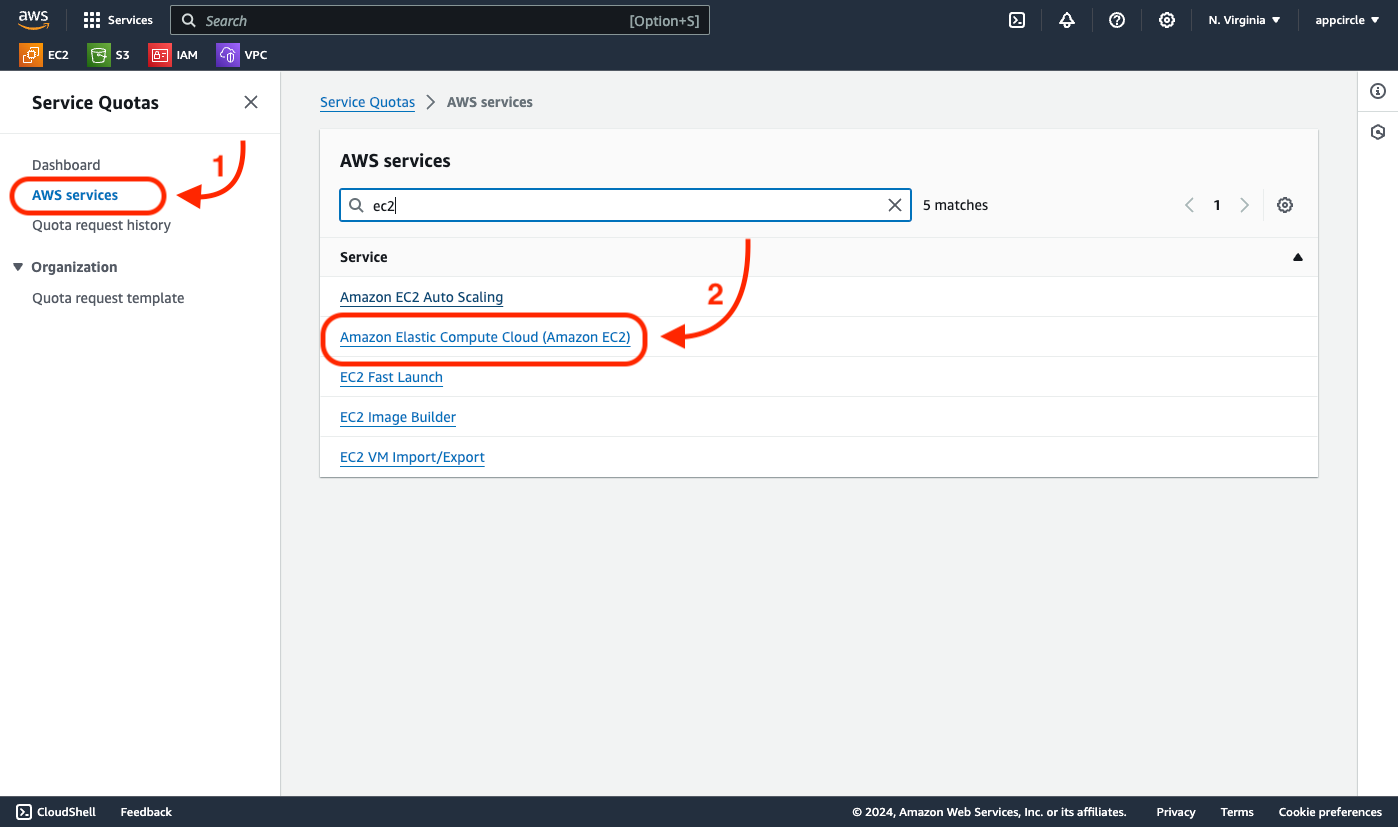
- Head to the "Service Quotas" menu.

- Click on the "AWS services". Filter the EC2 services as below, and then click on the "Amazon Elastic Compute Cloud (Amazon EC2)" service.
-
Filter the services by "dedicated mac2" and select the relevant instance type service quota.
- In this tutorial, we will use "mac2" hosts.

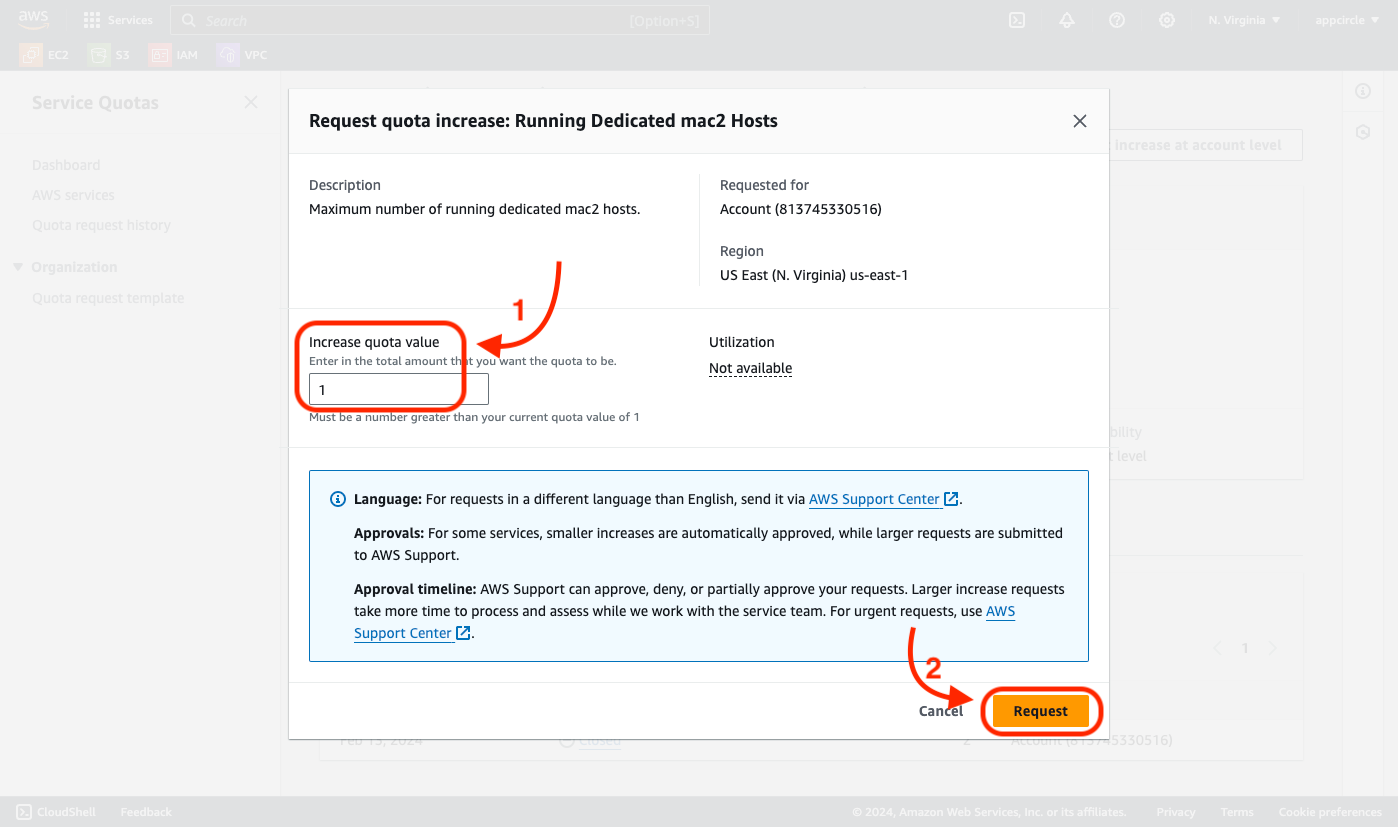
If the "applied account-level quota value" is 0, then you should request an increase as below.
- For your first quota request, you can request
1quota.
Create the Dedicated Host
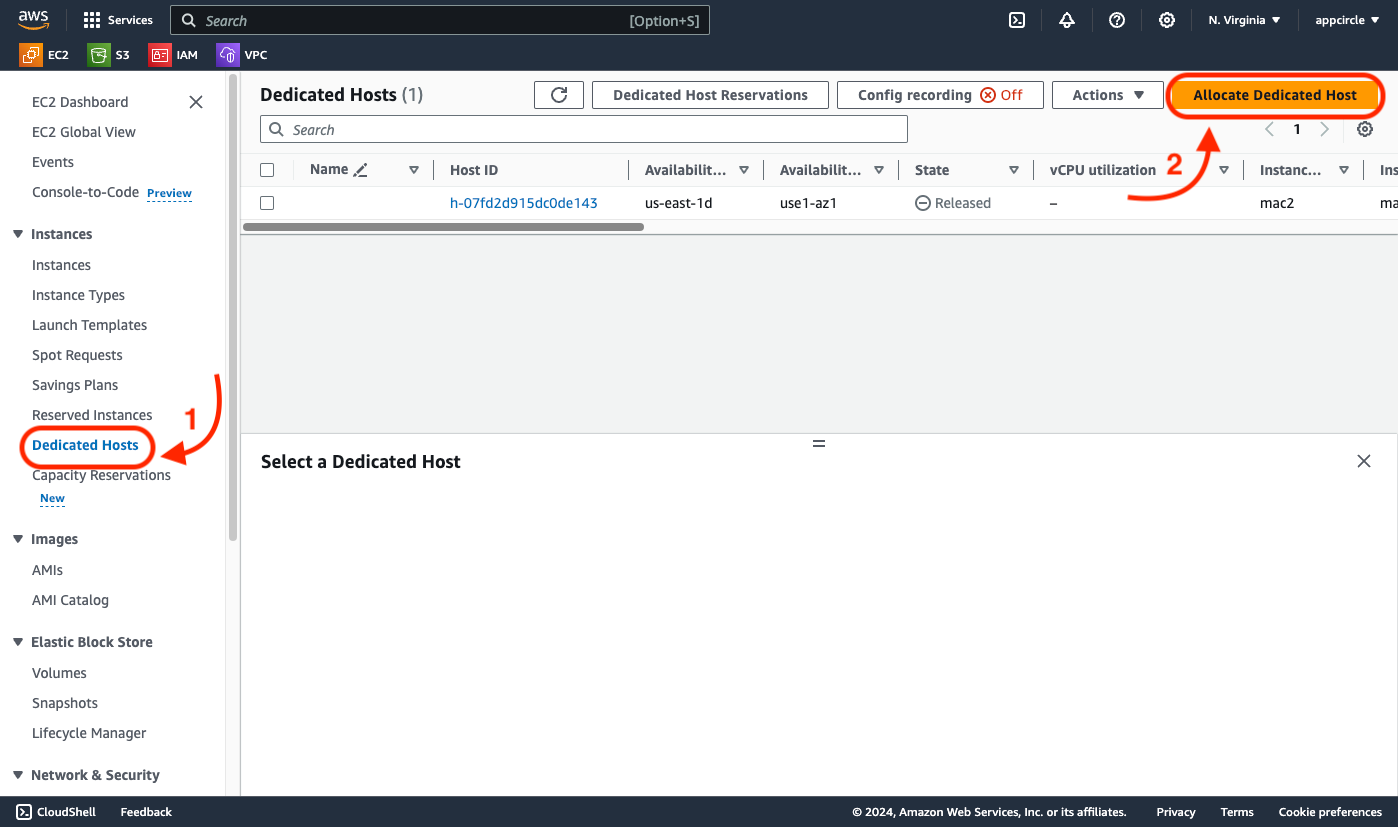
- Head to the EC2 menu to create an dedicated instance.
- Head to the "Dedicated Hosts" menu and click on the "Allocate Dedicated Host" button.
-
Enter a dedicated instance name in the "Name tag" field. For example, "Appcircle Dedicated Host".
-
Then you should select the instance family, instance type and the availability zone. For example,
mac2for the instance family andmac2.metalfor the instance type.
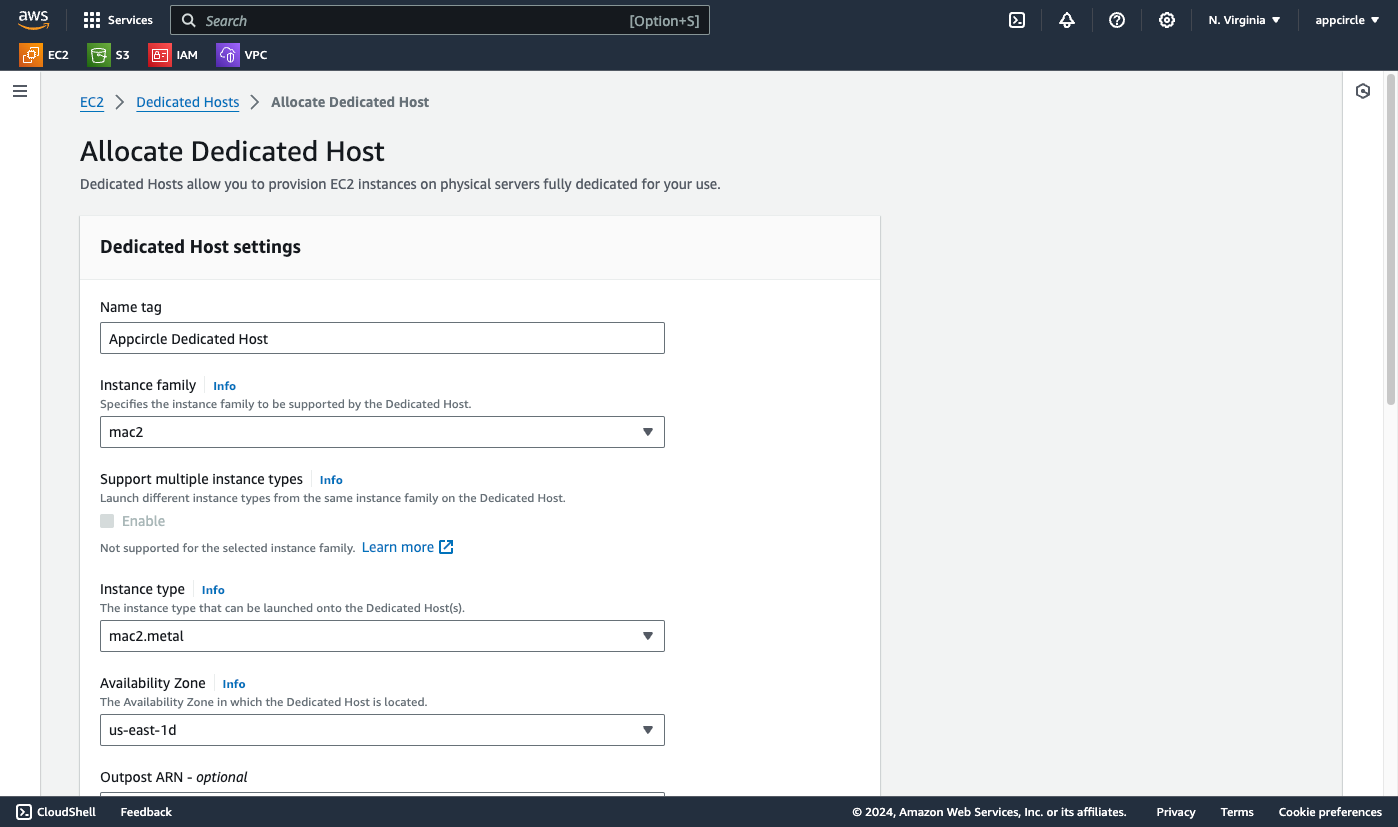
You must select one of the mac2, mac2-m2 or mac2-m2pro instance families since the Appcircle runner is supported on these instance families.
In the AWS documentation, you can find the underlying infrastructure listed below.
EC2 M1 Mac instances (mac2.metal) are built on 2020 Mac mini hardware powered by Apple silicon M1 processors.
EC2 M2 Mac instances (mac2-m2.metal) are built on 2023 Mac mini hardware powered by Apple silicon M2 processors.
EC2 M2 Pro Mac instances (mac2-m2pro.metal) are built on 2023 Mac mini hardware powered by Apple silicon M2 Pro processors.
-
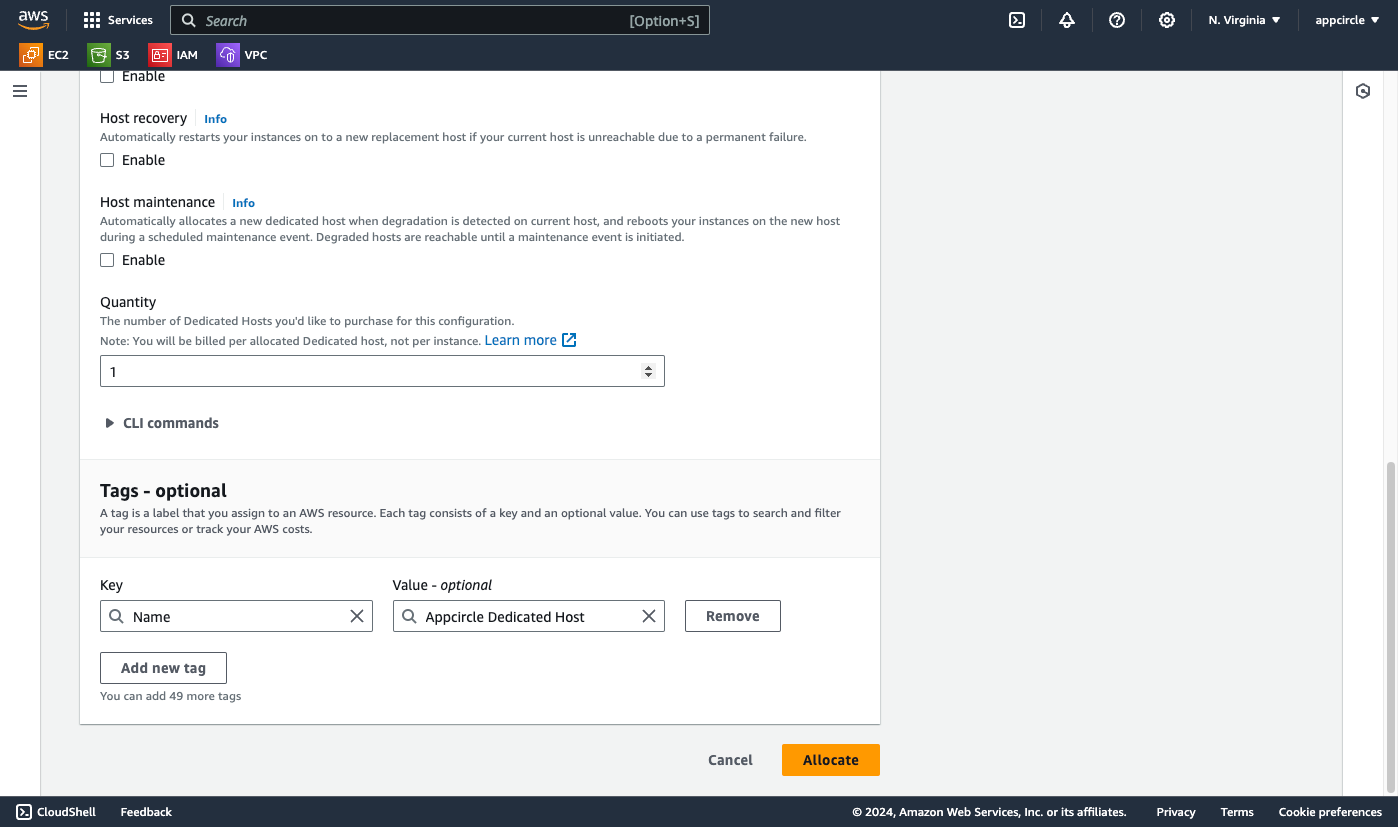
Since the Mac instances doesn't support "Host maintenance", you must uncheck it.
-
Click on the "Allocate" button to create your dedicated host.
- You can see the created dedicated host on the Dedicated Hosts dashboard.
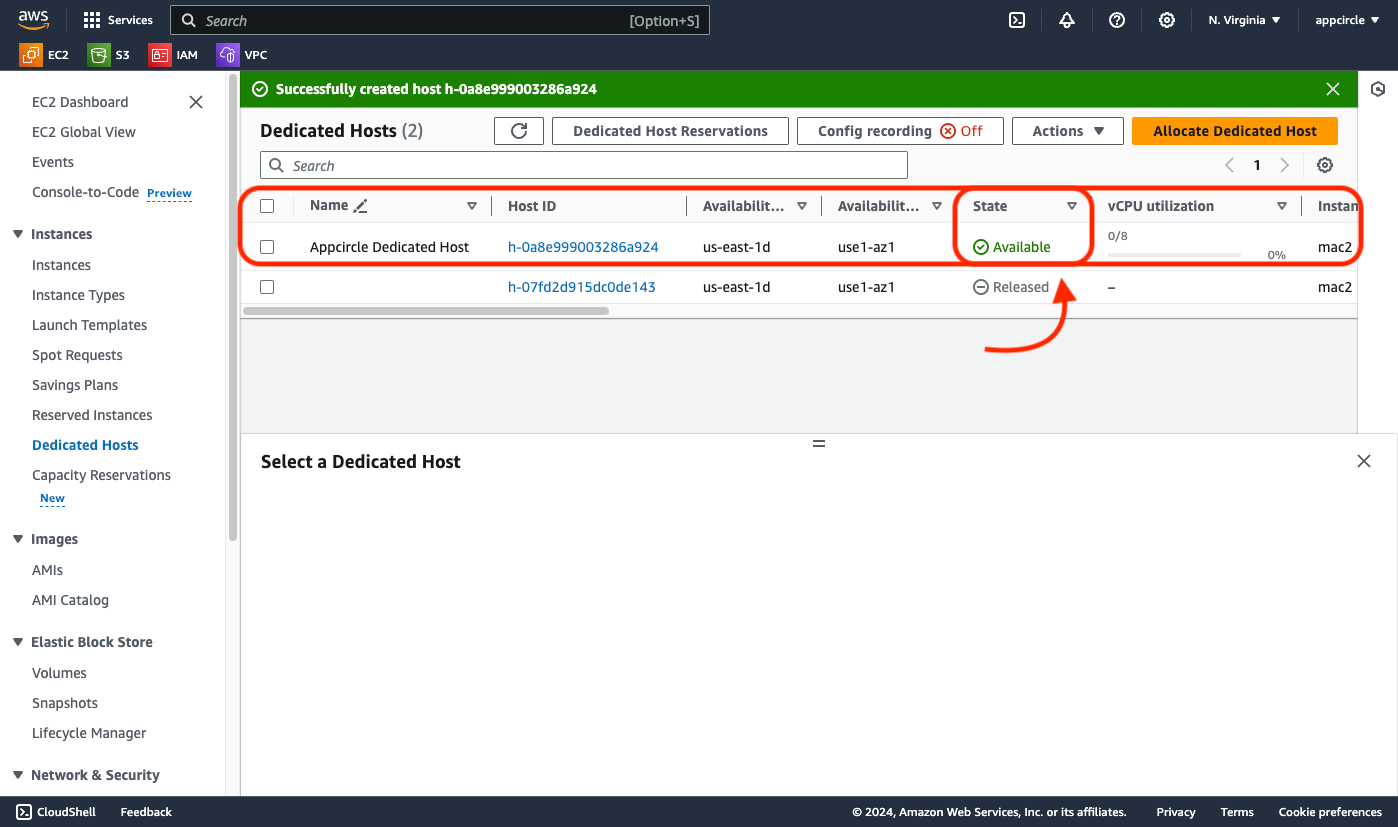
- When you see the state of the dedicated host as "Available", you can continue with creating EC2 Mac instance.
If you have more than one dedicated hosts, make a note of the dedicated Host ID to avoid confusion when creating the EC2 Mac instance.
Creating an EC2 Mac Instance on the Dedicated Host
- Head to the EC2 menu to create an EC2 Mac instance.
- Click on the "Launch Instance" button from the EC2 dashboard.
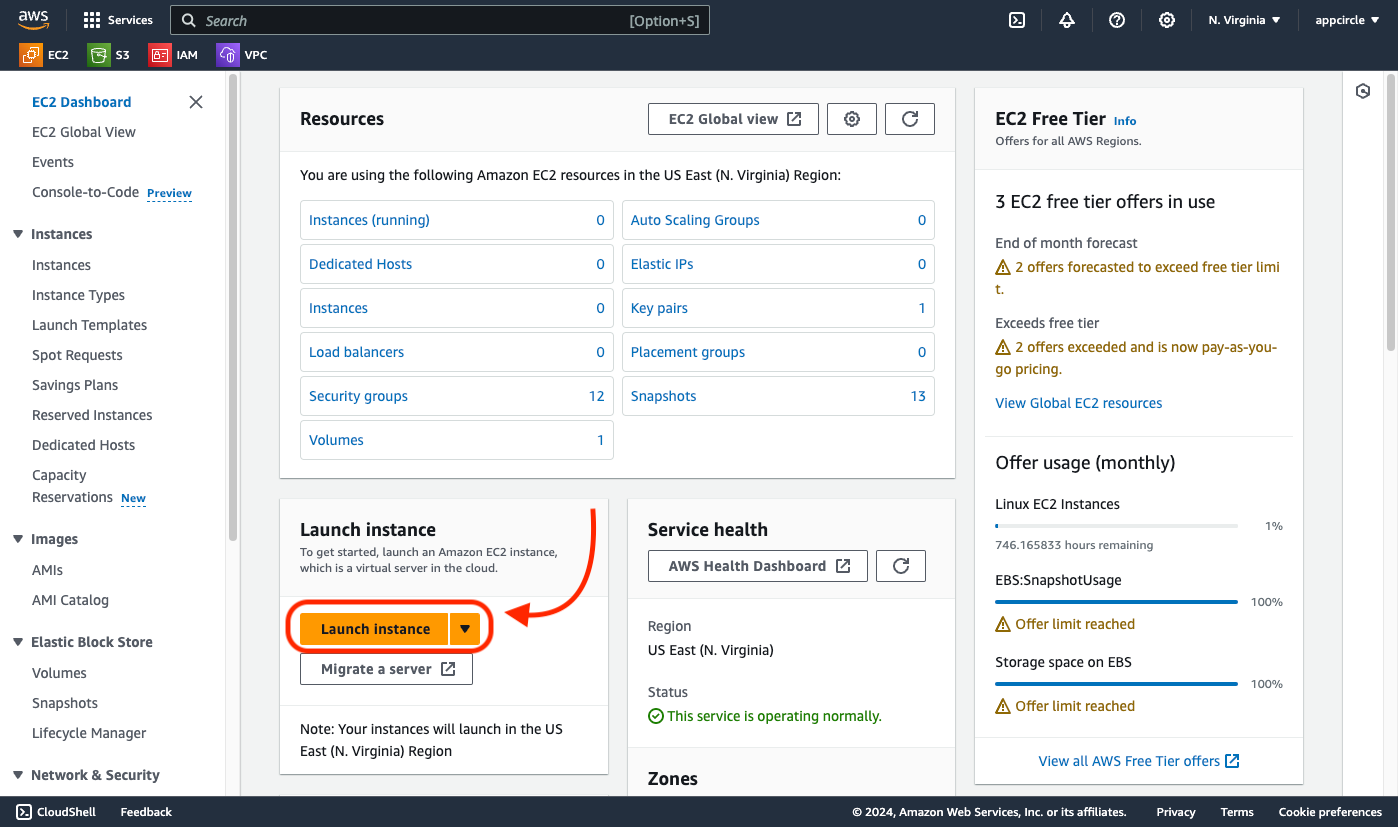
You should fill out the required fields as per your needs. Please follow the below steps for a sample instance configuration.
-
Enter an instance name in the "Name and Tags" field. For example, "My Appcircle Runner".
-
In order to select the AMI, click on the "macOS" button. Then select "macOS Sonoma" from the AMI drop-down menu. And for the architecture, select "64-bit (Mac-Arm)".
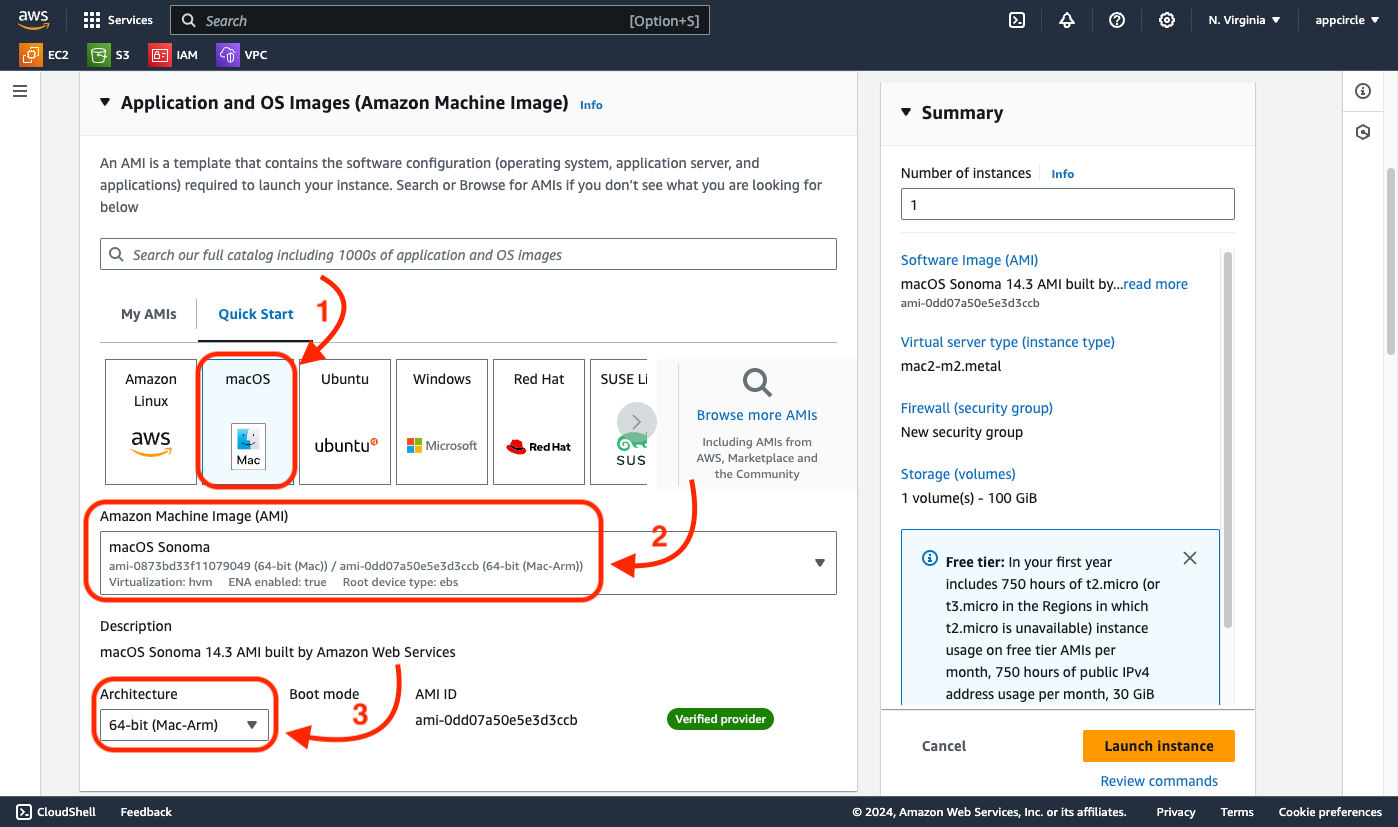
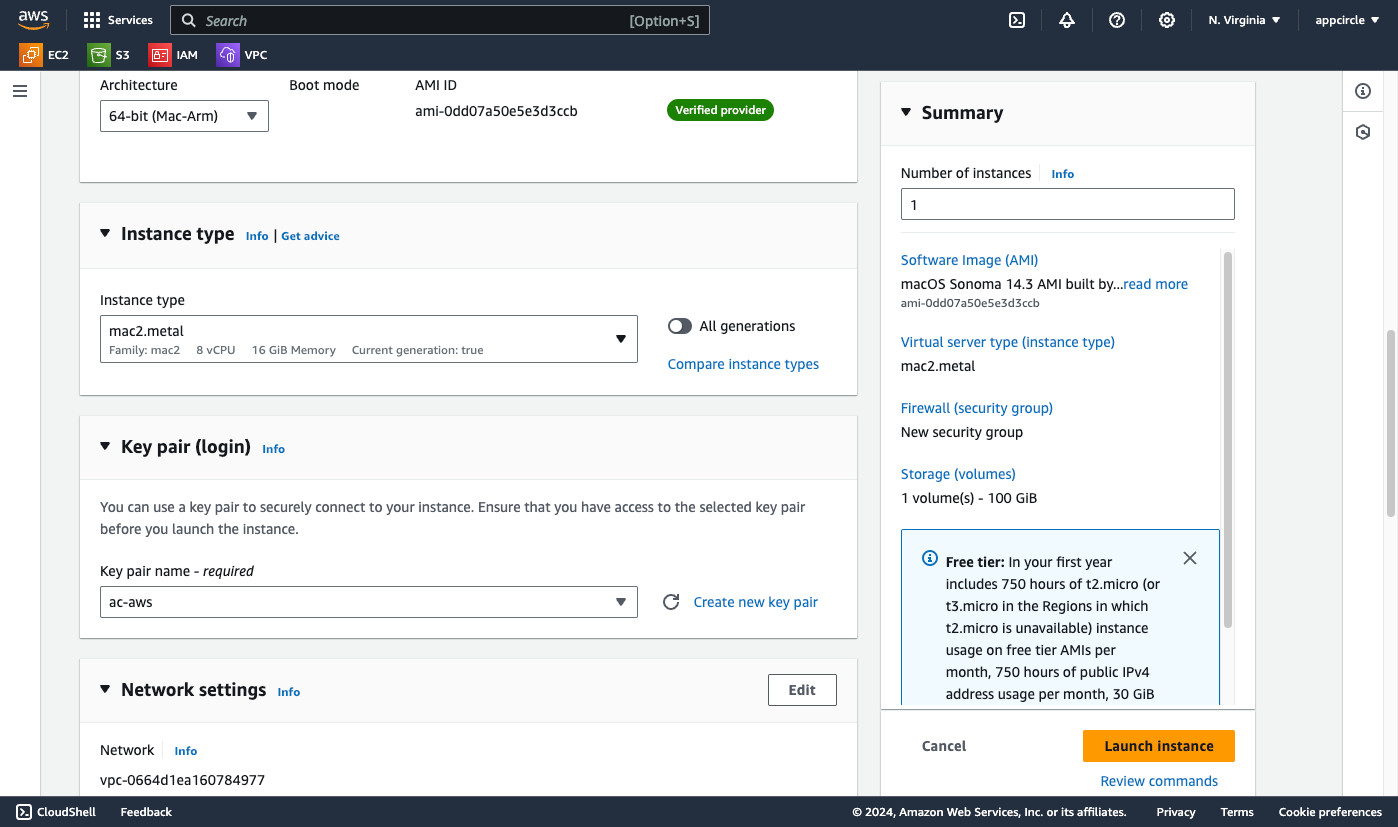
- We will use the
mac2.metalinstance type for our sample configuration since we have crated amac2.metaldedicated host above.
If you have created another type of dedicated host, like mac2-m2.metal or mac2-m2pro.metal, you should choose them from the menu.
- Select an existing key pair or click on the "Create new key pair" button if you don't have any on the AWS console.
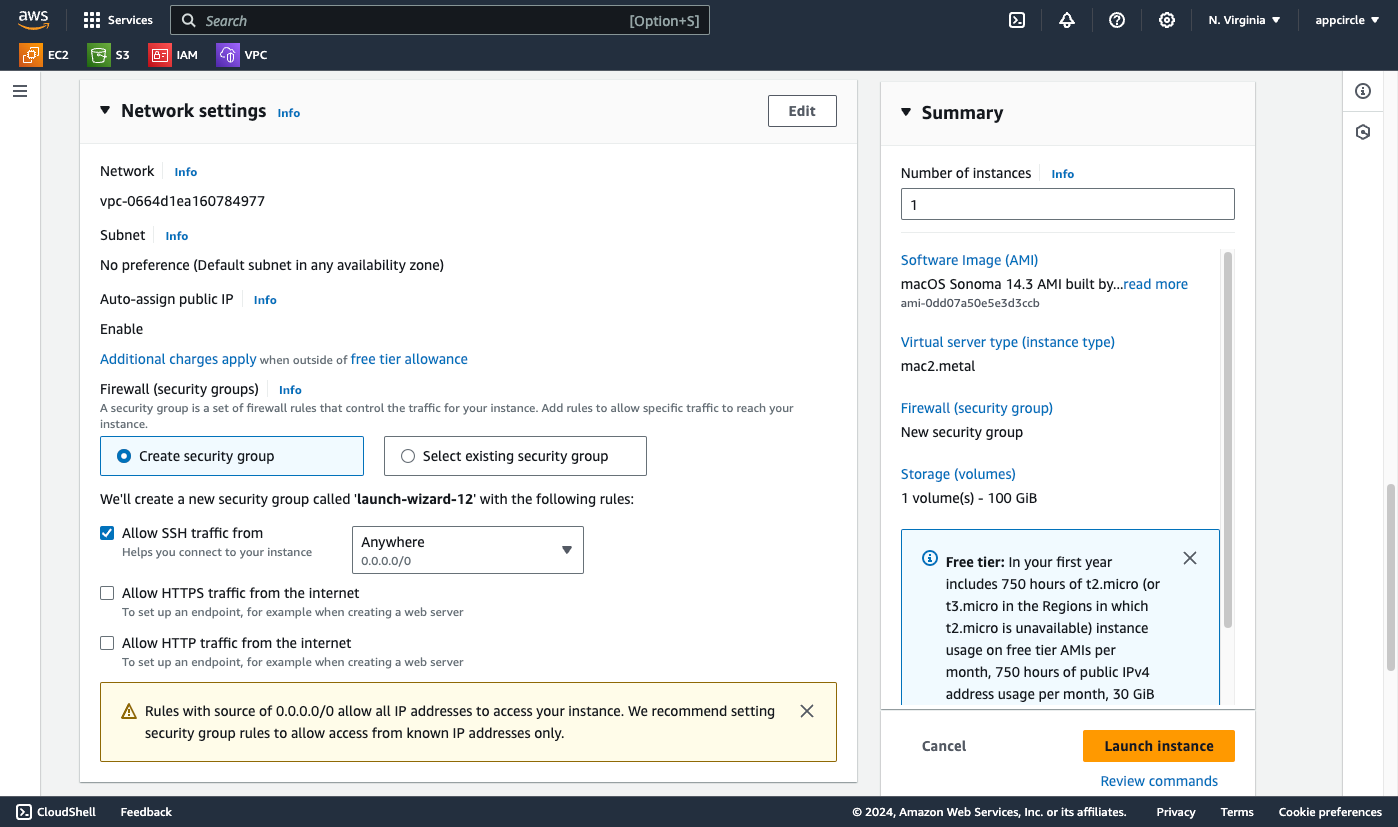
- For the network settings:
- We will use the default VPC created on the form.
- Don't allow HTTP and HTTPS traffic from the internet.
- The Appcircle runner doesn't require accepting any incoming HTTP(S) requests.
- You can restrict the SSH connection by specifying the source IP addresses.
- SSH is required to access the runner from the command line.
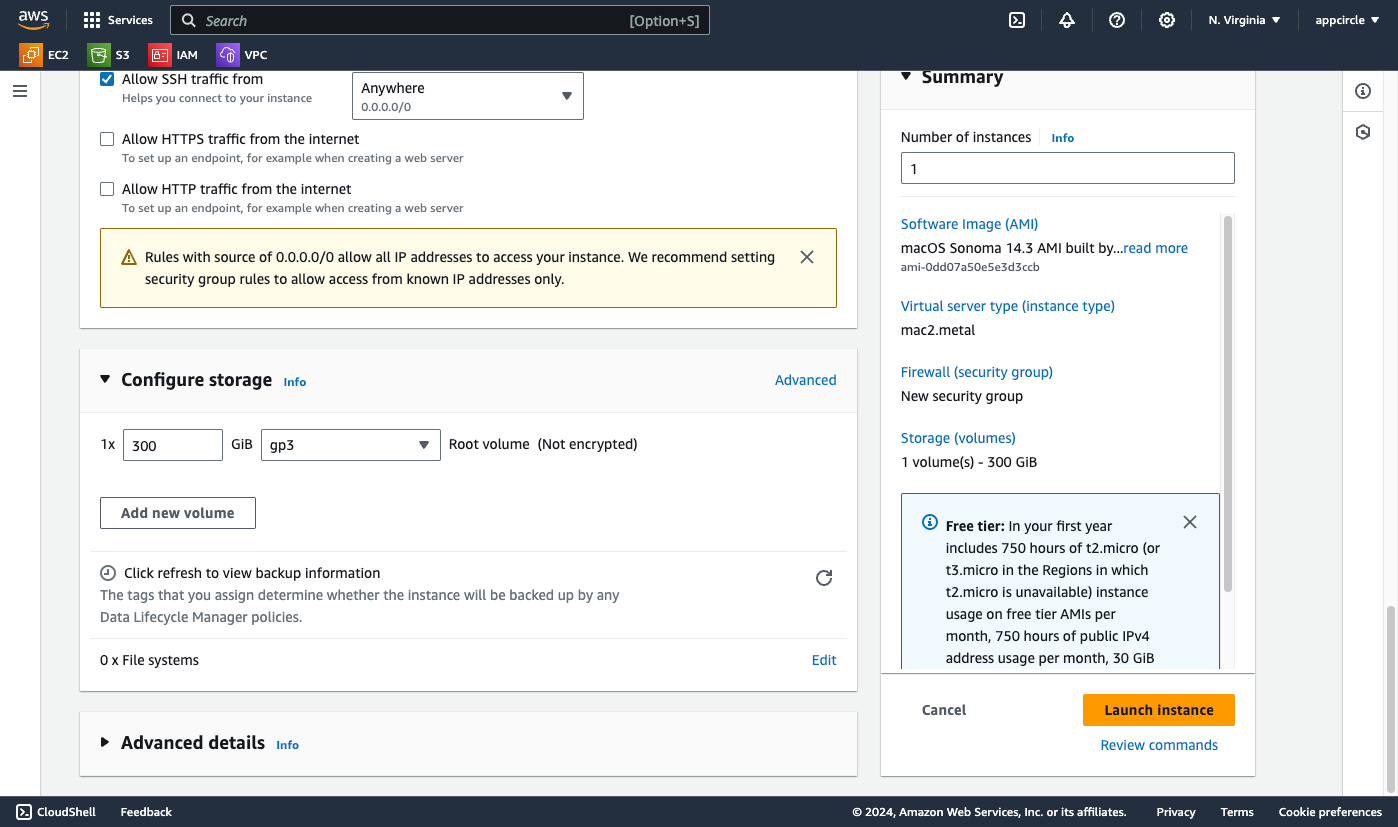
- For the storage, you should select a minimum 300 GB disk for a runner that will build Android and iOS applications with three Xcode versions.
- For each Xcode version you plan to install side by side, you should add 50 GB of disk space, roughly.
- In this tutorial, we will install the latest (at the moment) three Xcode versions as a sample configuration, which are
15.3,15.2, and15.1.
-
To select the previously created dedicated host, expand the "Advanced details" settings.
-
Set the "Tenancy" to
Dedicated Host. -
Set the "Target host by" to
Host ID. -
Set the "Tenancy host ID" to the dedicated Host ID of the previously created dedicated host.
-

Now you're ready to click on the Launch Instance button to create the EC2 Mac instance with the configuration you made.
You can head to the EC2 Instances page to see if your server is up and running.
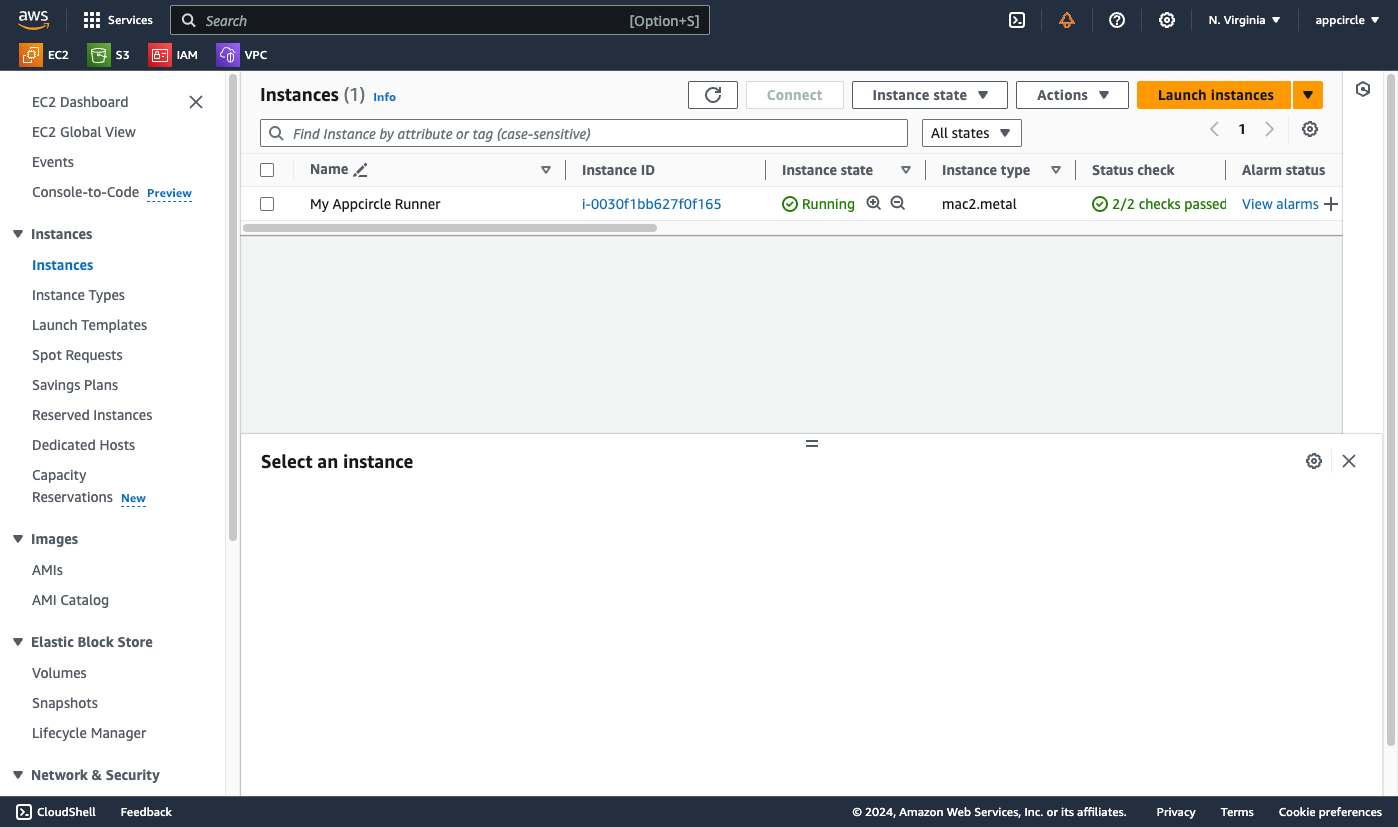
You need to wait until the Instance state of the instance is Running in order to connect to the instance with SSH.
Generally it takes ~5-10 minutes till the Instance state becomes Running from Pending.
Configuring the Appcircle Runner Instance
Connect via SSH
After you have successfully created an EC2 Mac instance, you can follow the steps below to configure it.
-
Get the IP address of the instance from EC2 dashboard.
- Networking > Networking Details > Public IPv4 address
- Or, Instance > Details > Public IPv4 address
-
Locate the SSH key pair, especially the private key, that you've created or used while configuring the instance.
-
Get an SSH connection tool like
puttyon Windows orsshon macOS and Linux to connect to the instance.
The ssh command below is for macOS and Linux. The other commands are the same after you connect to the instance.
Using private key and IP address, you can connect to the instance with SSH as seen below.
ssh -i "/path/to/your/private/key" ec2-user@ip-address-of-the-instance
The default user for the Sonoma macOS AMI is ec2-user. So you should use ec2-user while connecting to the newly created EC2 Mac instance.
So, let's assume that your instance IP address is 3.234.230.124 and your private SSH key path is /home/spacetech/.ssh/id_rsa.
You can connect to the instance using the below command on macOS or Linux.
ssh -i "/home/spacetech/.ssh/id_rsa" ec2-user@3.234.230.124
When you "Create new key pair" while creating the instance, the downloaded private key might cause a permission error when you try to connect to the instance. For instance;
... Permissions 0644 for 'MyCICDSSHKey.pem' are too open. It is required that zour private key files are NOT accessible by others. This private key will be ignored. ...
In this case, you need to change the permissions of the private key using the below command before connecting.
chmod 600 "/path/to/your/private/key"
It will be a one-time-operation that should be done once per private key.
The SSH command may ask you to add this server to the list of known hosts. You should write yes and hit enter.

Configure Runner
Install Latest Package
After you successfully connect to the Appcircle runner instance, you can install the Appcircle runner into it.
Change the current working directory to the home directory.
cd "$HOME"
Download the latest self-hosted runner package.
curl -O -L https://cdn.appcircle.io/self-hosted/runner/appcircle-runner-osx-arm64-1.8.5.zip
Extract self-hosted runner package.
unzip -o -u appcircle-runner-osx-arm64-1.8.5.zip
Change directory into extracted appcircle-runner folder for following steps.
cd appcircle-runner
Register the Runner to the Appcircle server
By default, the Appcircle runner is pre-configured to connect to the Appcircle cloud. If you are not using the Appcircle server as self-hosted, you can skip this information.
If you are using a self-hosted Appcircle server, edit the appsettings.json file with your favorite editor.
vi appsettings.json
You will see that the ASPNETCORE_BASE_API_URL and ASPNETCORE_REDIS_STREAM_ENDPOINT values are pre-defined for the Appcircle cloud.
- Change the API URL to your self-hosted server API URL without changing the path.
- Change the Redis stream endpoint to the URL that's compatible with your installation.
For example:
{
  ...
  "ASPNETCORE_REDIS_STREAM_ENDPOINT": "redis.appcircle.spacetech.com:443,ssl=true",
  ...
  "ASPNETCORE_BASE_API_URL": "https://api.appcircle.spacetech.com/build/v1"
}
If your Appcircle server is working with HTTP, the Redis stream endpoint port must be 6379 instead of 443 and the ssl argument must be set to false.
Also, don't forget to configure the API URL scheme as HTTP in the global.yaml.
Using an Up-to-Date Runner with an Out-of-Date Server
By default, the latest runner (1.7.0 or later) is compatible with the Appcircle server 3.18.0 or later. For this reason, if you are installing the latest runner or upgrading the runner from older versions and using an older server, you need to make extra configurations.
To make the Appcircle runner compatible with an older server, you must change the two settings below in the Appcircle runner appsettings.json, which will make it compatible with older servers.
echo "$(jq '.ASPNETCORE_SEND_BUILD_LOG_TO_REDIS="false"' appsettings.json)" > appsettings.json && \
echo "$(jq '.ASPNETCORE_WORKFLOW_UPDATES_DISABLED="false"' appsettings.json)" > appsettings.json
Now you need to create a Runner Access Token to register this instance with the Appcircle server.
Go to your organization's integration settings and generate runner access token.
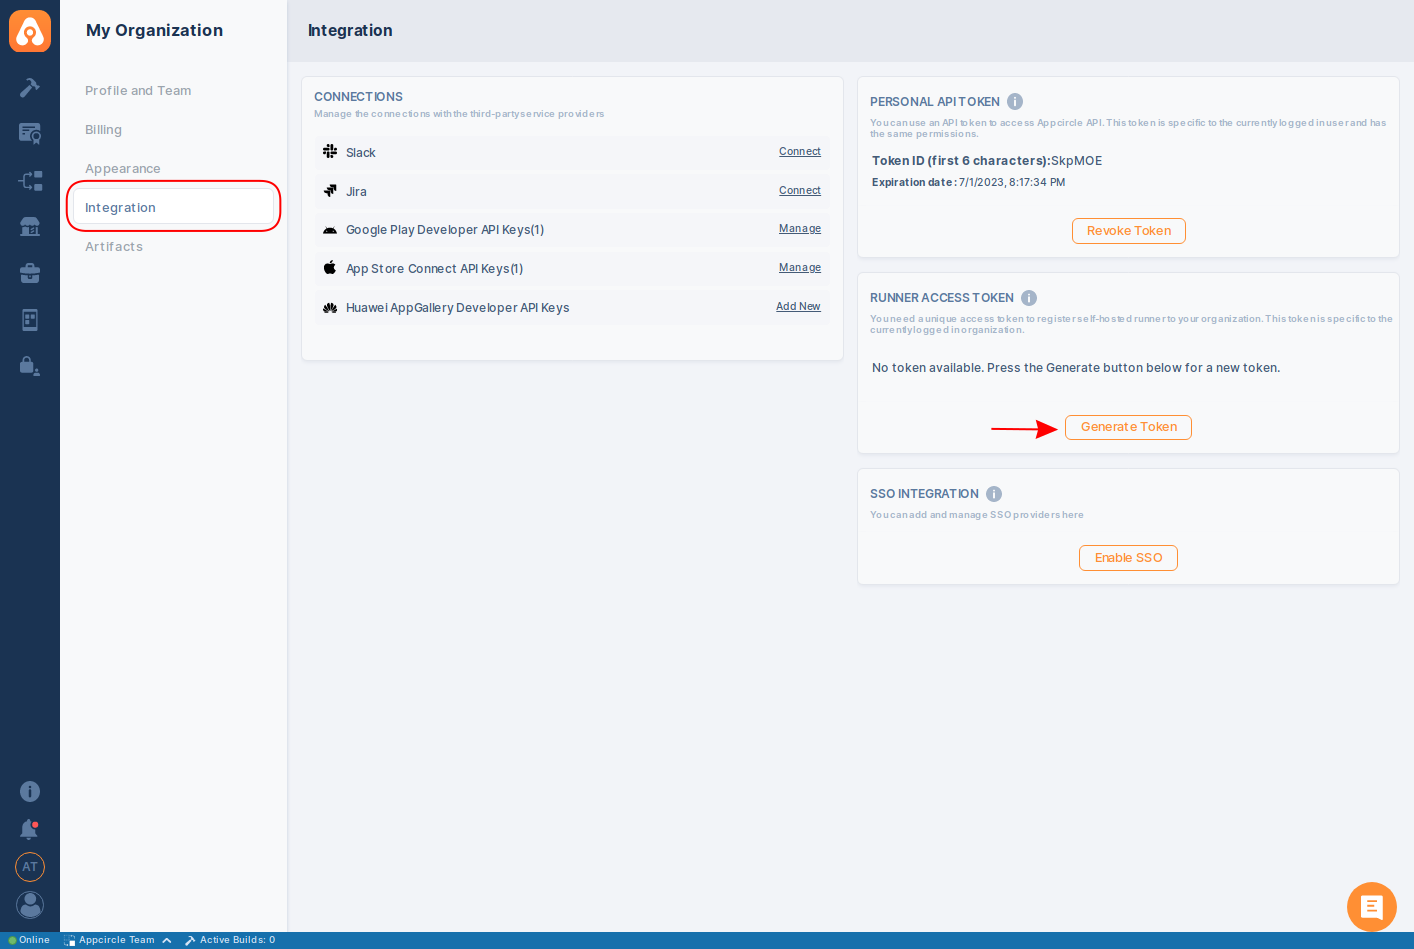
Using generated token, register self-hosted runner to your organization with desired name and pool.
./ac-runner register -t ${Access Token} -n ${Runner Name} -p ${Runner Pool}
Runner name is the text that you identify your self-hosted runner in your organization. You can use any suitable text for runner naming according to your requirements. You will find registered self-hosted runner in "Self-hosted Runners" list with the given name.
Runner pool is the text which identifies the runner pool in your organization. You can use any suitable text for pool naming according to your requirements. You will use given pool name at build profile settings and also see registered self-hosted runner in "Self-hosted Runners" list with the given pool name.
For example, below command is registering runner named "runner1" with pool named "Arm64_pool" to specified organization with using generated runner access token.
./ac-runner register -t aat_XVY27uHw7W1GA_cw5Vut0p_WOzHeYeJ2ZkTbqAVE3GX -n runner1 -p Arm64_pool
For more details on runner and pool, see Manage Self-hosted Pools and Manage Self-hosted Runners in docs.
Access token is required only for registration process and it can be used for any self-hosted runner, many times until revoked.
Revoking access token itself is not affecting already registered runners. You can't register new self-hosted runners to organization with revoked token anymore.
Only one valid access token can be used actively for an organization. There is no hard-limit on token generation and revoke. Acccording to your security requirements, you can revoke and generate new access token anytime you want.
Once you complete this step, you will see new added runner at "Build > Self-hosted Runners" list.
It's enabled by default but its state should be Offline by now.
Install the Required Build Tools
You need to install some workflow required build tools once before executing any build pipeline.
You can install iOS platform tools, android platform tools or both of them according to your requirements.
Below are some example configurations which shows you some sample runner configuration scenarios:
- Install only iOS platform tools with default Xcode (15.2.x)
./ac-runner install -o ios
If your operating system is macOS 11 (Big Sur), then the default selected Xcode version will not be compatible for your system.
Set -x argument explicitly with one of the compatible versions. You can select 12.5, 13.0, 13.1 or 13.2 version for Xcode.
- Install only iOS platform tools with Xcode versions 14.3.x and 15.3.x
./ac-runner install -o ios -x 14.3,15.3
- Install only android platform tools
./ac-runner install -o android
- Install both android and iOS platform tools with Xcode version 15.3.x
./ac-runner install -o ios,android -x 15.3
While configuring self-hosted runner, platform argument (-o) doesn't work as append strategy. Your latest platform argument will be self-hosted runner's final platform.
Let's assume, you installed iOS platform tools at first with -o ios and then want to add also android platform in order to build both iOS and android apps.
Using -o android in this case will be wrong argument. You must use -o ios,android for this purpose.
For this tutorial, we will install the Android tools and iOS tools with the latest (at the moment) three stable Xcode versions.
./ac-runner install -o ios,android -x 15.3,15.2,15.1
Run the Service
Install and start self-hosted runner service.
./ac-runner service -c install
Once you complete this step, its state should be seen as Online in "Self-hosted Runners" list.
You can install and run only one instance of self-hosted runner on a physical machine.
Building Applications
Congratulations, now your runner is waiting for build jobs. In order to use your self-hosted runner pool;
- Find your app's build profile in "Build Profiles"
- Click on "Configurations" to open branch config details
- Select your runner's pool from "Config" tab
- Check also other settings for your runner capabilities
- Save settings and pool configuration
- Start Build 🎉
For a comprehensive overview of building applications on the Appcircle platform, you can navigate to the Platform Build Guides page.
Need help?
Get help from Appcircle's support team, or see how others are using Appcircle by joining our Slack Channel.
![]()
Have questions? Contact us here.