Building React Native Applications
You can build your React Native applications in Appcircle for iOS or Android platforms.
Appcircle will use your package.json file to determine and use the dependencies of your application.
Creating a React Native Build Profile
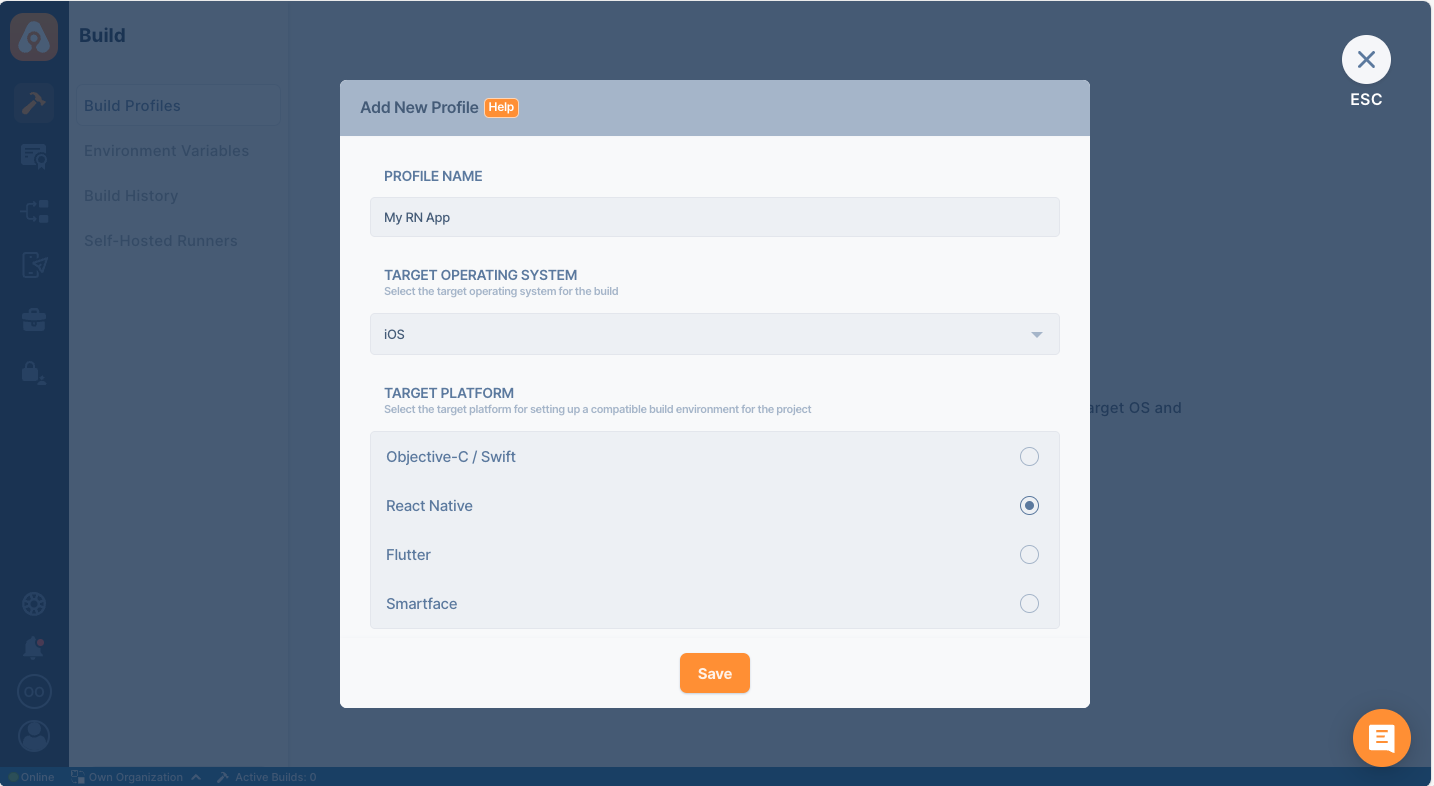
Simply create a new build profile as usual and select your target operating system as iOS or Android. Select React Native for Target Platform.
Once your build profile is created, click on it and connect your Git repository. For details on this step, please follow the directions on the following page:
Adding a Build ProfileBuild Configuration for React Native Applications
Build configuration options are very similar to native iOS or Android applications. You can select configuration details, build triggers, signing identities and distribution options.
Private Modules
If your project uses private modules, don't forget the add necessary SSH keys to your workflow steps. You can use Activate SSH Private Key step to add your private SSH keys.
You may also use Authenticate with netrc step to access your private modules.
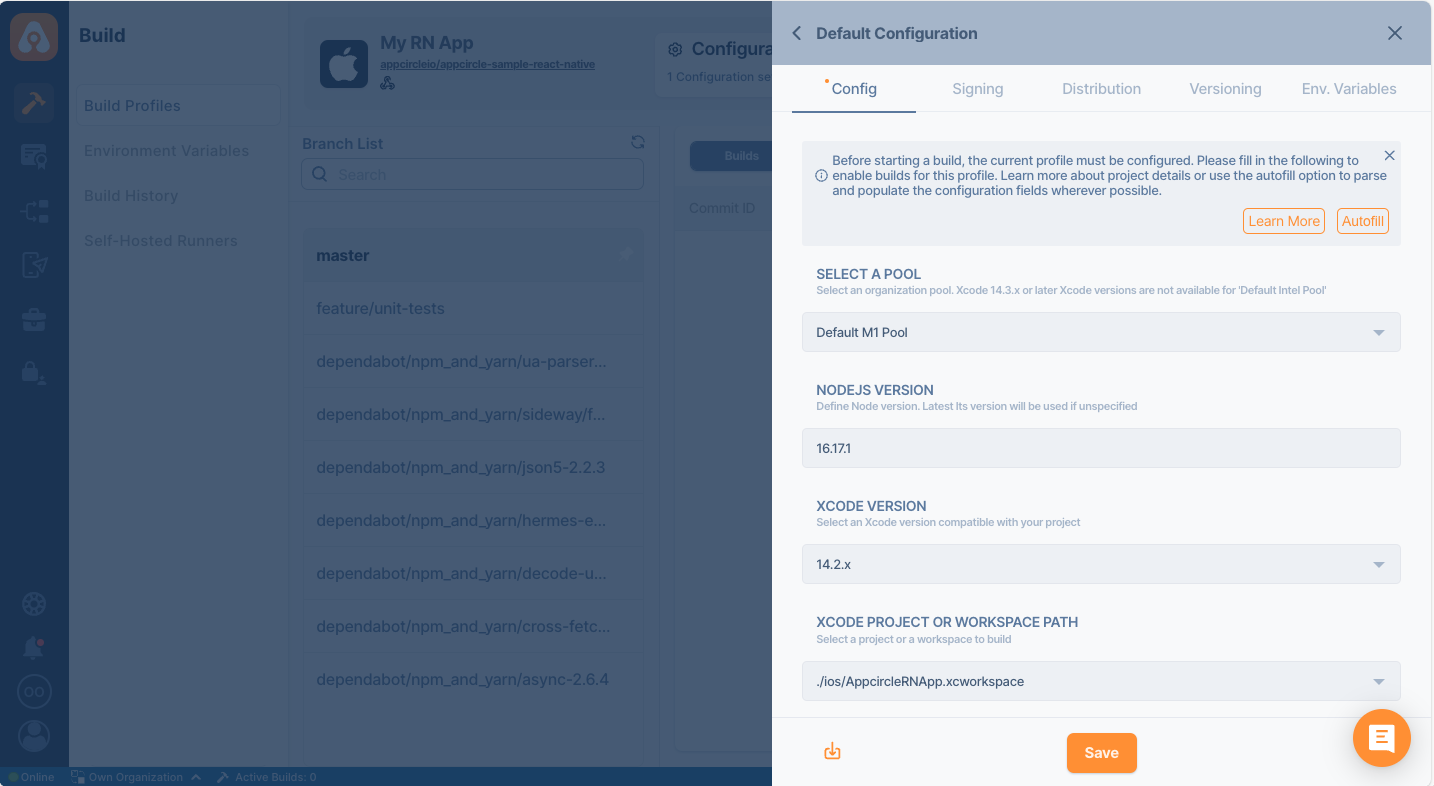
Build Configuration for React Native iOS applications
First, we need to set up a build configuration. Select the configuration from the Configuration section. The first step will be to enter project details. You can enter details manually or click on the "Autofill" button to retrieve them from your project.
Your iOS project needs to have an Xcode project or an Xcode workspace and a shared scheme to complete the build configuration successfully. Appcircle can fetch these workspaces and shared schemes from your branch automatically.
Share your iOS schemes
iOS schemes must be marked as shared in order to build your application outside of Xcode. If your application doesn't have a shared scheme, it can only be built using Xcode.
You can check the shared option in your Xcode's scheme manager to mark your application's scheme as shared.
Please don't forget to add additional scheme files to your version control.
Major Xcode versions are available for building in Appcircle. You can select the preferred Xcode version in the Build Configuration window. You can also set the preferred NodeJS version on this screen. If you don't set any version, lts version will be used.
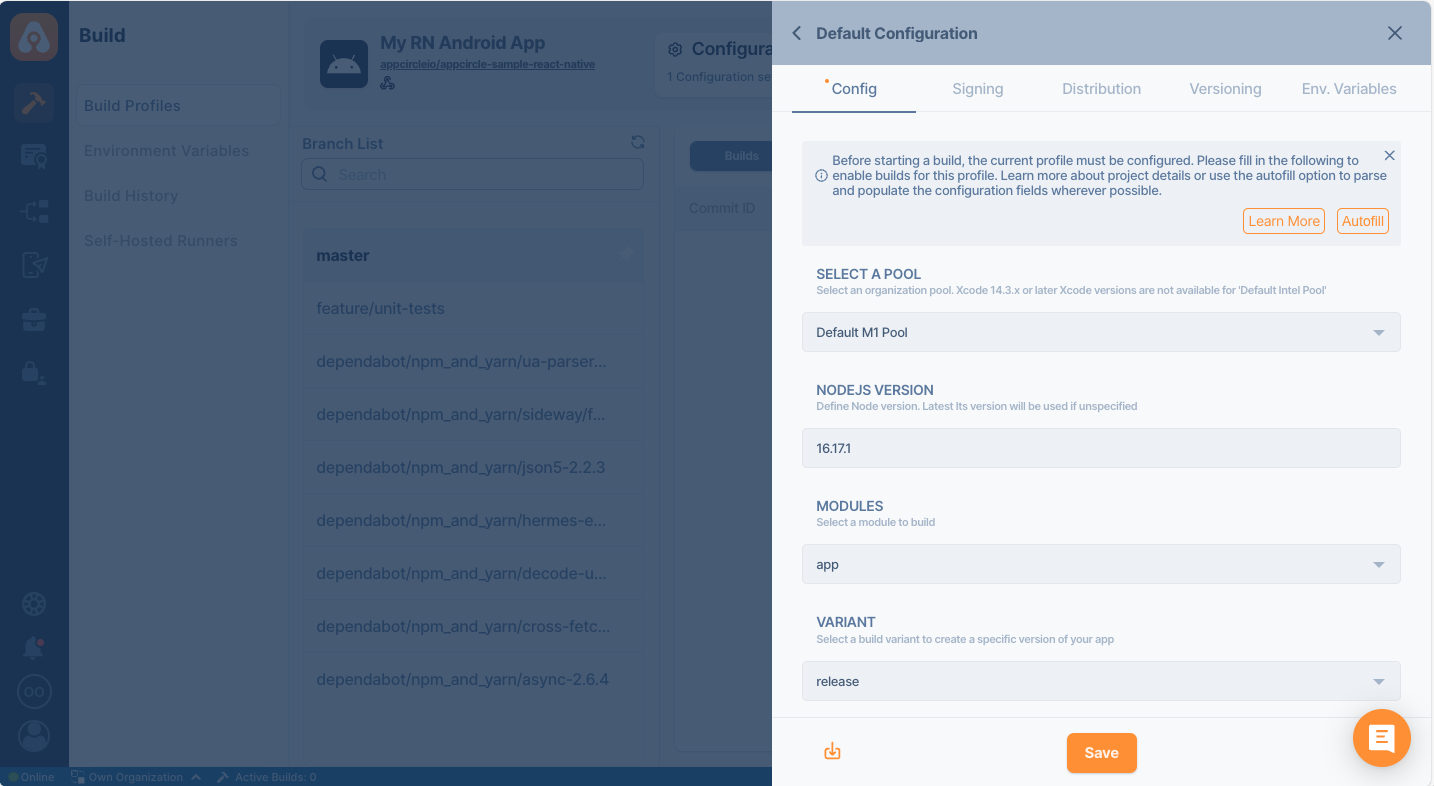
Build Configuration for React Native Android applications
First, we need to set up a build configuration. Select the configuration from the Configuration section. The first step will be to enter project details. You can enter details manually or click on the "Autofill" button to retrieve them from your project.
Sending the Build Status to the Repository Providers
At the bottom of the config tab, you will the **Set Commit Build Status **option.

When this option is enabled, the build status for that commit is shared with the repository provider.
.png)
Build Triggers
Triggers, is common for both iOS and Android.
Appcircle allows you to trigger builds manually or automatically using build triggers.
- On push: Whenever code is pushed to a configured branch, the build is triggered.
- On a tagged push: Whenever a tagged commit is pushed, the build is triggered for that commit. Commits without any tags are ignored.
- On push with selective tags: Whenever a commit includes one of the typed in tags, the build is triggered. You can specify tags with Unix shell-style wildcards to trigger builds.
Signing React Native iOS applications
The next step on build configuration is Signing. Here, please select the provisioning profile you added in the Apple Certificates & Provisioning Profiles section.
You can get both unsigned and signed build artifacts based on your configuration.
Signing React Native Android applications
Here, please select the Android Keystore you added in the Android Keystores section.
You can get both unsigned and signed build artifacts based on your configuration. Please note that unsigned builds will not be distributed by email.
Distribution (Deployment) Configuration
The next step on build configuration is Distribution.
You can select a previously created distribution profile or create a new one in this window. Use the top input box to enter a name for the new distribution profile you want to create. Press enter or click on the green + icon on the right to create the distribution profile.
Finally, check Auto Distribute if you want your build to be deployed to the Testing Distribution automatically and Auto Deployment if you want the build to be deployed to Store Submission automatically.
Create a Distribution Profile and Sharing with Testers
Any previous build can be deployed to the Testing Distribution without the need for rebuilding.
Environment Variables
The final tab is to add environment variables to the build. For advanced use cases, you can define variables and secrets to be incorporated during the build in the Environment Variables submodule so that you don’t need to store certain keys and configurations within the repository.
Please refer to the following document for more information on environment variables:
Why to Use Environment Variables and Secrets?
Build workflows for React Native applications
Once you complete your build configuration, you can edit your build workflow. React Native builds have additional steps for Node and Yarn commands. You can also arrange, add or remove workflow steps using Appcircle's workflow editor and the Workflow Marketplace.
To learn more about Appcircle's Workflow editor, see the corresponding page below:
What are Workflows and How to Use Them?Starting a React Native Build and After a Build
To start your first build, just press the start build button – the play button under the actions columns (or push some code to your repo if autobuild is configured.) You will see the build progress and the log in realtime.
Once your build is complete, you can now download the binary file or deploy it to Testing Distribution manually (if autodistribute is enabled, it will be sent automatically after a successful build). You can also view or download your build logs at anytime.
After a BuildFAQ
ERR_OSSL_EVP_UNSUPPORTED
If you receive an error similar to the following, it’s likely that your application or a module you’re using is attempting to use an algorithm or key size which is no longer allowed by default with OpenSSL 3.0.
 opensslErrorStack: [ 'error:03000086:digital envelope routines::initialization error' ],
  library: 'digital envelope routines',
  reason: 'unsupported',
  code: 'ERR_OSSL_EVP_UNSUPPORTED'
You can either add the command-line option, --openssl-legacy-provider to your build scripts or change your node version to v16.x
NPM/Yarn specific errors
If you face problems during NPM/Yarn install steps on Appcircle but not on your local machine, you should confirm the following steps:
- Make sure that your packages support the node version you use.
- Make sure that the file interactions that is done on
preinstalland/orpostinstallscrips are suitable to be executed on a different machine
Queries to registry.yarnpkg.com return a 404/500/...
First, you should check the NPM status page for possible availability issues.
Our runners have yarn classic (1.x) by default. See the iOS build agent stacks and the Android build agent stacks pages for the exact versions.
On the other hand, yarn modern (2.x) has stability improvements that can fix these kinds of network errors. You can see here for details.
Upgrading to the latest versions is critical to a fast and stable yarn experience. So, if you're getting these kinds of errors in your build pipeline, we recommend upgrading your yarn version.
You can see the steps to do upgrade in the following section. 👇
Upgrading From Yarn 1 to Yarn 2 in Pipeline
- Add a "Custom Script" step to your workflow before the "npm/Yarn Commands" step.
- It should be a bash script and should have the below content.
cd $AC_REPOSITORY_DIR
yarn set version berry
yarn --version
yarn config set -H enableImmutableInstalls false
When you run the pipeline again with an up-to-date workflow, you should see the upgraded yarn version in your build logs.
Disable Flipper SDK on iOS
Flipper can be a good tool for debugging your applications. It still gets built even if it's not being used for release builds. To speed up your builds, Flipper can be disabled on Appcircle by making the Flipper SDK inclusion conditional.
Example Podfile modification:
  if !ENV['AC_APPCIRCLE']
    use_flipper!
    post_install do |installer|
      flipper_post_install(installer)
    end
  end
Appcircle uses the lts(Long Term Support) node version by default.
You can access how to change your node version and other relative information about workflow steps and configurations on the page below:
React Native Specific Workflow StepsNeed help?
Get help from Appcircle's support team, or see how others are using Appcircle by joining our Slack Channel.