Install Appcircle on Amazon Web Services (AWS)
Overview
An Appcircle server Amazon Machine Image (AMI) is a pre-configured template used to create virtual servers, known as instances, in the Amazon Web Services (AWS) environment.
Think of it as a snapshot of a server that includes the operating system, necessary tools, applications, and any additional services needed to run the Appcircle server.
Pre-requirements
Appcircle Requirements
If you don't apply a license, you can go on with the package located in the AMI and use the Appcircle server as a "Starter Plan" user. But it's recommended to purchase a license from Appcircle that will increment the license limits and enable you to access the Appcircle resources for future upgrades.
If you are a licensed user, you should contact us about the licensed Appcircle server package that includes your actual license.
Technical Requirements
Before using the Appcircle server AMI, there are a couple of things that you need to handle.
AWS Account
You must have an active AWS account with appropriate permissions to launch EC2 instances and work with other related services.
Understanding of AWS Services
A basic understanding of Amazon Web Services (AWS) services, particularly EC2 (Elastic Compute Cloud), is beneficial.
You should be familiar with instance creation, networking, security groups, and storage configurations.
1. Networking and Security Configuration
You might need to configure networking aspects such as Virtual Private Cloud (VPC), subnets, route tables, and security groups to properly integrate the instance within the network environment and manage access controls.
2. SSH Key Pairs for Secure Access
You need an SSH key pair to access to the server that you will create securely.
3. Linux System Configuration
Basic familiarity with Linux system configurations and commands is essential since this document will use Linux commands.
Creating an Appcircle Server from the AMI
After you meet all the requirements discussed above, you can follow the steps below to create an Appcircle server from the AMI.
-
Log in to the AWS console with your account.
-
Select the region from the right upper corner.
-
Head to the EC2 menu to create an EC2 instance.
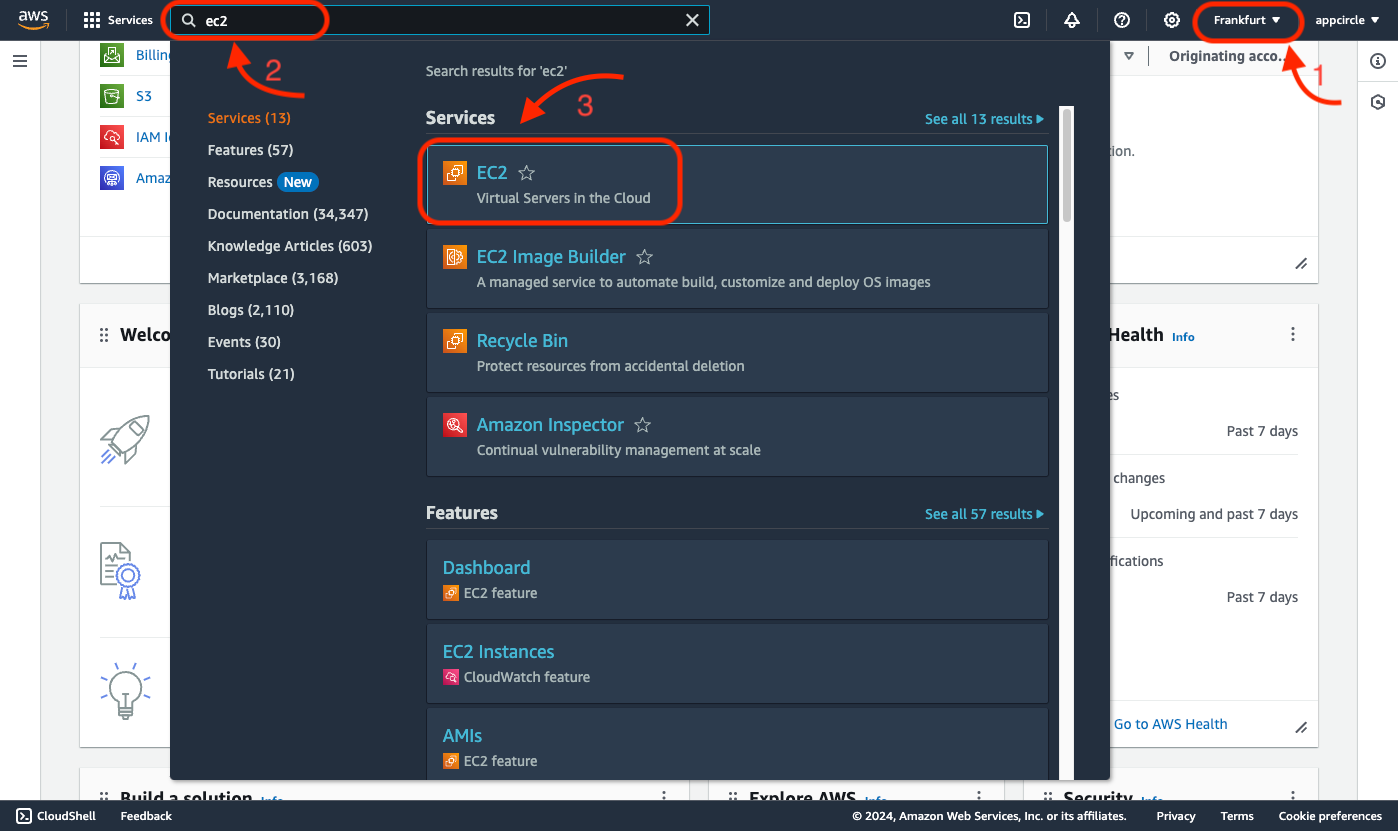
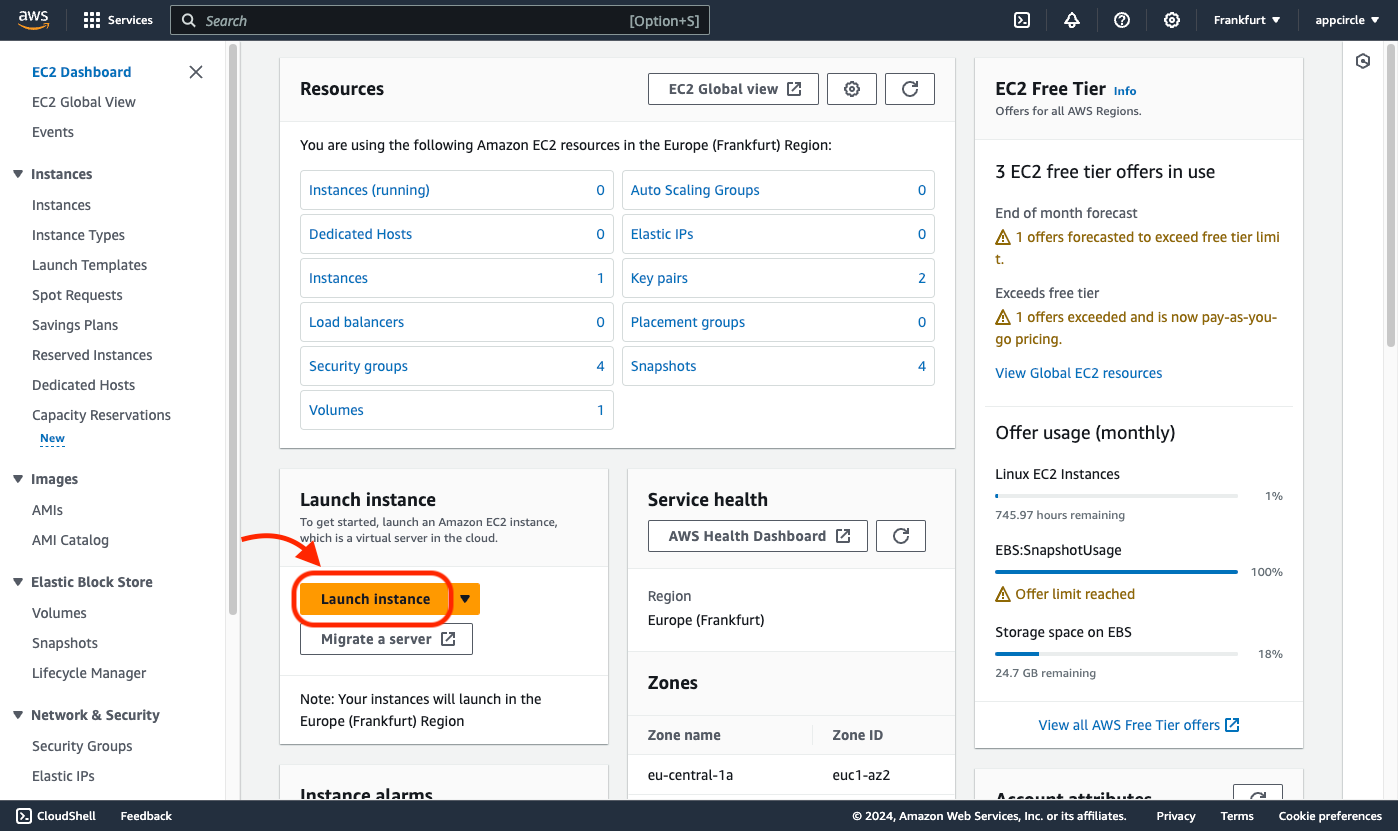
- Click on the "Launch Instance" button from the EC2 dashboard.
You should fill out the required fields as per your needs. Please follow the below steps for a sample instance configuration.
-
Enter an instance name in the "Name and Tags" field. For example, "My Appcircle Server".
-
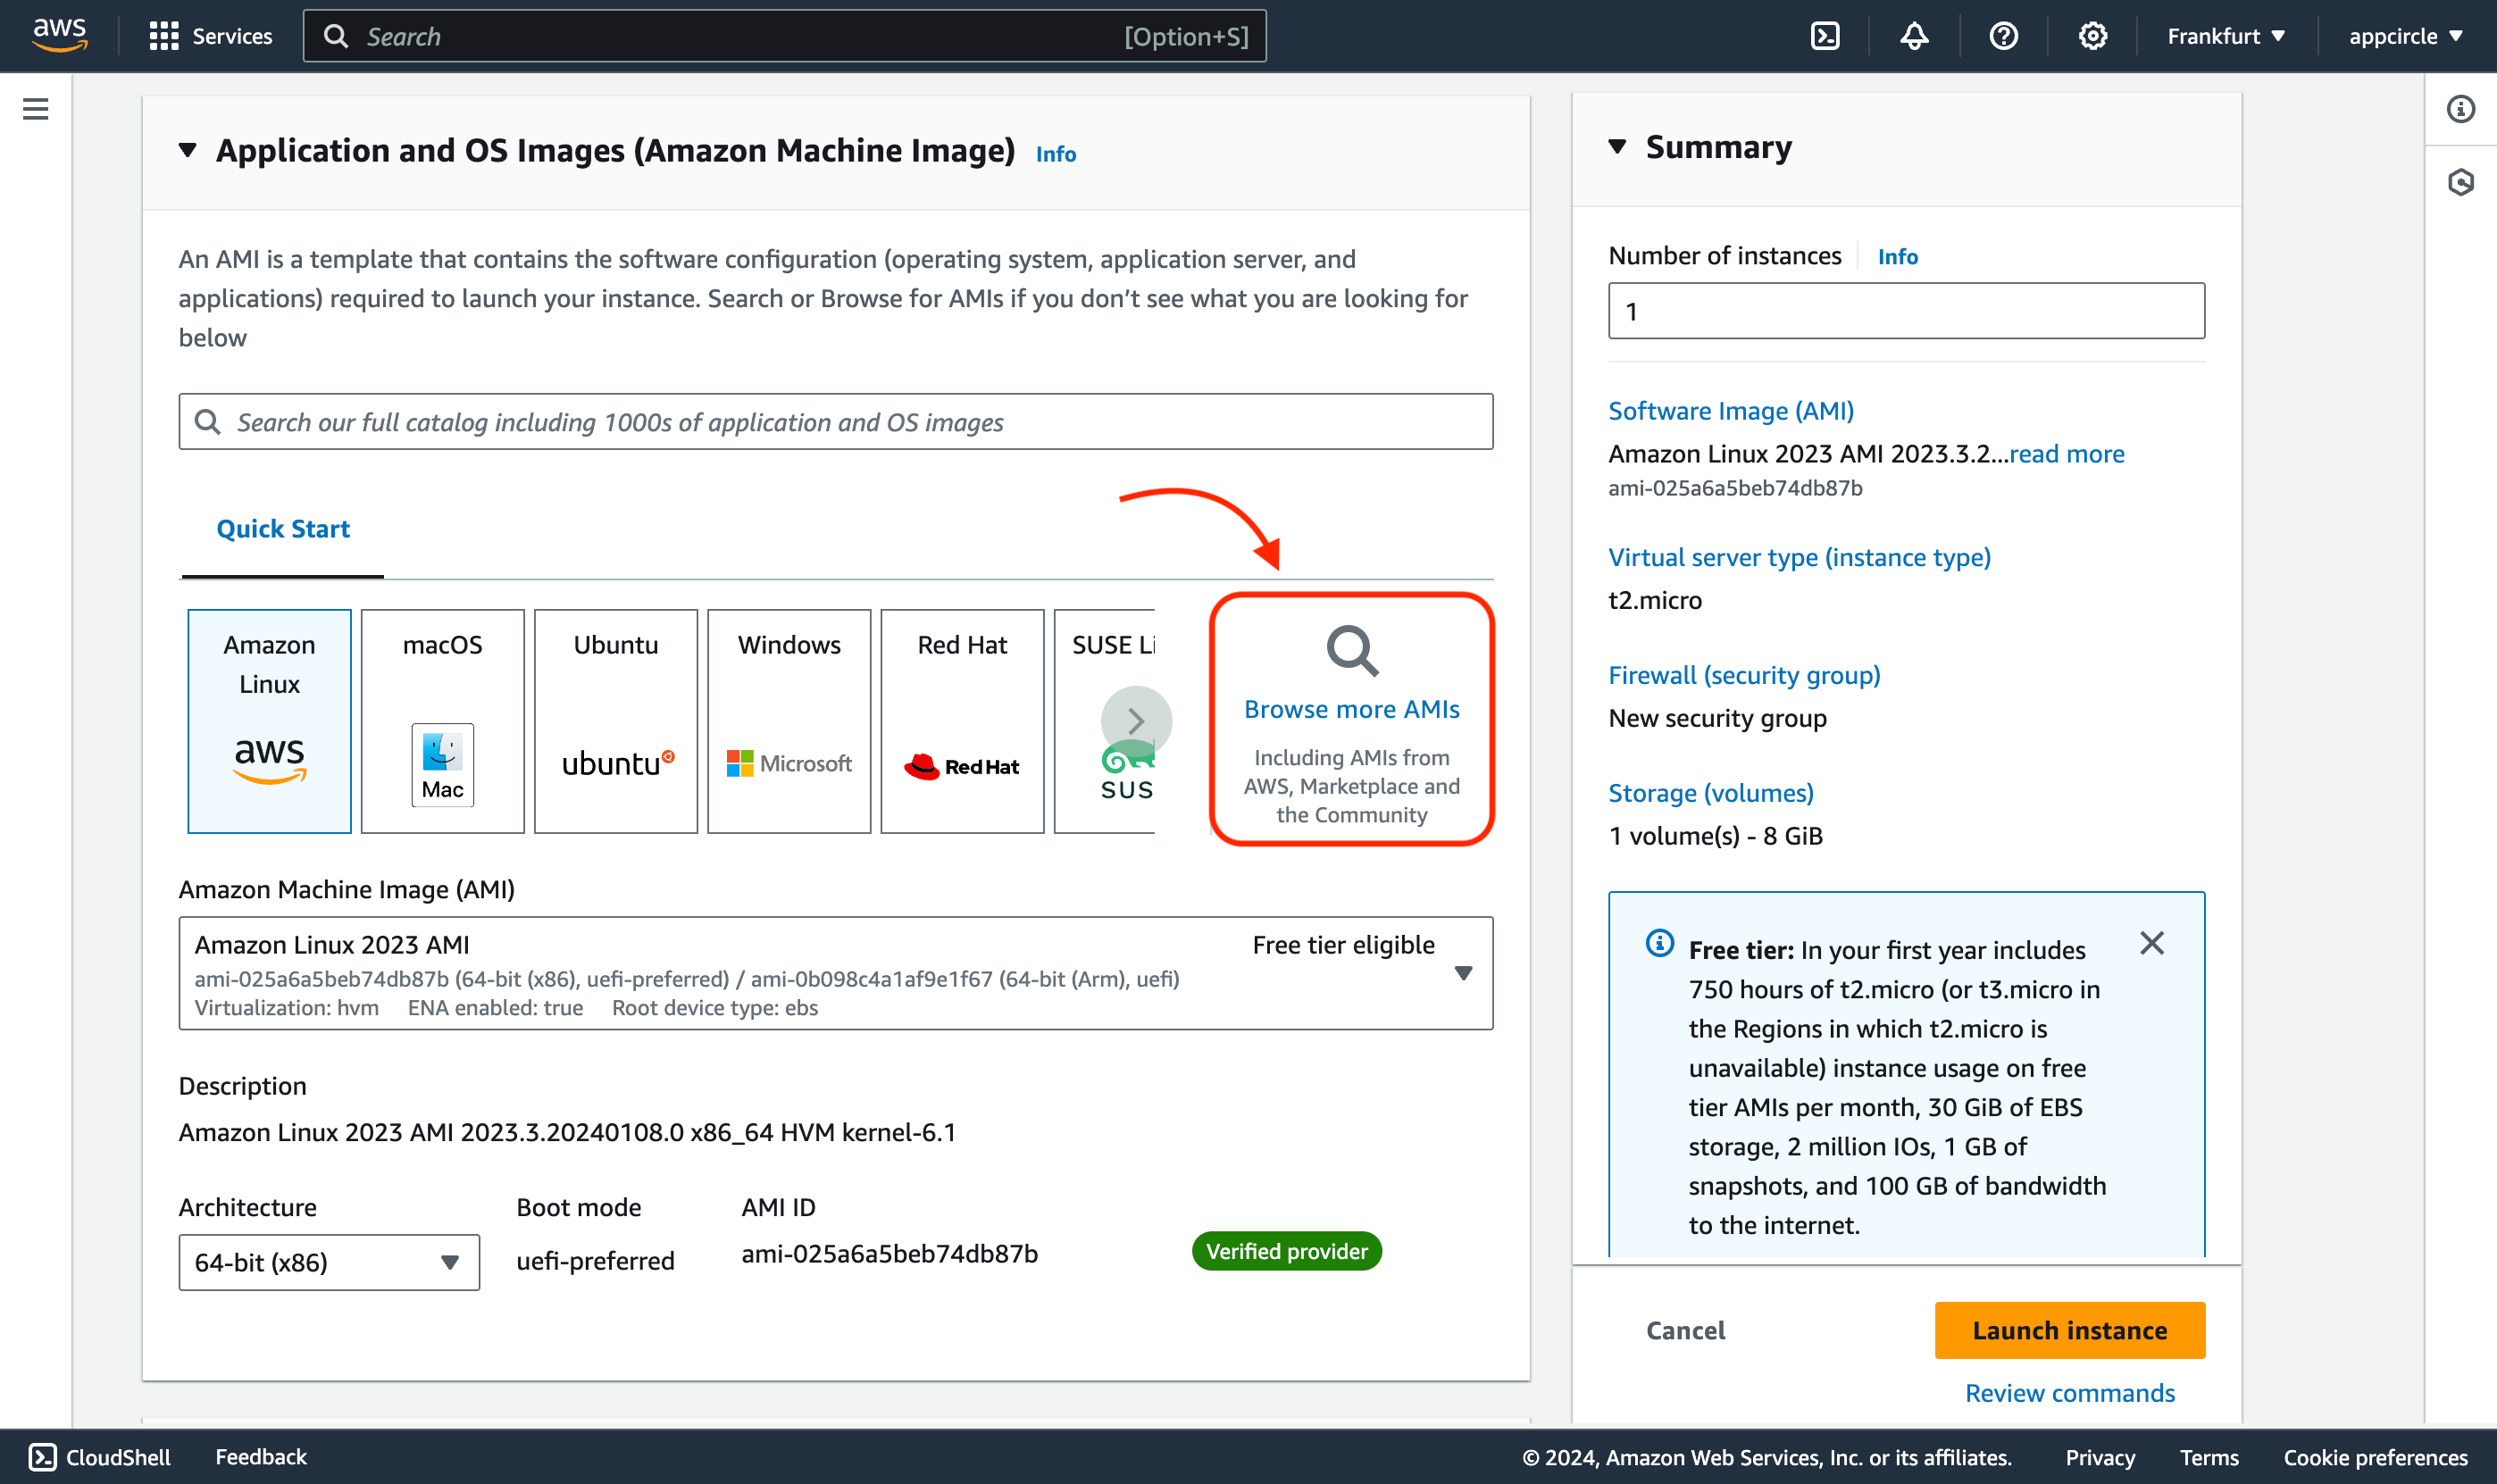
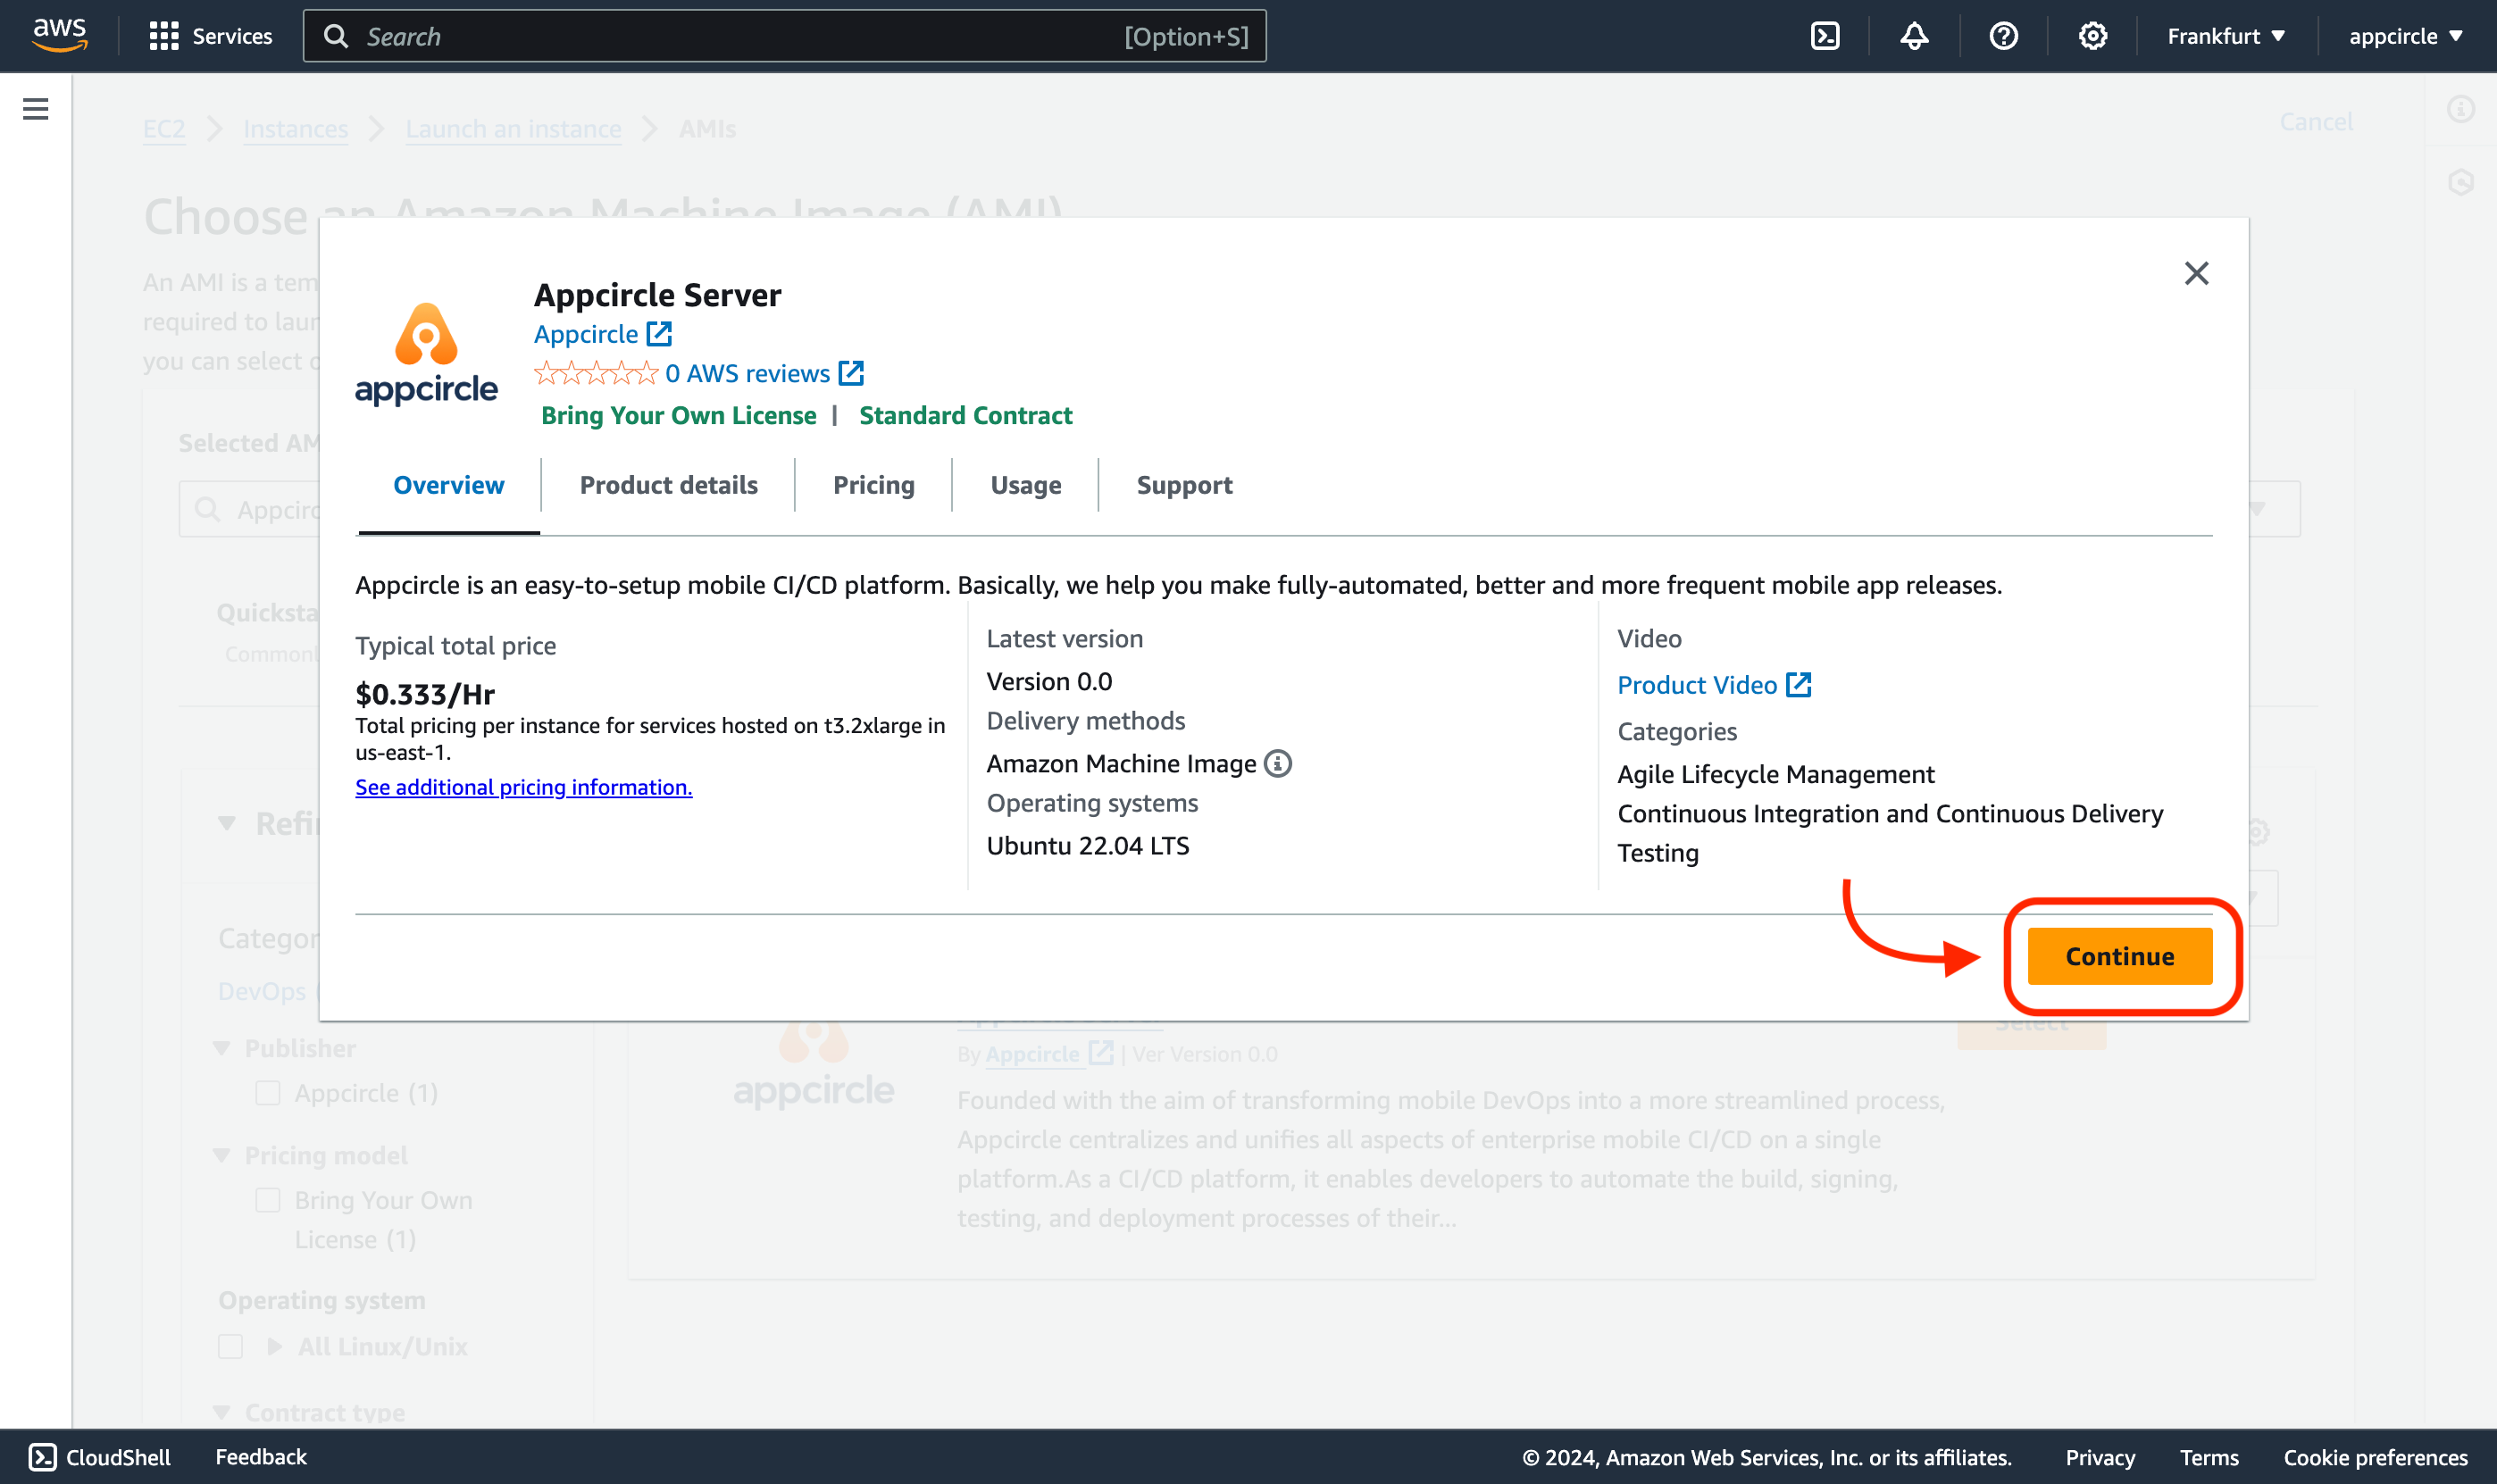
In order to select the AMI, click on the "Browse more AMIs" button and search for the Appcircle server AMI.
- Search for "Appcircle" in the "AWS Marketplace AMIs" tab and click on the "Select" button for the AMI.
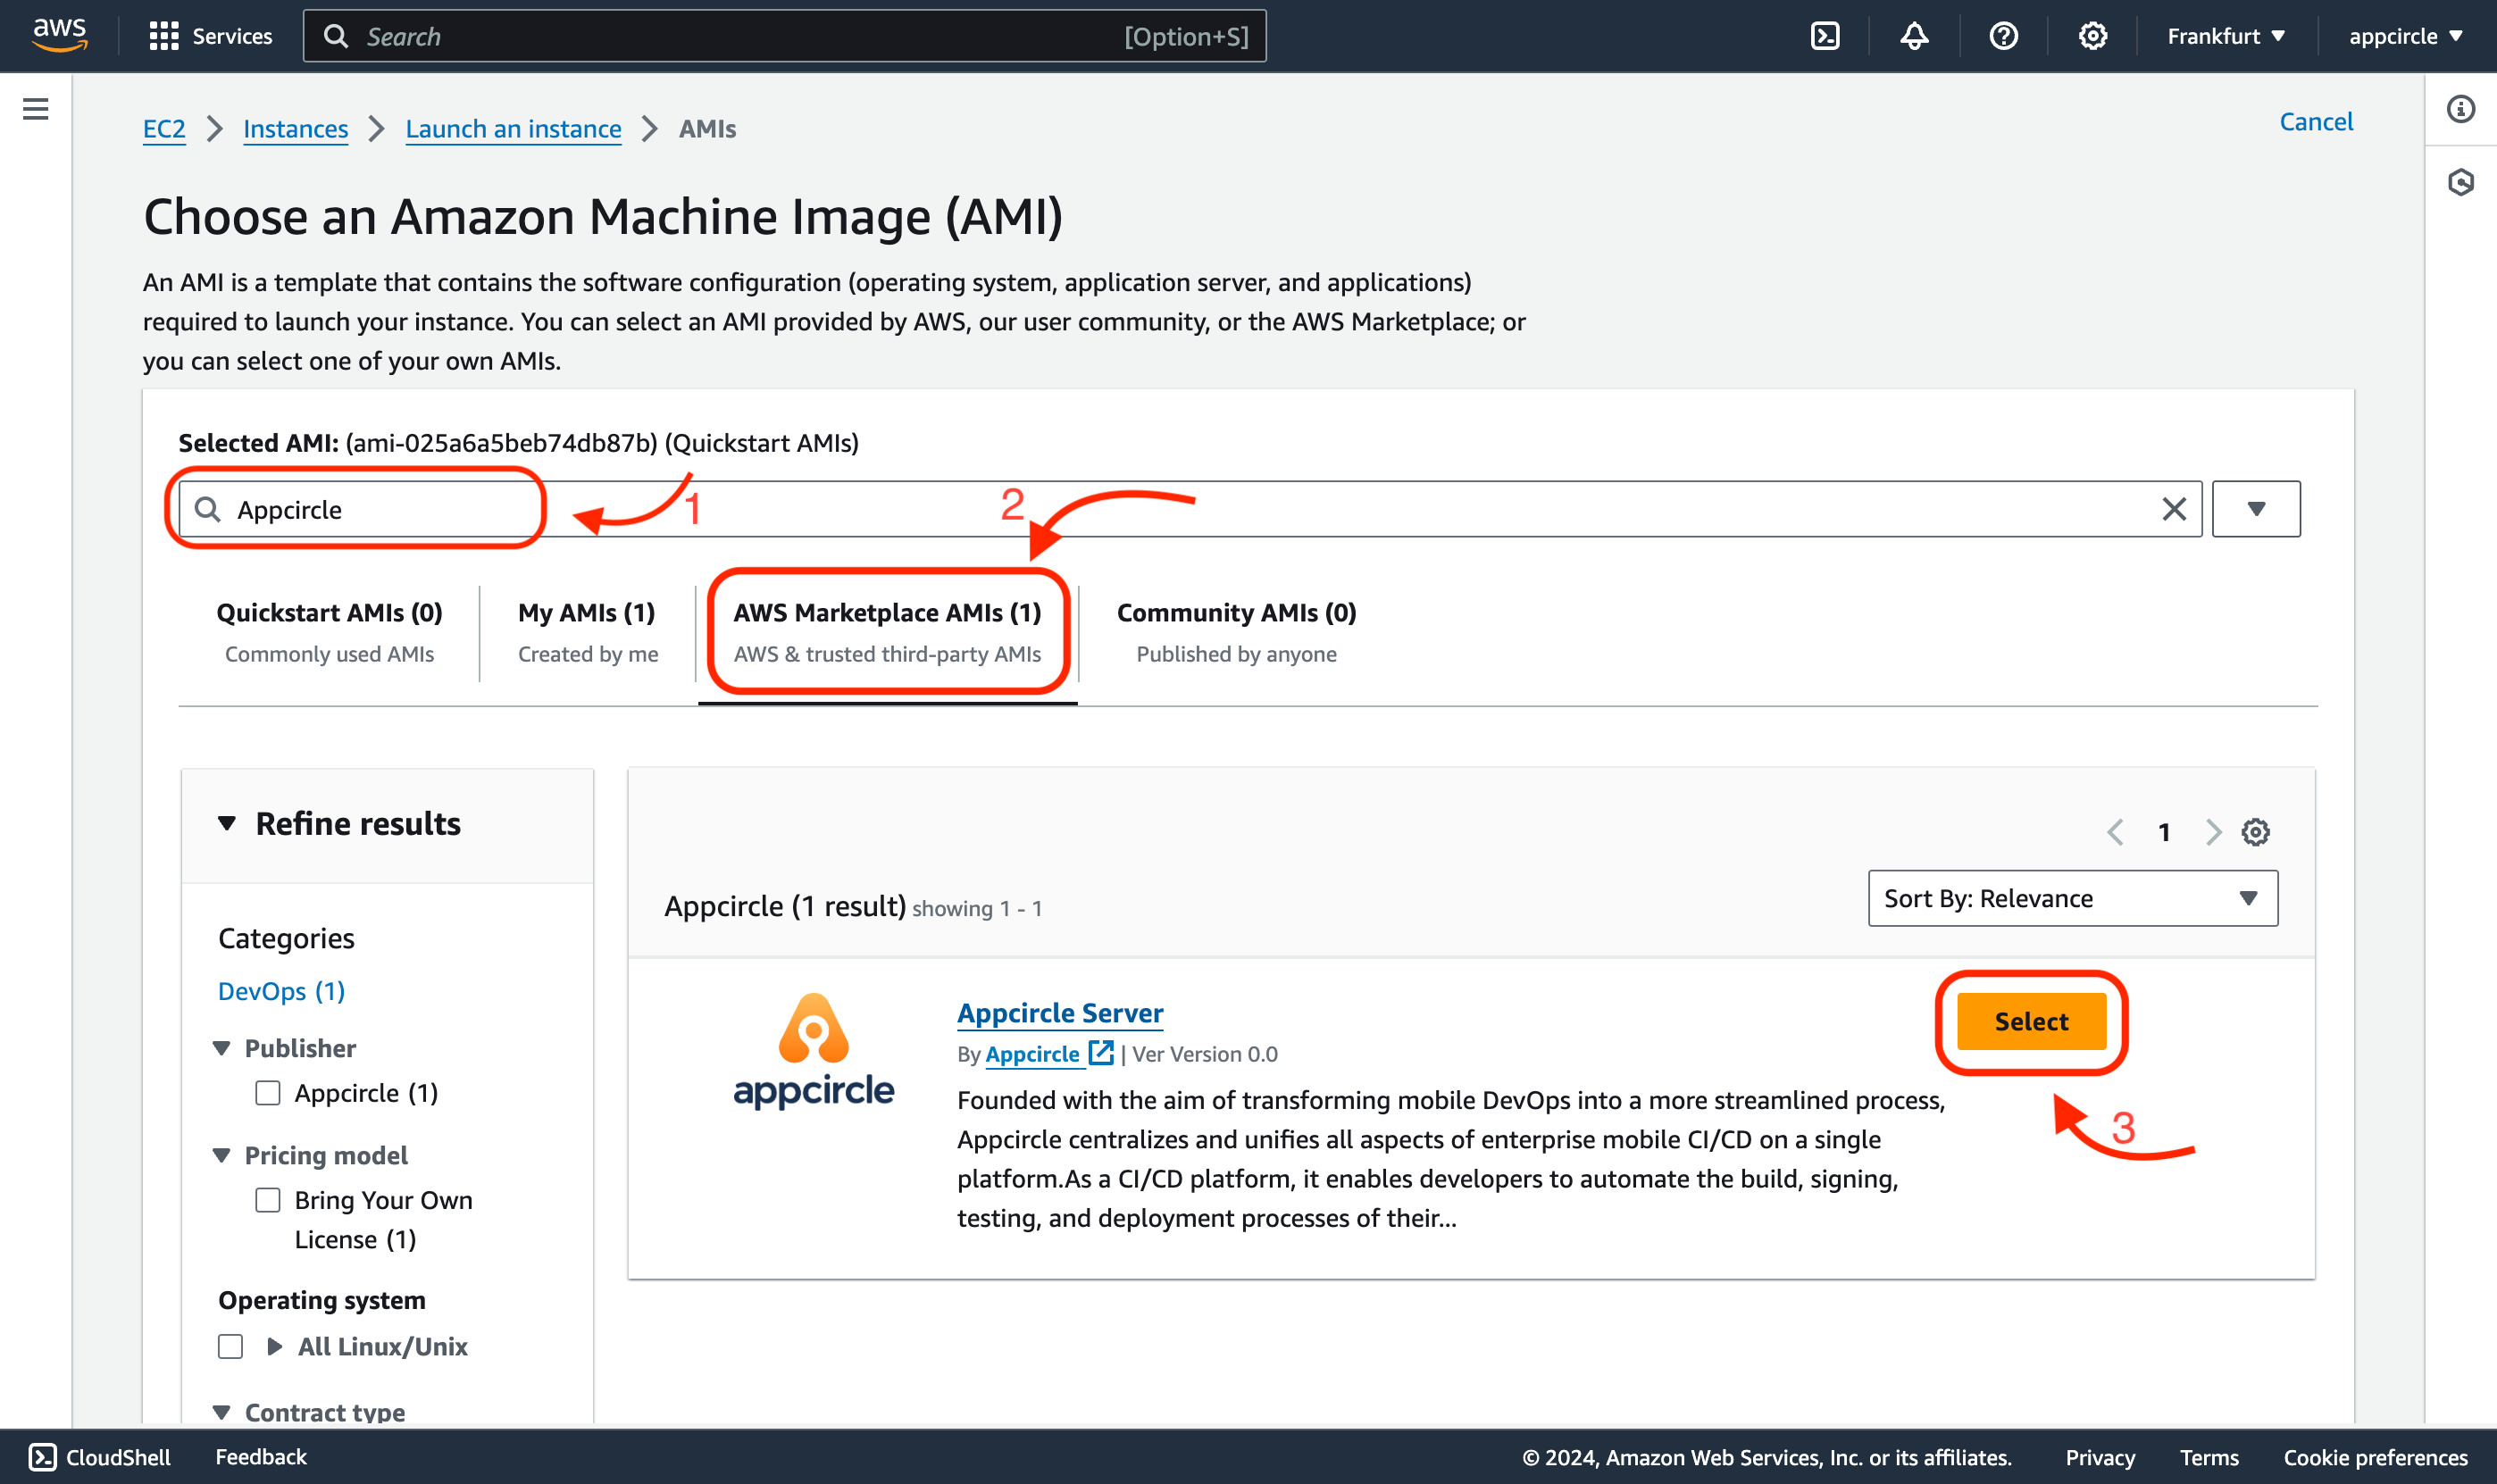
- Click "Continue" to select Appcircle server AMI.
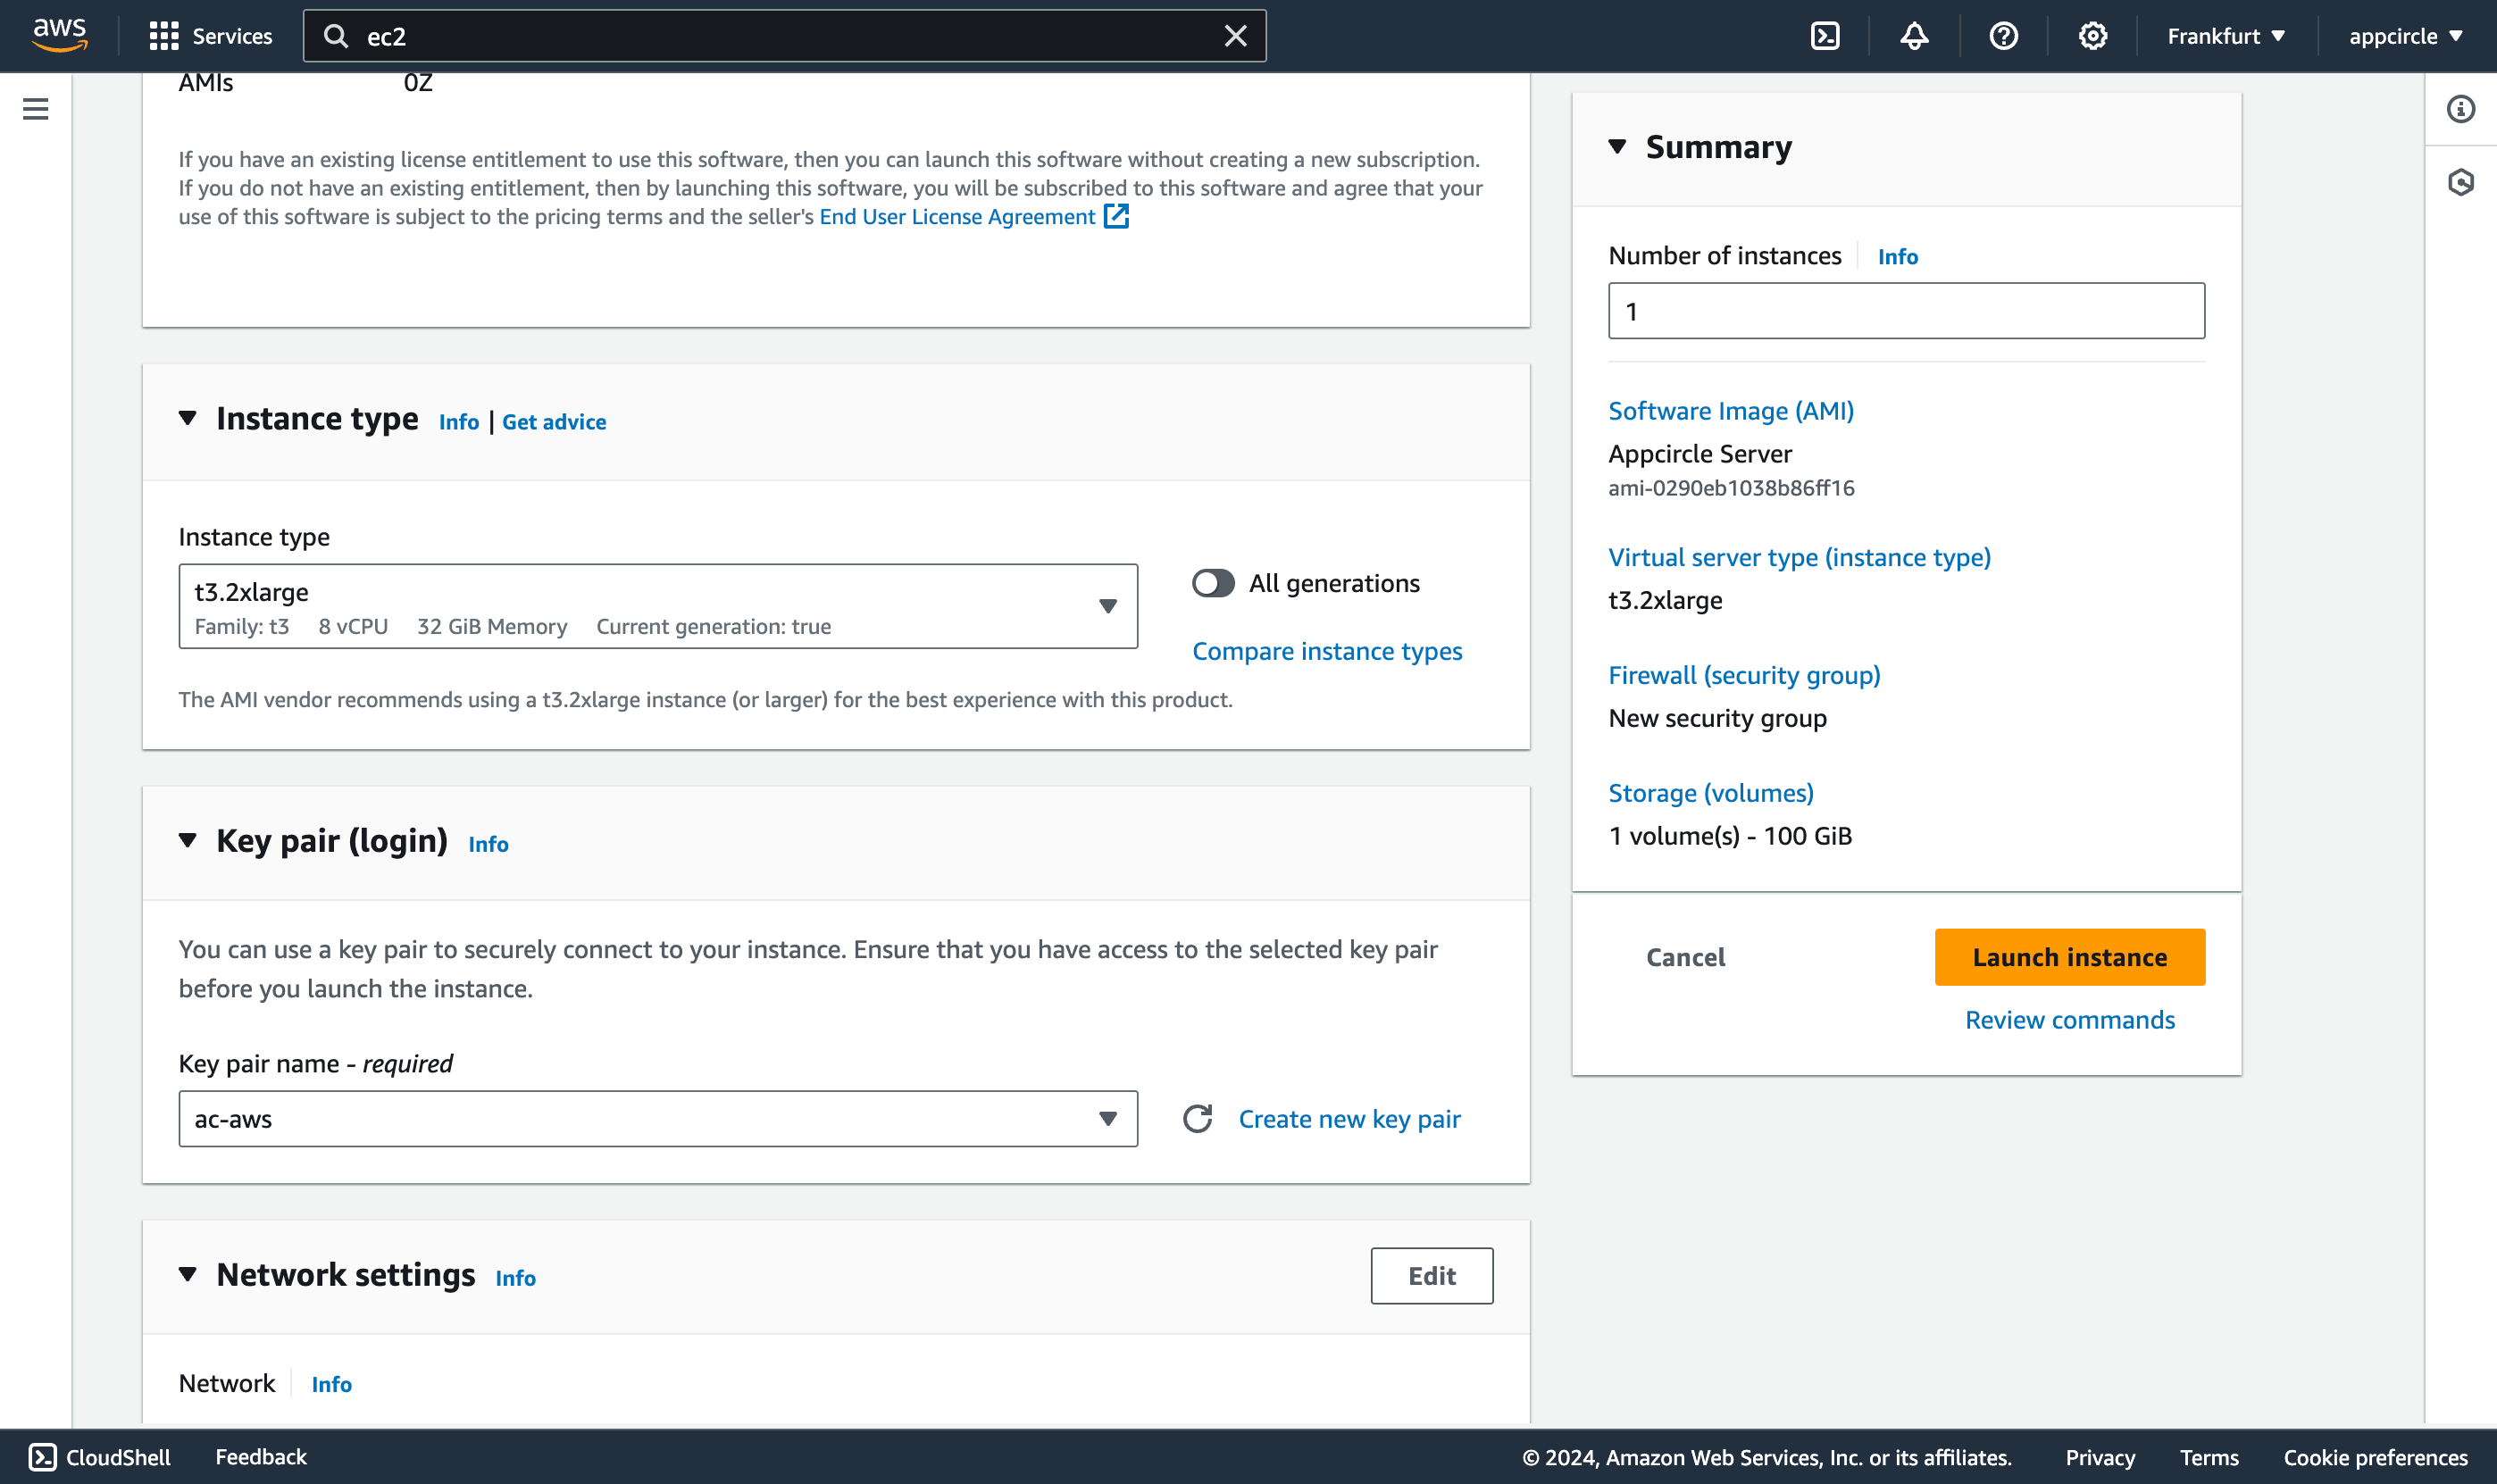
- We will use the
t3.2xlargeinstance type for our sample configuration since it meets the minimum requirements for the vCPU count.
For the details about minimum hardware requirements, you should see the Hardware Requirements section.
- Select an existing key pair or click on the "Create new key pair" button if you don't have any on the AWS console.
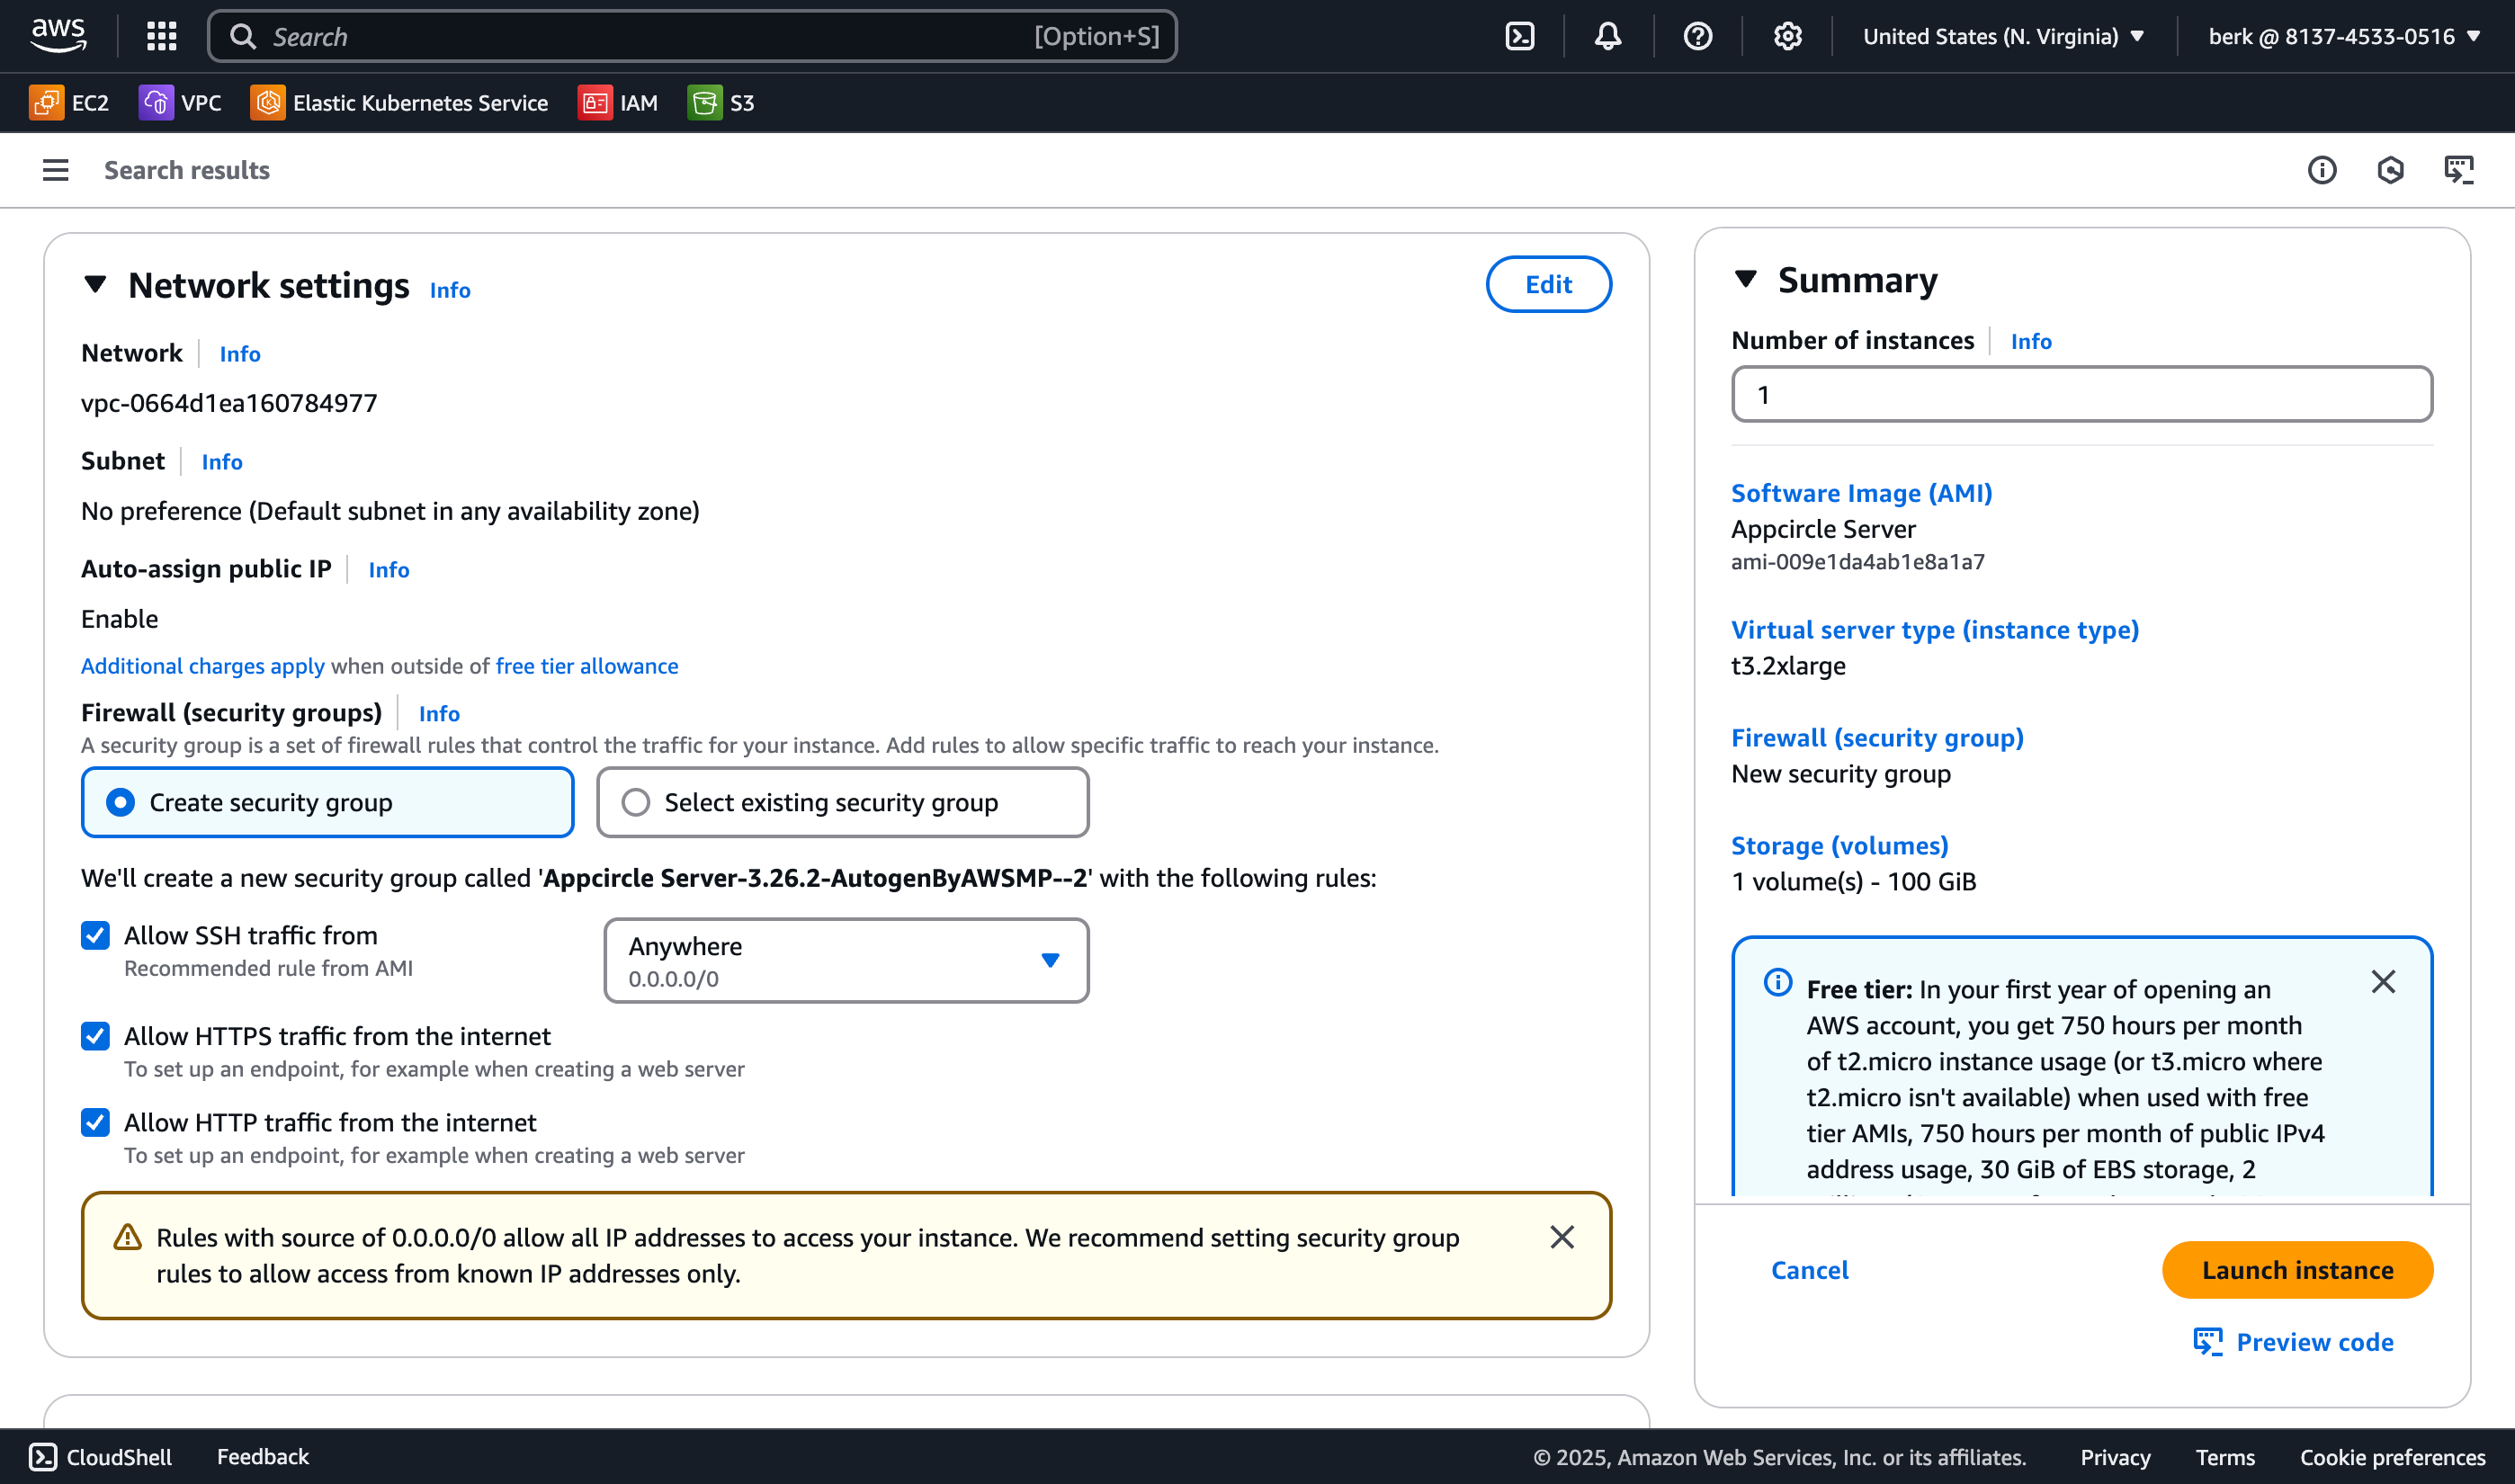
- For the network settings:
- We will use the default VPC created on the form.
- Allow HTTP and HTTPS traffic from the internet.
- This is required for accessing the Appcircle server dashboard.
- Allow SSH traffic.
- SSH is also required to access the server from the command line.
- You can restrict the SSH connection by specifying the source IP addresses.
If you want to also send ping requests to the instance for health check purposes, you can also add another rule with the type "All ICMP-IPv4" while editing the inbound rules of the security group after the instance and security group are created.
- For storage, you can select a minimum 100-GB disk for a PoC setup or testing purposes.
You should see the recommended storage sizes and other disk requirements in the Hardware Requirements section.
Keep in mind that the pre-configured swap also consumes disk space, and its size is as large as the memory size.
So, although a minimum 100-GB disk is enough to run the Appcircle server, we recommend a minimum 200-GB disk space for long-term usage.
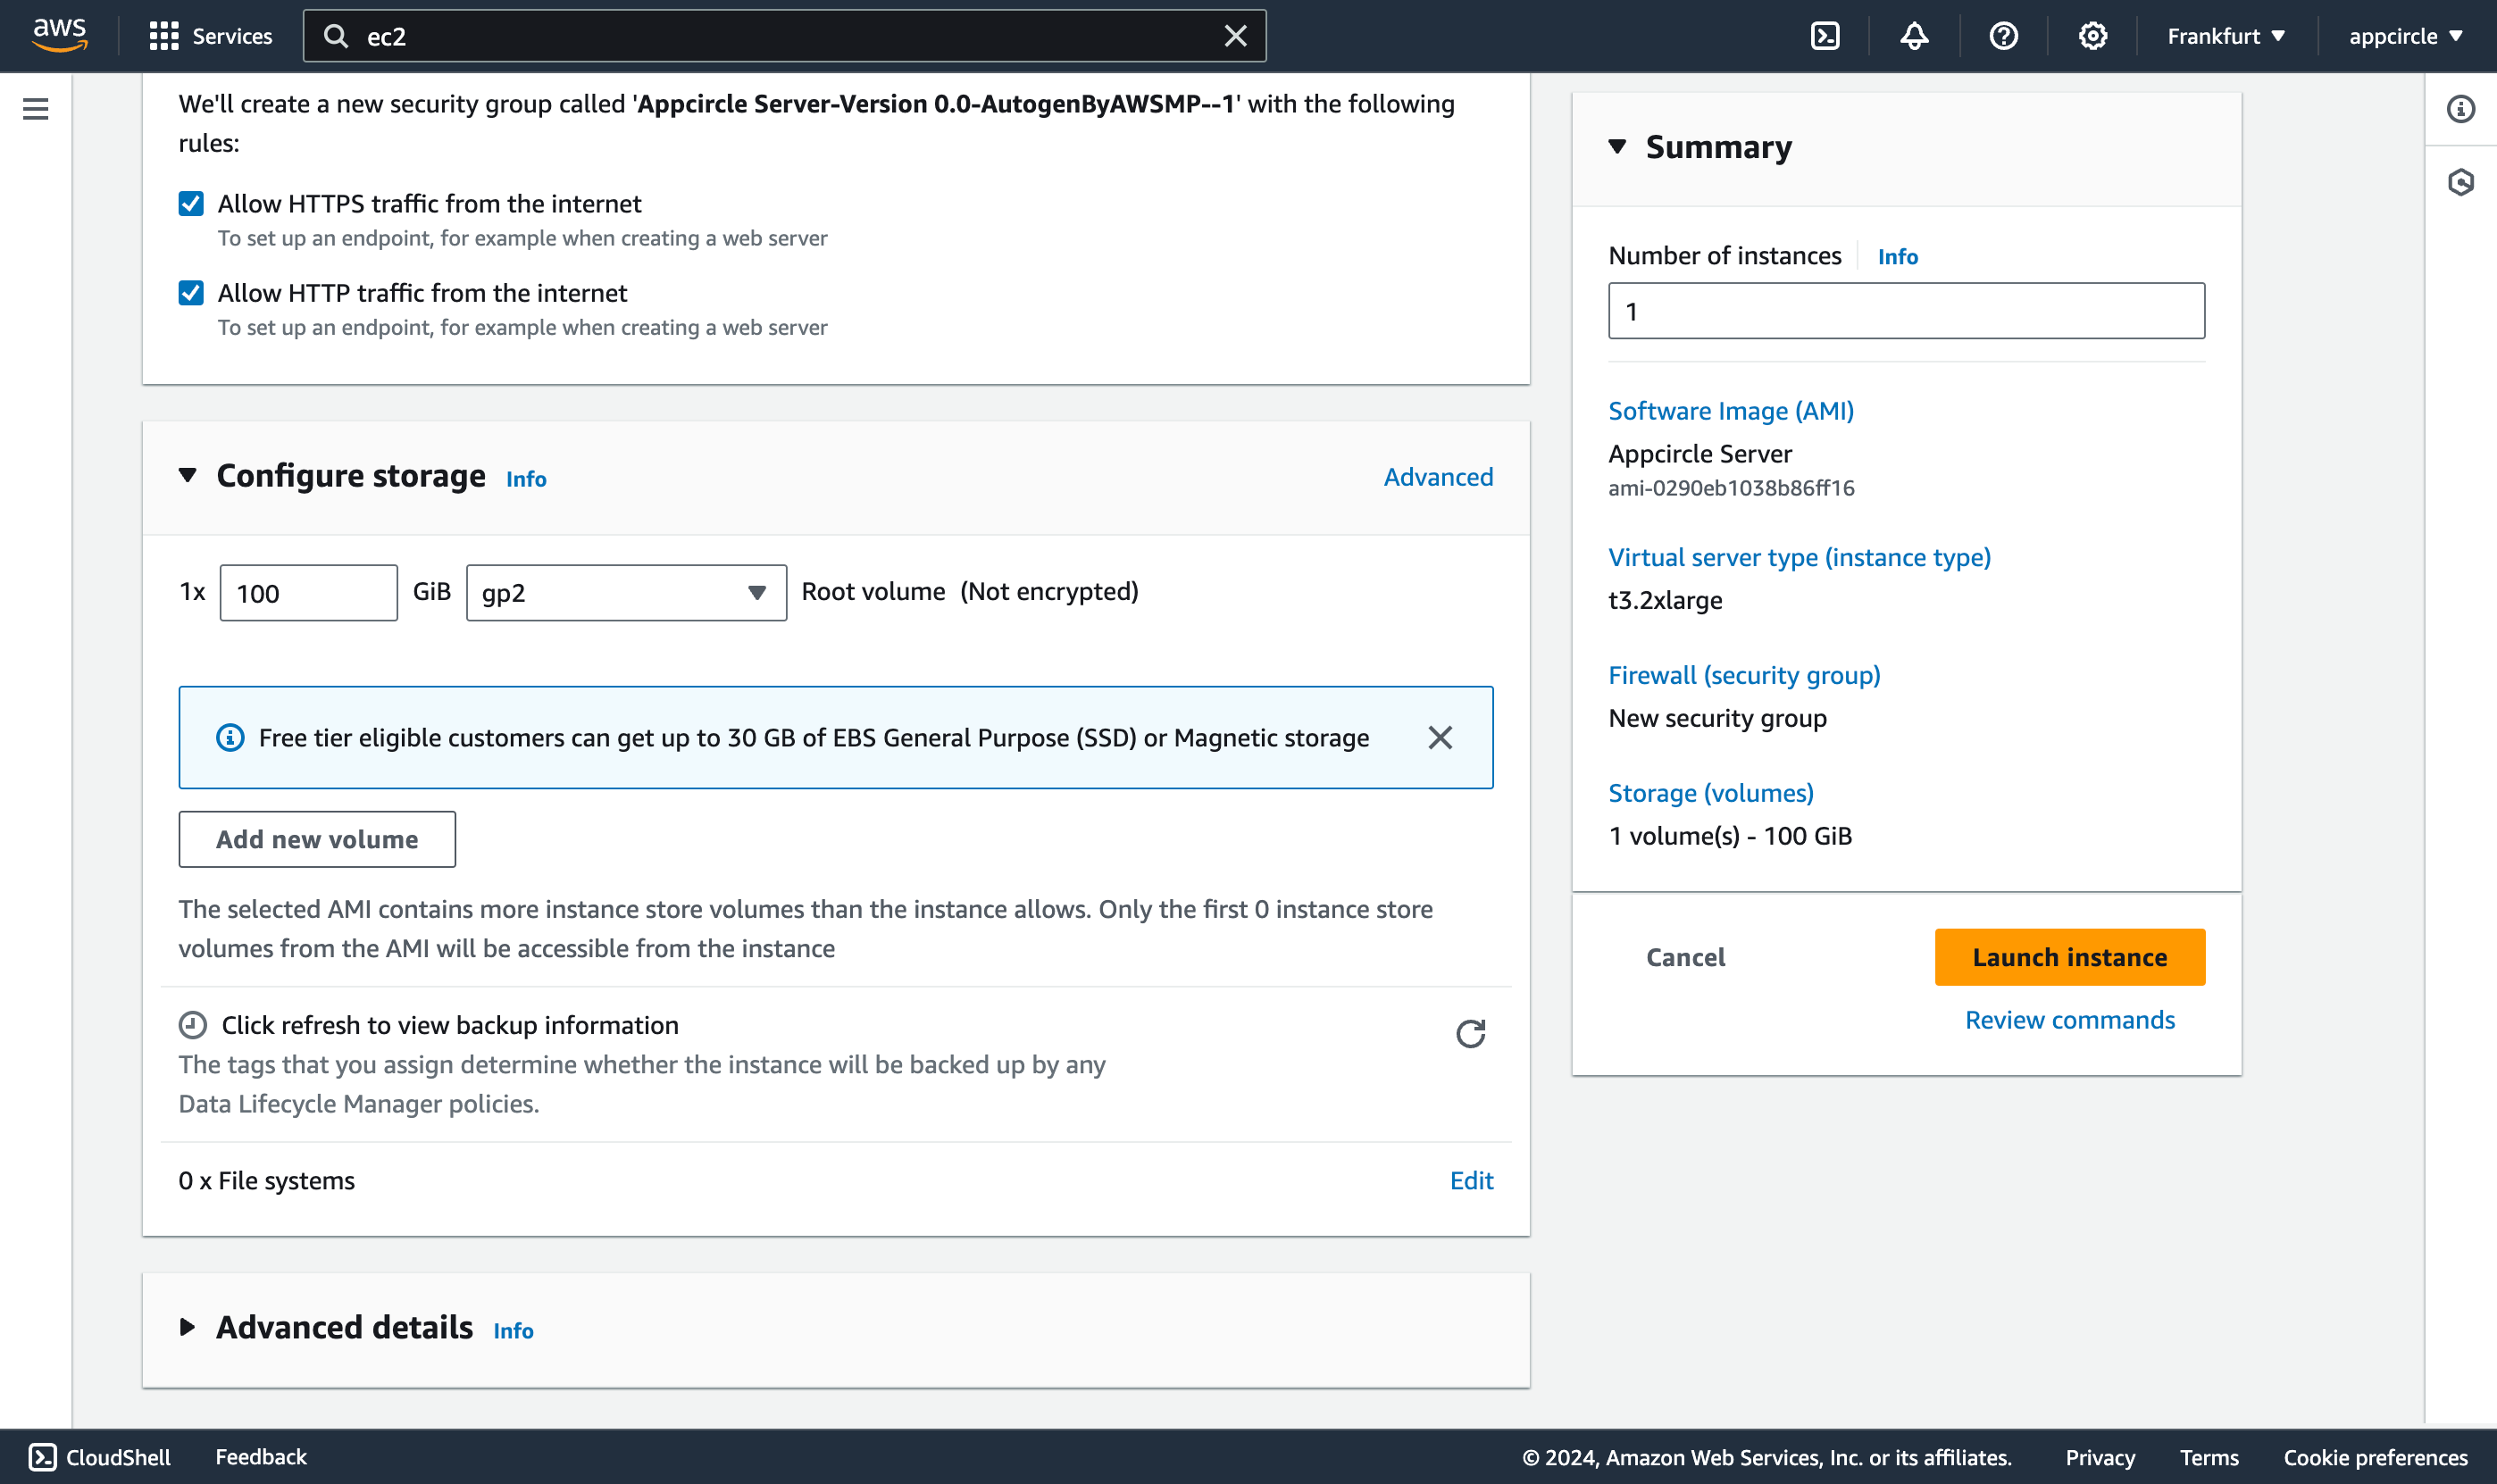
Now you're ready to click on the Launch Instance button to create the instance with the configuration you made.
The instance creation may take some time due to the AWS AMI subscriptions.
Please wait patiently while AWS creates your Appcircle server instance. If the instance is not created within 2 hours, you can follow the steps above and launch it again.
You can check the subscription in the "AWS Marketplace Subscriptions" service in the AWS console.
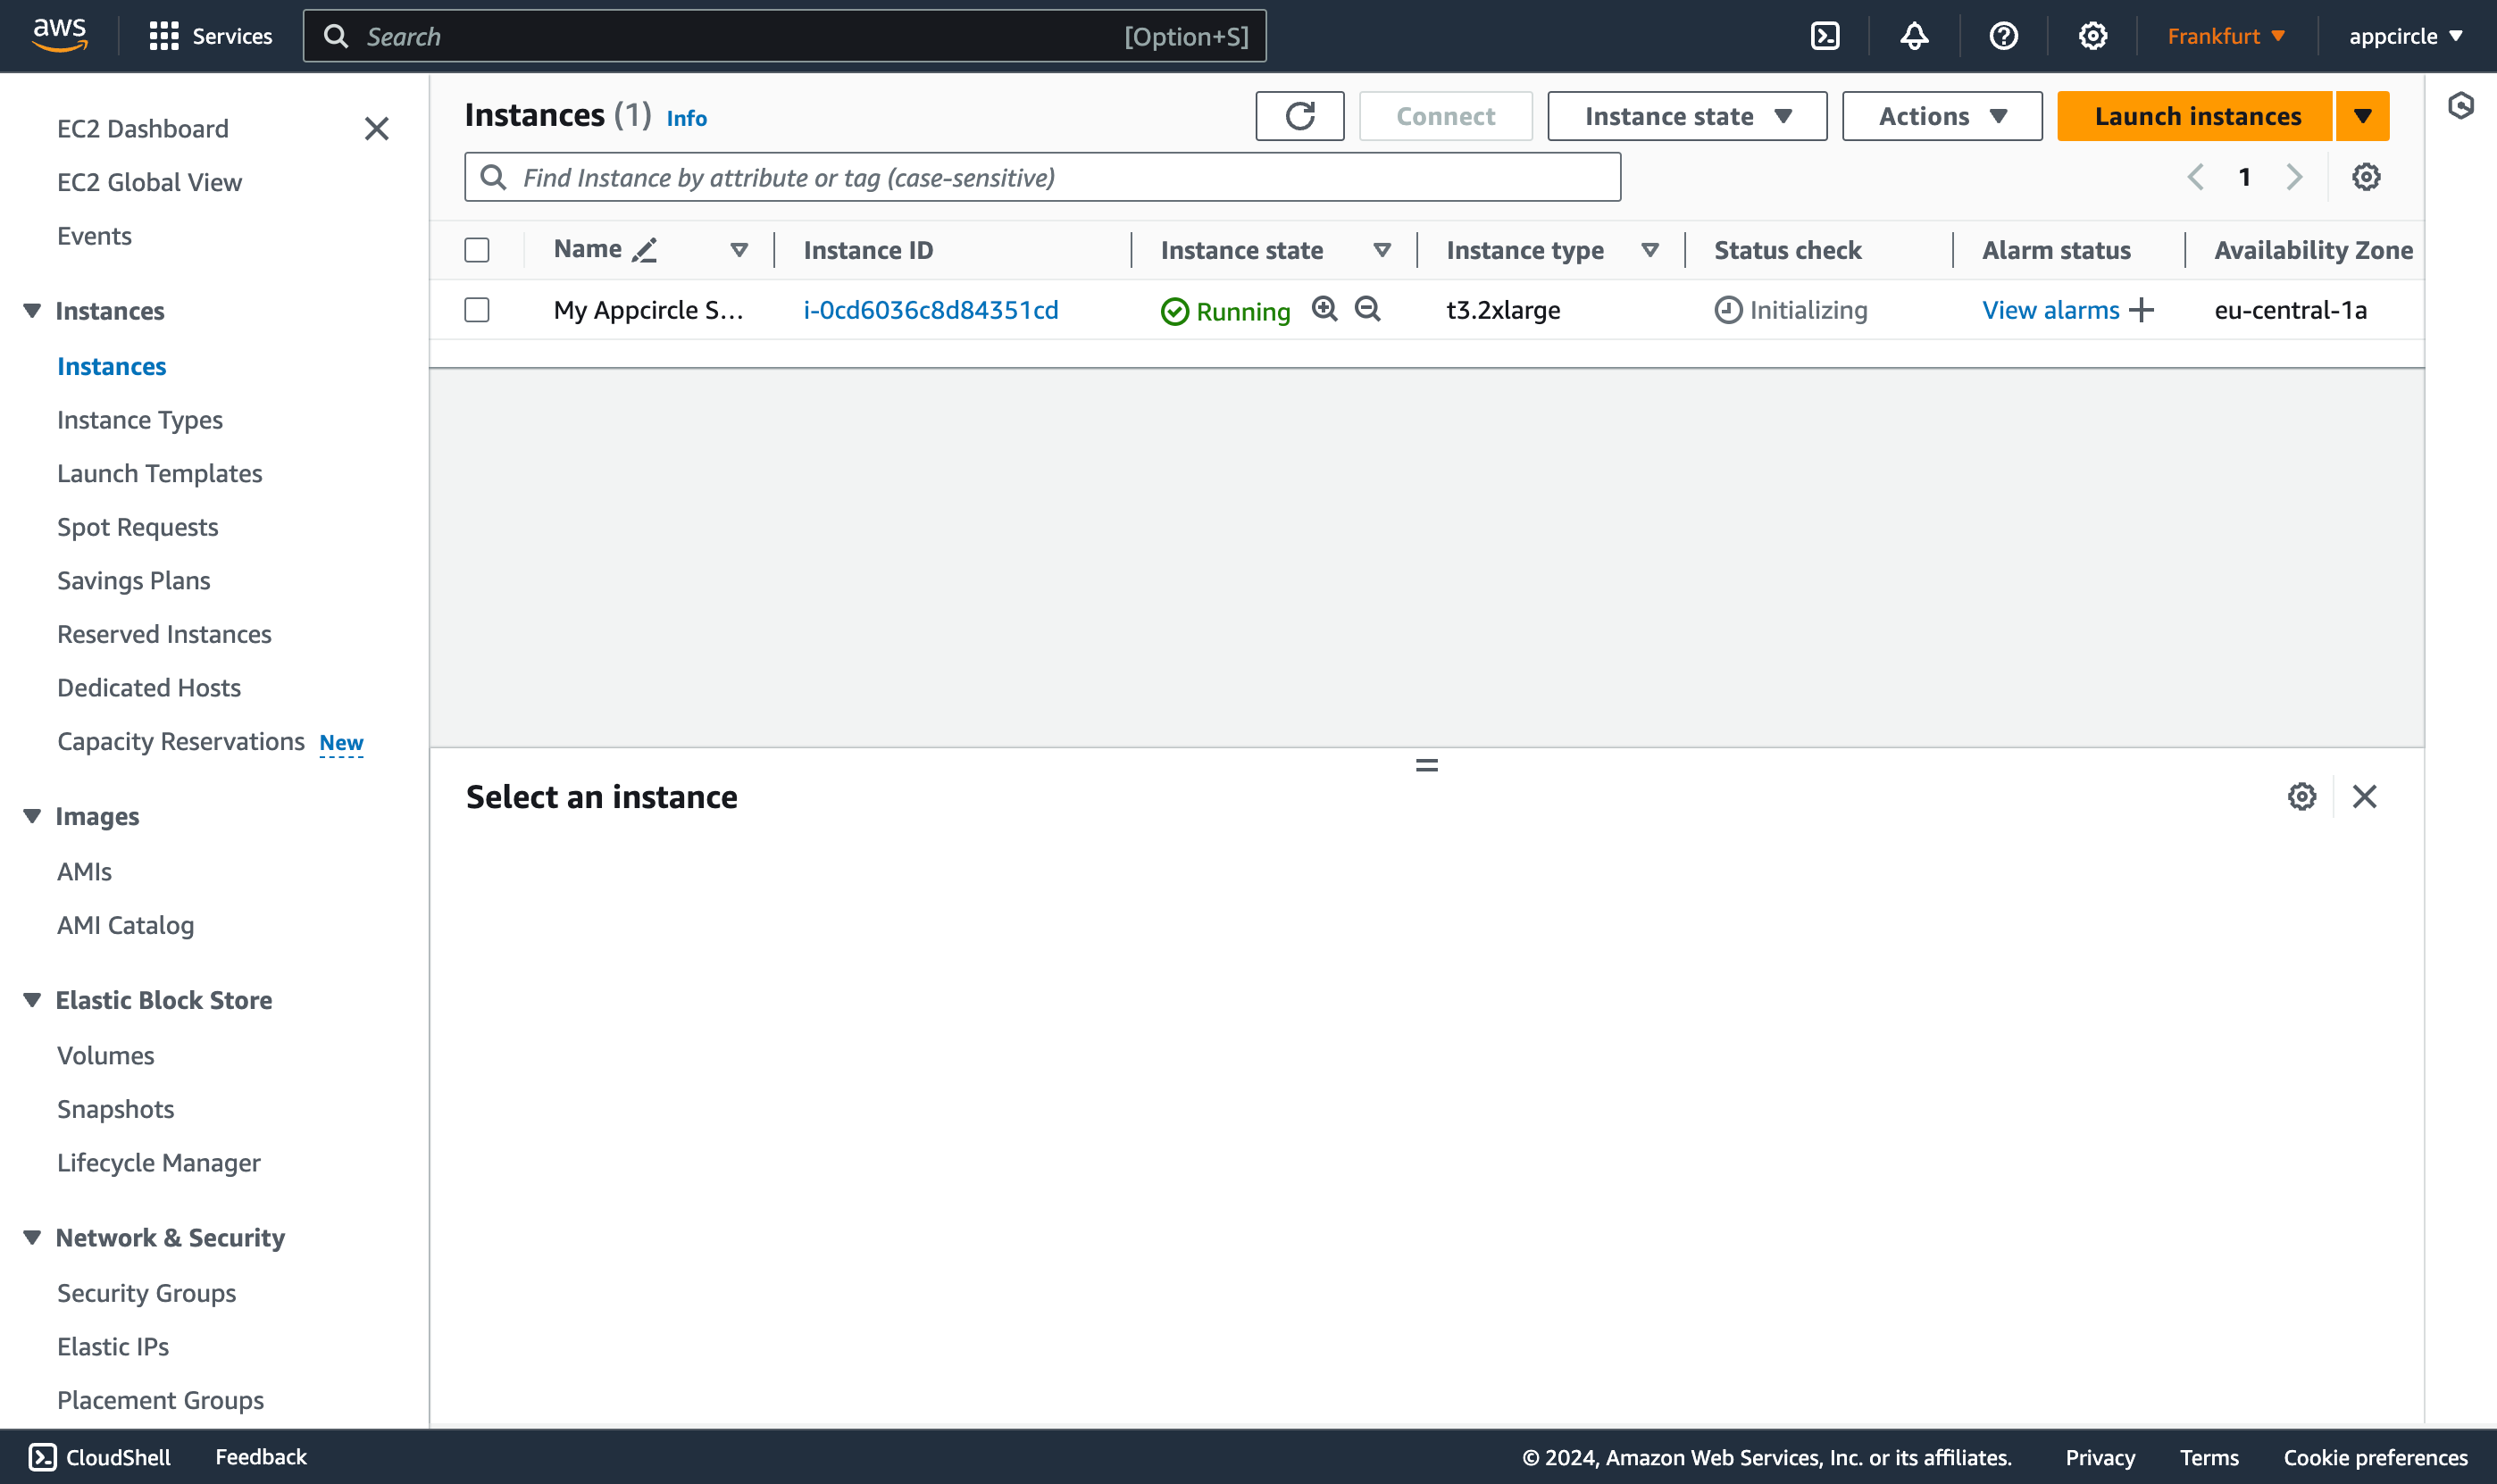
You can head to the EC2 Instances page to see if your server is up and running.
Configuring the Appcircle Server Instance
Connect via SSH
After you have successfully created an EC2 instance from the Appcircle server AMI, you can follow the steps below to configure it.
-
Get the IP address of the instance from EC2 dashboard.
- Networking > Networking Details > Public IPv4 address
- Or, Instance > Details > Public IPv4 address
-
Locate the SSH key pair, especially the private key, that you've created or used while configuring the instance.
-
Get an SSH connection tool like
puttyon Windows orsshon macOS and Linux to connect to the instance.
The ssh command below is for macOS and Linux. The other commands are the same after you connect to the instance.
Using private key and IP address, you can connect to the instance with SSH as seen below.
ssh -i "/path/to/your/private/key" ubuntu@ip-address-of-the-instance
The default user for the Appcircle AMI is ubuntu.
So, let's assume that your instance IP address is 34.205.139.17 and your private SSH key path is /home/spacetech/.ssh/id_rsa.
You can connect to the instance using the below command on macOS or Linux.
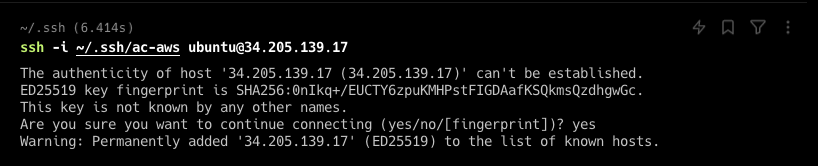
ssh -i "/home/spacetech/.ssh/id_rsa" ubuntu@34.205.139.17
When you "Create new key pair" while creating the instance from Appcircle AMI, the downloaded private key might cause a permission error when you try to connect to the instance. For instance;
... Permissions 0644 for 'MyCICDSSHKey.pem' are too open. It is required that zour private key files are NOT accessible by others. This private key will be ignored. ...
In this case, you need to change the permissions of the private key using the below command before connecting.
chmod 600 "/path/to/your/private/key"
It will be a one-time-operation that should be done once per private key.
The SSH command may ask you to add this server to the list of known hosts. You should write yes and hit enter.
Configure Server
After you successfully connect to the Appcircle instance, the first thing you should do is start a system update. Although the Appcircle server is up-to-date, it is recommended that you perform security updates again.
sudo apt update && \
sudo apt upgrade
The Appcircle server directory is located in the $HOME directory as the appcircle-server folder.
ls -l "$HOME"
Change the current working directory to that folder.
cd "$HOME/appcircle-server"
If you are a licensed user, please contact us to get the licensed Appcircle zip package. You should upgrade the pre-installed package in the instance.
Also, put the cred.json file you received from us into the appcircle-server folder.
Please contact us to purchase an enterprise license if you don't have one.
Now you're ready to configure the Appcircle server according to your needs.
- Follow the server configuration steps.
- Configure the DNS settings for your Appcircle server instance. Create
AandCNAMErecords for your instance. - Initialize the project.
- Run the server.
- Finally you can go to the Appcircle server dashboard using the main domain you defined.

Connecting Runners
When you complete installation successfully by following the above steps, you're ready for your first build. 🎉
But in order to run build pipelines, you need to install and connect self-hosted runners. We have a dedicated section for the installation and configuration of self-hosted runners. Follow and apply related the guidelines here.
Appcircle also supports the installation and execution of the runners on AWS.
You can see the details about how to configure a runner on AWS here.
The self-hosted runner section in the documents has all the details about runners and their configuration.
By default, self-hosted runner package has pre-configured ASPNETCORE_BASE_API_URL for Appcircle-hosted cloud.
https://api.appcircle.io/build/v1
☝ You need to change its value with your self-hosted Appcircle server's API URL.
Assuming our sample scenario explained in configuration, its value should be
http://api.appcircle.spacetech.com/build/v1
for our sample scenario.
🎗 After download, open appsettings.json with a text editor and change ASPNETCORE_BASE_API_URL value according to your configuration.
Please note that you should do this before registering.
Considering system performance, it will be good to install self-hosted runners on other machines. A self-hosted Appcircle server should run on a dedicated machine itself.
You can install any number of runners according to your needs and connect them to a self-hosted Appcircle server.
Need help?
Get help from Appcircle's support team, or see how others are using Appcircle by joining our Slack Channel.
![]()
Have questions? Contact us here.