Docker to Kubernetes Migration
Overview
This guide provides a step-by-step walkthrough for migrating your self-hosted Appcircle instance from a standalone Docker environment to a Kubernetes cluster. It assumes that you already have:
- A fully operational Docker deployment of Appcircle server.
- A Kubernetes cluster ready for deployment.
- A bastion host.
In this guide, the standalone Appcircle server refers to the machine that hosts the Appcircle server with Docker.
Also the bastion host refers to a machine with network access to both:
- The existing standalone Appcircle server.
- The Kubernetes cluster.
The bastion host serves as a central point for executing commands, transferring backup data, and applying configurations. During the migration process, you will:
- Copy configuration files and database backups from the Docker host to the bastion host.
- Use the bastion host to deploy and configure the new Appcircle instance in the Kubernetes cluster.
This migration process involves downtime. To minimize disruption, plan accordingly and:
- Back up all crucial data before starting the migration.
- Thoroughly review each step and ensure you understand its implications.
- Test the migration process in a staging or non-production environment if possible.
- Notify users about the expected downtime and migration schedule.
In this documentation, we will migrate from a standalone Appcircle server to a Kubernetes-based Appcircle server using the internal stateful applications (PostgreSQL, MongoDB, MinIO, Vault) provided by the Appcircle Helm chart.
If you choose to use external stateful services, you will need to adapt certain migration commands to fit your custom environment. Specific commands requiring modifications for external deployments are highlighted in the relevant sections of this documentation.
In the case of using external stateful services, the bastion host requirements should be adjusted to meet your specific setup. For example, the storage and access requirements for the external databases and services will need to be accounted for during the migration. Please ensure that your bastion host is configured with appropriate resources and network access to support these external services.
Do not change any configurations on your standalone Appcircle server or on the K8s configuration file during the migration process.
Any changes made before the successful migration to Kubernetes are unsupported and may lead to data loss or unexpected behavior.
If you need to modify configurations such as SMTP settings, wait until the migration is complete and then use the relevant configuration documentation to make the changes on the Kubernetes-based Appcircle server.
Prerequisites
To complete this guide, you must have the following:
1. Domain Name
A main domain name, which will have subdomains, is required for the Appcircle server. Since the standalone Appcircle server already has a configured domain name, you should retain the same domain name when migrating to the Kubernetes cluster.
In this documentation, we will use appcircle.spacetech.com as an example main domain and spacetech as an example organization name.
Click to view more details about domain name prerequisite.
By default, Appcircle uses seven subdomains. These subdomains are:
- api.appcircle.spacetech.com
- auth.appcircle.spacetech.com
- dist.appcircle.spacetech.com
- hook.appcircle.spacetech.com
- resource.appcircle.spacetech.com
- my.appcircle.spacetech.com
- redis.appcircle.spacetech.com
Upon completing the deployment of the Appcircle server, you will need to create DNS records based on the Ingress objects created in Kubernetes.
2. SSL Certificate
If the standalone Appcircle server is already using HTTPS, you should provide an SSL certificate for the Appcircle server Kubernetes deployment.
You can reuse the SSL certificates from your standalone Appcircle server for the Kubernetes deployment. These certificates can be found in your standalone server's global.yaml or user-secret file. This will ensure consistency and avoid the need to generate new certificates.
If the standalone Appcircle server uses HTTP, you can skip configuring an SSL certificate.
Click to view more details about SSL certificate prerequisite.
-
The SSL certificate private key shouldn't be password protected.
-
The SSL certificate should be in PEM format.
-
Ensure the one certificate covers all the subdomains in the domain name section.
-
Make sure to configure the Appcircle server with a fullchain certificate, which should include the leaf (or app) certificate, intermediate certificates, and the root certificate.
You can use a wildcard certificate to cover all the subdomains, simplifying the certificate management process. For example, a wildcard certificate for *.appcircle.spacetech.com will be enough.
If you use a domain like appcircle.spacetech.com, it will have two levels of subdomains. Ensure that both your DNS provider and SSL certificate provider support multi-level subdomains for proper configuration.
3. Kubernetes Cluster
A Kubernetes cluster is required to install the Appcircle server using Helm.
Minimum hardware requirements for enterprise installation:
- Node(s) with
x86_64architecture - 8 CPUs
- 16 GB RAM
- 50 GB Disk per node
The required storage size for the Appcircle server depends significantly on the size of artifacts, such as APK, IPA, and cache files.
Since you already have a running standalone Appcircle server, you should check its data sizes and adjust the storage sizes for the Kubernetes deployment accordingly by continuing to follow this documentation.
Click to view more details about Kubernetes cluster prerequisite.
Recommended hardware requirements for enterprise installation:
- Nodes with
x86_64architecture - 32 CPUs
- 64 GB RAM
- 1 TB Disk
For production environments, if you deploy stateful applications with the Appcircle Helm chart, you will need significant storage capacity, as specified above. You can configure disk resource allocations through Helm values according to your needs.
However, if you opt to use external services for components such as PostgreSQL or MinIO, the storage requirements for the cluster are significantly reduced to around 50GB. It is highly recommended to deploy stateful apps outside of the Appcircle Helm chart configuration.
For stateful apps that should deployed out of scope this helm chart, you can check the Production Readiness document.
For storage details, you can check the Storage Class Configuration section.
Using SSD storage is highly recommended if stateful applications are installed within the Appcircle Helm chart scope. SSDs provide faster read/write speeds, improving the performance and responsiveness of your applications.
Additionally, ensure that your Kubernetes version is 1.29.1 or later to maintain compatibility and support.
4. Bastion Host
The bastion host should meet the following requirements to facilitate the migration from the standalone Appcircle server to the Kubernetes Appcircle server:
Hardware Requirements
- 2 CPUs
- 4 GB RAM
- Sufficient disk space for migration tasks. The disk space requirement will depend on the total size of the PostgreSQL, MongoDB, and Vault data of the standalone Appcircle server. You can easily see the data size of the standalone Appcircle server by checking this section.
- MinIO disk space is not a concern, as the data is directly copied between the source and target servers without being stored on the bastion host.
Ensure the bastion host has enough storage to temporarily hold any necessary migration files, but do not expect it to store the data long-term.
Software Requirements
-
Operating System: The bastion host should be a Linux machine. You can use any popular/mainstream Linux distribution such as Ubuntu, Debian, Red Hat, CentOS, etc.
-
Required Tools:
kubectl: For managing Kubernetes clusters.helm: For deploying and managing Helm charts.ssh: For connecting to the standalone Appcircle server.- Any other tools or dependencies needed for specific migration steps will be detailed in those steps.
-
Network Configuration: Ensure the bastion host can reach both the standalone Appcircle server and the Kubernetes cluster over the required network ports.
-
Resource Accesses: The user on the bastion host must have:
- Standalone Appcircle server access: The bastion host should have SSH access to the standalone Appcircle server.
- Kubernetes Access: The bastion host should be able to access the Kubernetes cluster API with
kubectlfor deploying Appcircle server.
Pre-installation Steps
1. Ingress Controller
The Kubernetes cluster should have an Ingress controller installed and configured since Appcircle exposes its services through Ingress objects.
For trial purposes, you can use the default Ingress-Nginx controller deployed within the Helm chart scope and skip this section.
You can check the default Ingress-Nginx controller values and configure as your needs by checking the Ingress Configuration documentation.
For production environments, it's recommended to use your own Ingress controller.
Appcircle server supports Ingress-Nginx controller by default. To install Ingress-Nginx controller to the Kubernetes cluster, please check the Ingress-Nginx controller documentation.
Other Ingress controllers like HAProxy Ingress controller are also supported by modifying Helm values accordingly.
Enable SSL Passthrough
You can skip this section if you use the default Ingress-Nginx controller deployed within the Helm chart scope.
Enable ssl-passthrough feature on your ingress-controller Enabling the SSL passthrough depends on the Ingress controller that is used in the Kubernetes cluster. For example:
-
For Nginx Ingress controller, you can check the Nginx documentation.
-
For HAProxy Ingress controller, you can check the HAProxy documentation.
Enabling the SSL passthrough option does not automatically allow all SSL traffic from all Ingress objects to pass through to the original service. Instead, it enables Ingress resources to leverage the SSL passthrough feature, allowing encrypted traffic to reach the backend service without being decrypted by the Ingress controller.
Ingress Configurations
You can skip this section if you use the default Ingress-Nginx controller deployed within the Helm chart scope.
Configure the Appcircle ingresses for production usage. For more details, please check the Ingress Configuration documentation.
2. Production Readiness
If you are deploying the Appcircle server for a production environment, it is recommended that stateful applications, such as databases or object storage, be deployed outside the scope of the Appcircle server Helm chart.
For more information, you can check the Production Readiness documentation.
3. Standalone Appcircle Server Steps
This section outlines the essential steps to back up data from your existing Standalone Appcircle server installation and prepare your Kubernetes environment for the migration.
You will:
- Create a directory on the bastion host to store backups.
- Backup configuration files, secrets, and database credentials from the Standalone Appcircle server host.
Before starting, create a full backup of your Appcircle server. Options include:
- Creating a VM snapshot of the Docker host.
- Using a backup tool specific to your infrastructure.
- Ensuring configuration files and database dumps are included in your backups.
1. Create a Migration Directory
On your bastion host, create a directory to store all migration files:
mkdir appcircle-k8s-migration
2. Backup Appcircle Configuration Data
On the standalone Appcircle server, execute the following commands to back up the necessary files. Transfer the outputs to the migration directory on the bastion host.
-
Appcircle Server Directory: Change directory to the
appcircle-server.cd appcircle-serverinfoThe
spacetechin the example codes below are example project name.Please find your own project name and replace
spacetechwith your project name.To see projects, you can check the
projectsdirectory.ls -l ./projects -
global.yamlConfiguration: Print theglobal.yamlfile and save it on the bastion host:cat projects/spacetech/global.yaml -
User Secrets: Decode and print the
user-secretfile and save it on the bastion host:cat projects/spacetech/user-secret | base64 -d -
Generated Secrets: Print the
generated-secret.yamlfile and save it on the bastion host:cat projects/spacetech/generated-secret.yaml -
cred.jsonfile: Print thecred.jsonfile and save it on the bastion host:cat cred.json
3. Check the Data Size on the Standalone Appcircle Server
-
Log in to the standalone Appcircle server:
-
Change directory to the
appcircle-server:cd appcircle-server
The spacetech in the example codes below are example project name.
Please find your own project name and replace spacetech with your project name.
To see projects, you can check the projects directory.
ls -l ./projects
-
Get the volume sizes:
export APPCIRCLE_DISK_USAGE=$(docker system df -v) -
Check the MinIO data size:
echo "$APPCIRCLE_DISK_USAGE" | grep "spacetech_minio_snsd_data" -
Check the MongoDB data size:
echo "$APPCIRCLE_DISK_USAGE" | grep "spacetech_mongo_data1" -
Check the PostgreSQL data size:
echo "$APPCIRCLE_DISK_USAGE" | grep "spacetech_posgresqlData" -
Check the Vault data size:
echo "$APPCIRCLE_DISK_USAGE" | grep "spacetech_vault_data"
You will use those values while configuring the values.yaml of the Appcircle server Helm chart.
4. Make Sure the Standalone Appcircle Server Is Running
Before proceeding with the migration, verify that the standalone Appcircle server is operational and healthy. This ensures you can create accurate backups without issues.
-
Log in to the standalone Appcircle server:
-
Change directory to the
appcircle-server:cd appcircle-server -
Check the health status of the standalone Appcircle server:
infoThe
spacetechin the example codes below are example project name.Please find your own project name and replace
spacetechwith your project name.To see projects, you can check the
projectsdirectory.ls -l ./projects./ac-self-hosted.sh -n spacetech check
5. Check the Standalone Appcircle Server Version
Before the migration, you should check the version of the Appcircle server and take the following actions:
-
Check the latest standalone Appcircle server version:
Please check the standalone Appcircle server version history to learn the latest version.
-
Log in to the standalone Appcircle server:
-
Change directory to the
appcircle-server:cd appcircle-server -
Check the Appcircle server version:
infoThe
spacetechin the example codes below are example project name.Please find your own project name and replace
spacetechwith your project name.To see projects, you can check the
projectsdirectory.ls -l ./projects./ac-self-hosted.sh -n spacetech version-
If the version of the standalone Appcircle server is the latest:
- You can proceed with using the latest Appcircle Helm chart.
-
If the Appcircle server version is greater than or equal to
3.23.2:- You may opt to install a Helm chart version that corresponds to your specific standalone Appcircle server version.
- Please check the version history of the Helm chart and use the latest Helm chart version for that version.
-
If the Appcircle server version is earlier than
3.23.2:- Update the standalone Appcircle server to at least version
3.23.2prior to initiating the migration.
- Update the standalone Appcircle server to at least version
-
6. Find the Organization Name
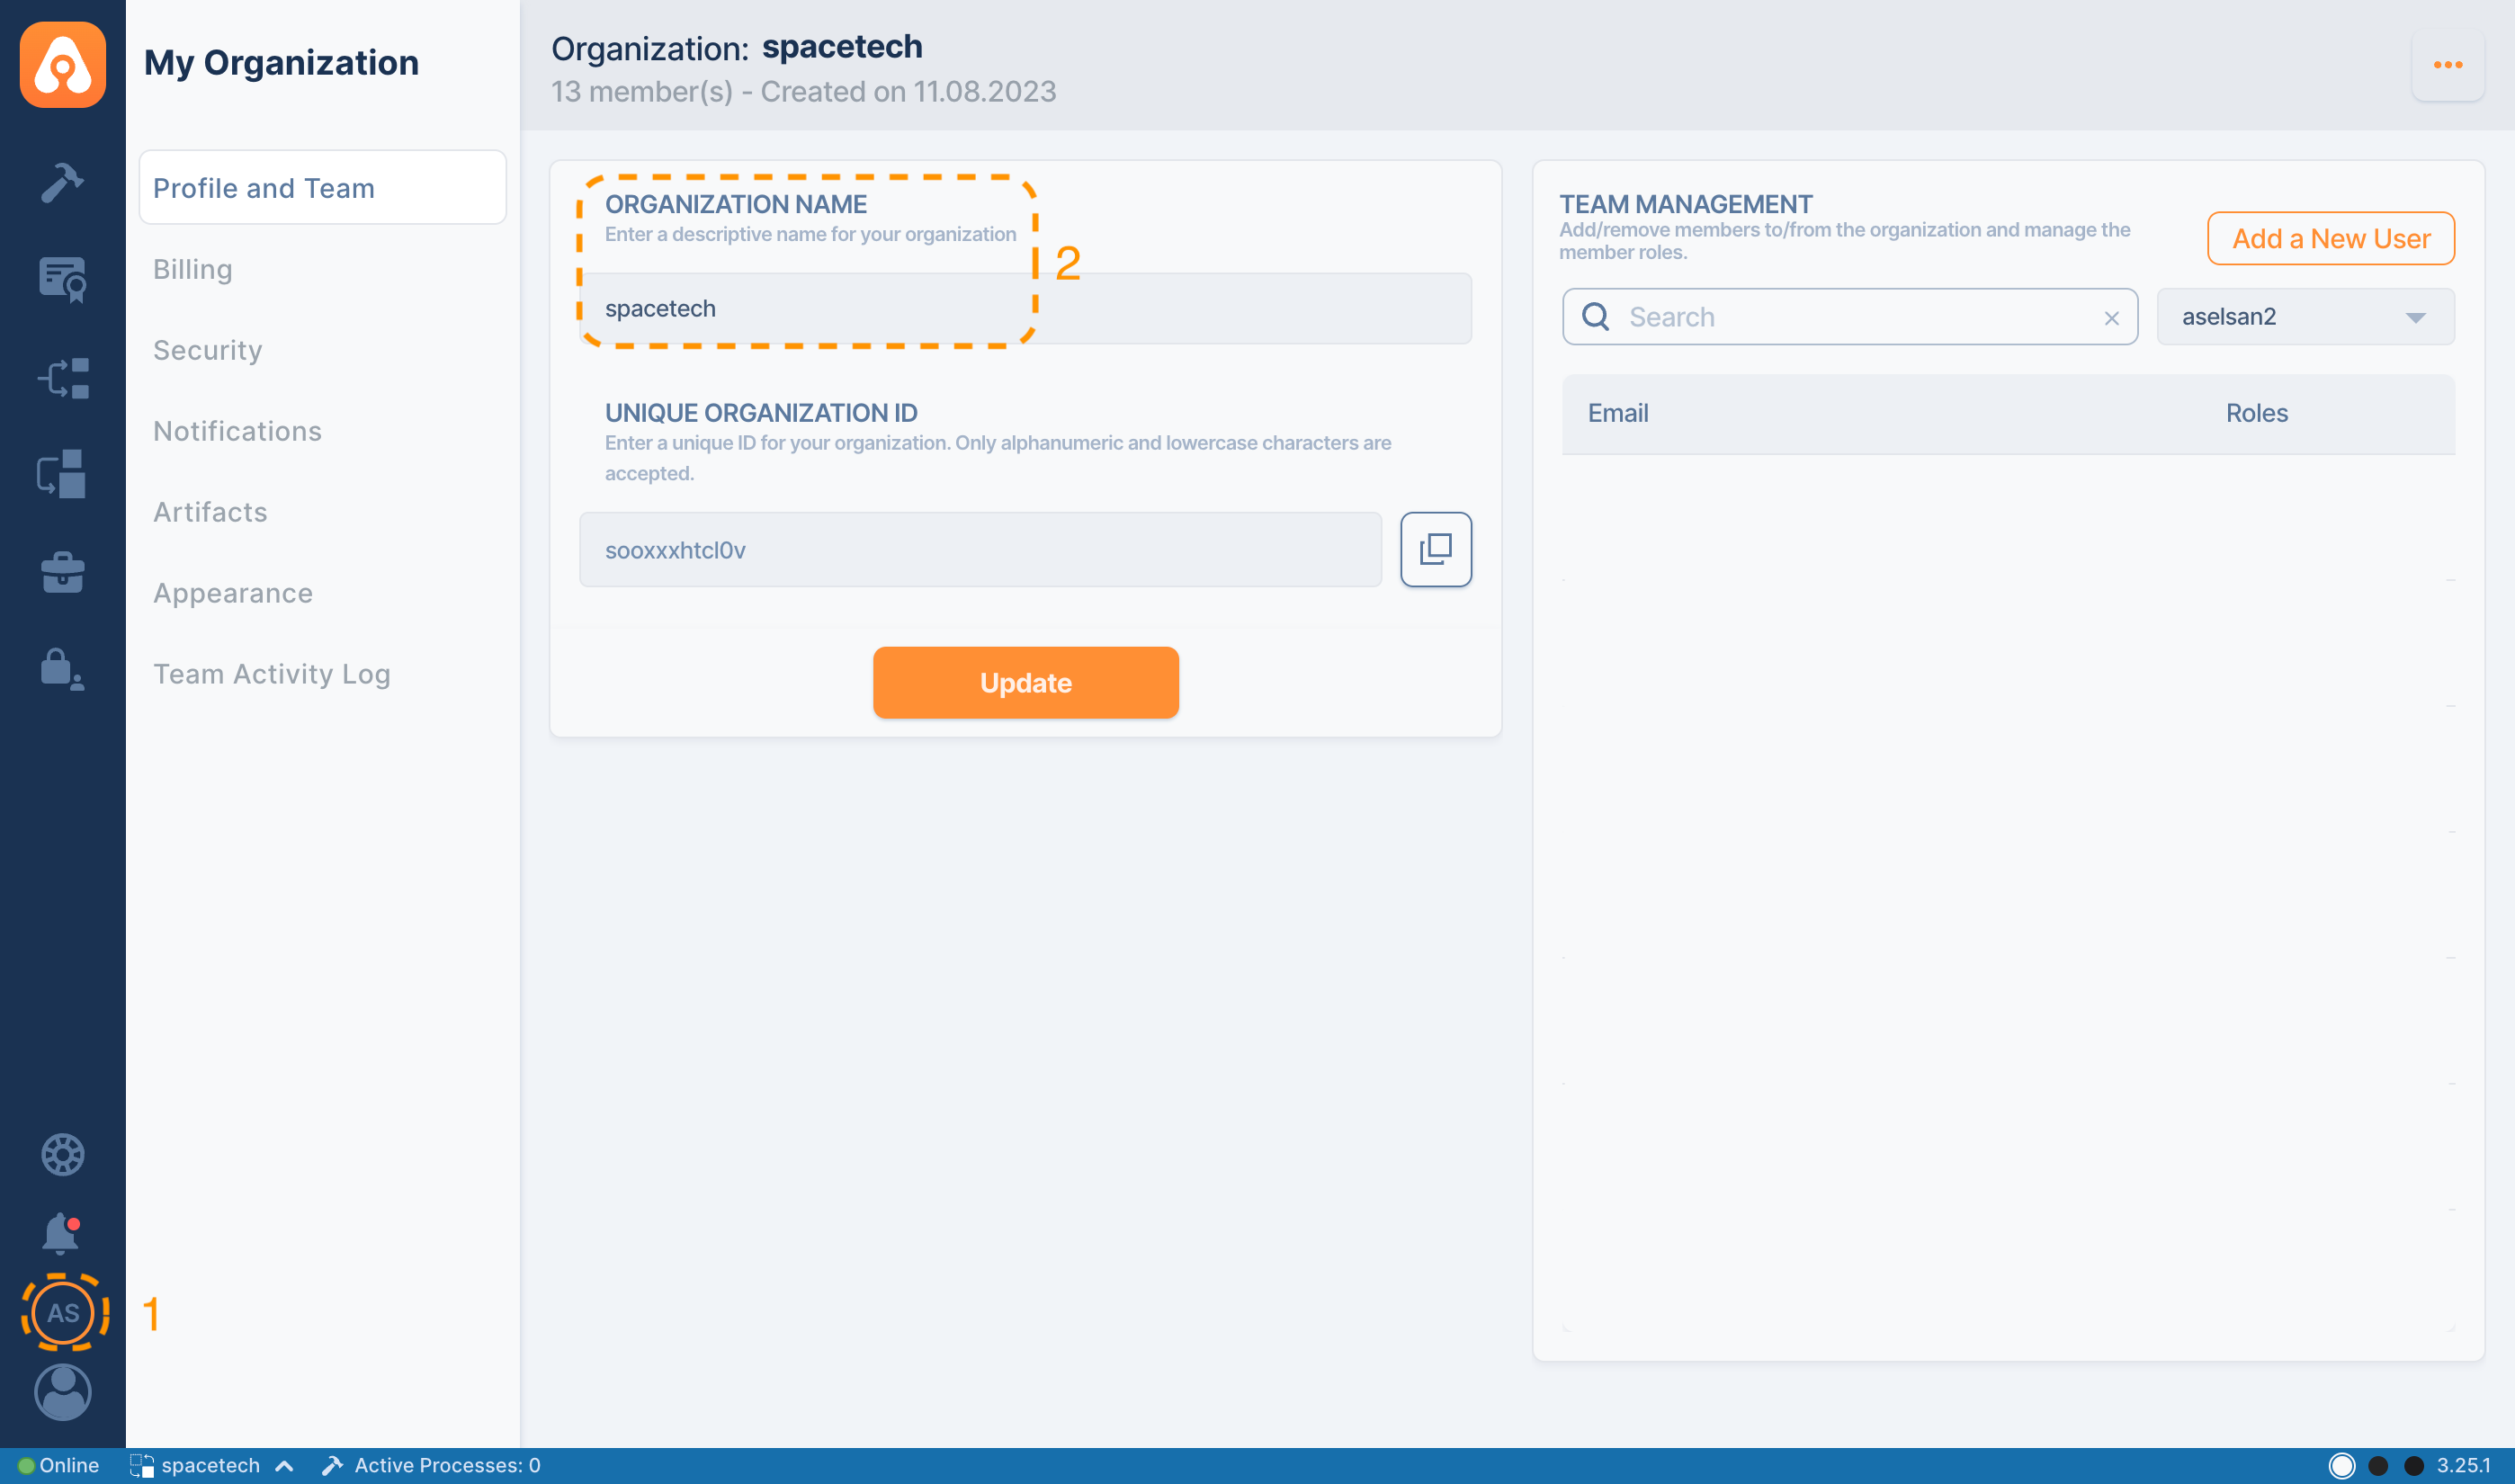
To migrate the Appcircle server data, you should find the name of the current organization.
To find the organization name:
- Go to the standalone Appcircle server dashboard.
- Switch to the root organization.
- Navigate to your Organization page to retrieve the details.
- You can directly see the organization name in the UI.
- Save the organization name to use on the next steps.
7. Stop the Standalone Appcircle Server Requests.
For the migration, there should be no running builds on the Appcircle during the migration. Also prevent external requests while keeping the server healthy by stopping the Nginx service.
-
Log in to the standalone Appcircle server:
-
Change directory to the
appcircle-server:cd appcircle-server -
Change directory to the
exportdirectory of the project:infoThe
spacetechin the example codes below are example project name.Please find your own project name and replace
spacetechwith your project name.To see projects, you can check the
projectsdirectory.ls -l ./projectscd projects/spacetech/export -
Stop the Nginx service:
docker compose stop nginx
Installation
1. Create values.yaml
Below is a minimal values.yaml file that you should configure for your deployment.
Please adjust these values according to your environment requirements and save your file.
In the example values below, we used spacetech as an example organization name. You should replace it with your actual organization name or any other value you prefer.
Please review the comments for the values.yaml below. If the values provided are incompatible, the installation may not complete successfully. Ensure that all configurations are correctly entered to avoid potential issues during the setup process.
- Minimal Configuration
- Production Configuration
Click to view example values.yaml file.
# Global configurations for Appcircle deployment
global:
  urls:
    # Main domain configuration - All Appcircle services will be subdomains of this domain
    # Use the same domain as specified in the `global.yaml` file of the standalone Appcircle server.
    domainName: .appcircle.spacetech.com
  # SMTP server configuration for sending emails (Authentication, Notifications, Testing Distribution)
  # Use the same SMTP settings as specified in the `global.yaml` file of the standalone Appcircle server.
  mail:
    smtp:
      # SMTP server host
      host: "smtp.spacetech.com"
      # SMTP Server port, 587 typically used for StartTLS
      port: "587"
      # Email address that will be used as sender
      from: "admin@spacetech.com"
      # SSL configuration - Set to 'true' if the SMTP server uses SSL/TLS protocol for secure communication, typically on port 465.
      ssl: "false"
      # StartTLS configuration - Set to 'true' if the SMTP server uses StartTLS protocol, typically on port 587.
      tls: "true"
      # SMTP authentication settings
      auth: "true"
      username: "smtpUserName"
      password: "superSecretSmtpPassword"

# Authentication configuration
auth:
  auth-keycloak:
    # Initial admin user email for Appcircle server
    initialUsername: "admin@spacetech.com"
signingidentity:
  vaultServicePrefix: signing
Click to view example values.yaml file.
# Global configurations for Appcircle deployment
global:
  urls:
    # Main domain configuration - All Appcircle services will be subdomains of this domain
    # Use the same domain as specified in the `global.yaml` file of the standalone Appcircle server.
    domainName: .appcircle.spacetech.com
    # Protocol to be used for connections
    # Use the same scheme settings as specified in the `global.yaml` file of the standalone Appcircle server.
    scheme: https

  # SMTP server configuration for sending emails (Authentication, Notifications, Testing Distribution)
  # Use the same SMTP settings as specified in the `global.yaml` file of the standalone Appcircle server.
  mail:
    smtp:
      # SMTP server host
      host: smtp.spacetech.com
      # SMTP Server port, 587 typically used for StartTLS
      port: 587
      # Email address that will be used as sender
      from: admin@spacetech.com
      # SSL configuration - Set to 'true' if the SMTP server uses SSL/TLS protocol for secure communication, typically on port 465.
      ssl: "false"
      # StartTLS configuration - Set to 'true' if the SMTP server uses StartTLS protocol, typically on port 587.
      tls: "true"
      # SMTP authentication settings
      auth: "true"
      username: smtpUserName
      # You can create a secret with the password or directly enter the password here.
      password: superSecretSmtpPassword

  # If the K8s cluster access the container images from a private container image registry, you can configure it here.
  # Container Image Registry host for container images
  imageRegistry: europe-west1-docker.pkg.dev
  # Container Image Repository path between registry host and image name
  imageRepositoryPath: appcircle/docker-registry

  # Kubernetes Ingress controller class
  ingressClassName: "nginx"

  # SSL/TLS certificate configuration for HTTPS
  # You can create a secret with the certificate and key or directly enter them here.
  tlsWildcard:
    # Public certificate - Fullchain including leaf (app), intermediate and root SSL certificates
    cert: |
      -----BEGIN CERTIFICATE-----
      MIIFzTCCBLWgAwIBAgISBMLn5uQI6Wmzku14xXUbbIbmMA0GCSqGSIb3DQEBCwUA
      ...
      SA==
      -----END CERTIFICATE-----
      -----BEGIN CERTIFICATE-----
      MIIFBjCCAu6gAwIBAgIRAIp9PhPWLzDvI4a9KQdrNPgwDQYJKoZIhvcNAQELBQAw
      ...
      uYkQ4omYCTX5ohy+knMjdOmdH9c7SpqEWBDC86fiNex+O0XOMEZSa8DA
      -----END CERTIFICATE-----
      -----BEGIN CERTIFICATE-----
      MIIFazCCA1OgAwIBAgIRAIIQz7DSQONZRGPgu2OCiwAwDQYJKoZIhvcNAQELBQAw
      ...
      emyPxgcYxn/eR44/KJ4EBs+lVDR3veyJm+kXQ99b21/+jh5Xos1AnX5iItreGCc=
      -----END CERTIFICATE-----
    # Private key for the SSL certificate
    key: |
      -----BEGIN PRIVATE KEY-----
      MIIEvwIBADANBgkqhkiG9w0BAQEFAASCBKkwggSlAgEAAoIBAQC3wS87baGONXjr
      ...
      oUcjMAu/mGJjtn9AS0S7rRa58Q==
      -----END PRIVATE KEY-----
    # Certificate Authority public key - Typically the bottom certificate of the fullchain SSL certificate
    caCert: |
      -----BEGIN CERTIFICATE-----
      MIIFazCCA1OgAwIBAgIRAIIQz7DSQONZRGPgu2OCiwAwDQYJKoZIhvcNAQELBQAw
      ...
      emyPxgcYxn/eR44/KJ4EBs+lVDR3veyJm+kXQ99b21/+jh5Xos1AnX5iItreGCc=
      -----END CERTIFICATE-----
# Authentication configuration
auth:
  auth-keycloak:
    # Organization name for Appcircle server
    organizationName: spacetech
    # Initial admin user email for Appcircle server
    initialUsername: "admin@example.com"
    # Initial admin password - Should contain: min 6 chars, 1 lowercase, 1 uppercase, 1 number
    # You can create a secret with the password or directly enter the password here
    initialPassword: "superSecretAppcirclePassword1234"
    image:
      # Appcircle keycloak image repository path
      repository: europe-west1-docker.pkg.dev/appcircle/docker-registry/appcircle-keycloak

# Internal Ingress controller configuration
ingress-nginx:
  enabled: false

# Appcircle vault configuration
vault:
  server:
    image:
      # Appcircle vault image repository path
      repository: europe-west1-docker.pkg.dev/appcircle/docker-registry/appcircle-vault

# Web event Redis configuration
webeventredis:
  # Enable TLS for Redis connections
  tls:
    enabled: true
  # Ingress configuration for Redis
  ingress:
    enabled: true
    tls: true

signingidentity:
  vaultServicePrefix: signing
2. Remove Sensitive Information From values.yaml
Remove sensitive information such as Appcircle initial user password, SMTP password, SSL certificates, and other secrets from the values.yaml for production environments, by checking the Sensitive Values documentation.
3. Prepare values.yaml for Migration
Update your values.yaml file with the following configurations before deploying the Helm chart to ensure a smooth migration process.
Storage Updates
After checking the data size on the standalone Appcircle server, configure the storage sizes in values.yaml to meet or exceed your current data size requirements. Adequate storage is essential for a successful migration and seamless operation of the Appcircle server.
For detailed instructions, refer to the storage configuration page.
SSL Updates
The SSL configuration of the Appcircle server Helm chart should match the SSL configuration used by the standalone Appcircle server.
- If the standalone server is using HTTPS, configure the Helm chart for HTTPS.
- For more information about the SSL configuration, please check the SSL configuration page.
- If the server is running on HTTP, adjust the Helm chart configuration for HTTP.
Keycloak Updates
Ensure the organizationName and initialOrganizationId in the values.yaml file match those in the standalone Appcircle server.
To locate the initialOrganizationId:
- Login to the bastion host.
- Change directory to the location where you have saved the backup files.
cd appcircle-k8s-migration
- Check the
initialOrganizationIdvalue.
grep 'initialOrganizationId' generated-secret.yaml
- Also get the organization name you have checked from the step above.
Here’s an example configuration for values.yaml:
auth:
  auth-keycloak:
    replicas: 0
    organizationName: spacetech
    initialOrganizationId: fb**************a7
auth-keycloak.replicas: 0** disables Keycloak during the migration to avoid authentication conflicts.
MongoDB Updates
Set the resources preset to "large" for the migration phase to provide MongoDB with sufficient resources for handling larger datasets.
Example configuration:
mongodb:
  resourcesPreset: "large"
KVS Subdomain
The redis subdomain used on the standalone Appcircle server has been updated to kvs in the Helm configuration for the Kubernetes deployment.
If you want to update to the kvs subdomain:
- No changes are needed in the
values.yamlfile. - Add the
kvsDNS record for the new subdomain. - Update the Appcircle runner configurations to point to the new
kvssubdomain.
If you prefer to keep the redis subdomain (recommended):
-
Add the following configuration to the
values.yamlfile:global:urls:webEventRedis:subdomain: redis -
No new DNS record is required.
-
Appcircle runners do not need to be updated.
Additional Updates
Review the global.yaml file from your standalone Appcircle server for any custom configurations. Compare these settings with the Appcircle Helm chart documentation and apply them in your values.yaml if supported. This ensures consistency and avoids potential issues during migration.
4. Create Kubernetes Secrets
This section details the creation of Kubernetes secrets required for Appcircle to function correctly. These secrets store sensitive information such as passwords and certificates, securely injecting them into your Appcircle deployment.
Ensure you have gathered all necessary data before proceeding.
Some secret data, such as database passwords and Keycloak client secrets, used in the Kubernetes secrets creation below should match the data extracted from the backups of the standalone server. Ensure consistency between the backed-up values and the values used in the Kubernetes secrets to prevent connectivity and authentication issues.
-
Create a namespace:
For the Appcircle server deployment. In this documentation, we will use
appcircleas the example namespace.kubectl create namespace appcircle
-
Create Container Registry Secret:
By default, Appcircle uses its own image registry, which requires authentication with the
cred.jsonfile provided by Appcircle.If you are using your own container image registry to access Appcircle container images, you can either skip authentication if your registry doesn't require it or create a secret for your custom registry.
Follow the steps below to create the registry secret in the
appcirclenamespace for pods to successfully pull images:infoIf you are using your own container registry, follow the
Custom Registrysection below.If your registry doesn't require authentication, you can skip this section.
- Appcircle Registry
- Custom Registry
-
Save the
cred.jsonfile. -
Create the container registry secret:
kubectl create secret docker-registry containerregistry \-n appcircle \--docker-server='europe-west1-docker.pkg.dev' \--docker-username='_json_key' \--docker-password="$(cat cred.json)"tipIf the
HISTCONTROLenvironment variable is set toignoreboth, commands with a leading space character will not be stored in the shell history. This allows you to create secrets safely without storing sensitive information in the shell history.- Update the
server,username, andpasswordfields for your own custom registry and create the container registry secret:
kubectl create secret docker-registry containerregistry \-n appcircle \--docker-server='registry.spacetech.com' \--docker-username='yourRegistryUsername' \--docker-password='superSecretRegistryPassword'
-
Keycloak Clients Secret:
Create a secret with the name
${releaseName}-auth-keycloak-clients-secretcontaining the relevant secret keys.infoIn the example,
appcircle-serveris used as the release name. Make sure to replace it with your actual release name if it's different.cautionThe client secret values used below should match the data extracted from the
generated-secret.yamlbackup of your standalone Appcircle server.You can check the
.keycloak.clientskey in thegenerated-secret.yamlfile.Using incorrect values will prevent Appcircle from functioning correctly.
Source Key from generated-secret.yamlTarget Key keycloak.clients.appcircleWebSecretappcircleWebkeycloak.clients.buildServerSecretbuildServerkeycloak.clients.distributeAdminServiceSecretdistributionAdminServicekeycloak.clients.testerWebSecretdistributionTesterWebkeycloak.clients.licenseServerSecretlicenseServerkeycloak.clients.publishServerSecretpublishServerkeycloak.clients.reportingServerSecretreportingServerkeycloak.clients.storeAdminServiceSecretstoreAdminServicekeycloak.clients.storeServerSecretstoreServerkeycloak.clients.storeWebSecretstoreWebkeycloak.clients.distributionServerSecretdistributionServerkubectl create secret generic appcircle-server-auth-keycloak-clients-secret \-n appcircle \--from-literal=appcircleWeb='dc589939-******-87b57fc1a1c7' \--from-literal=buildServer='307f6946-******-9d7743294f6a' \--from-literal=distributionAdminService='a286d519-******-227dec040f53' \--from-literal=distributionTesterWeb='7cc0c02a-******-5e7139d63f3c' \--from-literal=licenseServer='e198b11a-******-1ac96174d6f7' \--from-literal=publishServer='7965798e-******-0b4e8af8afed' \--from-literal=reportingServer='88e3abfd-******-afd2e2a1263f' \--from-literal=storeAdminService='f263f48f-******-588c9f55b4e3' \--from-literal=storeServer='08839b8d-******-aff4ecb63703' \--from-literal=storeWeb='9f6a406e-******-a88c17d7c2f6' \--from-literal=distributionServer='7cc0c02a-******-5e7139d63f3c'Add required labels and annotations.
infoIf you have changed the default namespace (
appcircle) or the default release name (appcircle-server),kubectl label secret -n appcircle appcircle-server-auth-keycloak-clients-secret \-n appcircle app.kubernetes.io/managed-by=Helm && \kubectl annotate secret -n appcircle appcircle-server-auth-keycloak-clients-secret \-n appcircle \meta.helm.sh/release-name=appcircle-server \meta.helm.sh/release-namespace=appcircle
-
Keycloak Passwords Secret: Create a secret with the name
${releaseName}-auth-keycloak-passwordscontaining the relevant secret keys.infoIn the example,
appcircle-serveris used as the release name. Make sure to replace it with your actual release name if it's different.cautionThe Keycloak password values used below should match the data extracted from the
generated-secret.yamlbackup of your standalone Appcircle server. You can check the.keycloak.passwordkey for theadminPasswordand.keycloak.initialPasswordfor theinitialPasswordin thegenerated-secret.yamlfile. Using incorrect values will prevent Appcircle from functioning correctly.kubectl create secret generic appcircle-server-auth-keycloak-passwords \-n appcircle \--from-literal=initialPassword=<initial-password> \--from-literal=adminPassword=<admin-password>
-
MinIO Connection Secret:
Create a secret with the name
${releaseName}-minio-connectioncontaining the relevant secret keys.infoIn the example,
appcircle-serveris used as the release name. Make sure to replace it with your actual release name if it's different.cautionThe MinIO keys used below should match the data extracted from the
generated-secret.yamlbackup of your standalone Appcircle server. You can check the.minio.secretKeykey in thegenerated-secret.yamlfile for theaccessKeyandroot-passwordin the example command below. Using incorrect values will prevent Appcircle from functioning correctly.kubectl create secret generic appcircle-server-minio-connection \-n appcircle \--from-literal=accessKey=admin \--from-literal=secretKey=<your-minio-secret-key> \--from-literal=root-user=admin \--from-literal=root-password=<your-minio-root-password>
5. Add the Appcircle Helm Repository
Add the Appcircle Helm repository to the configuration of Helm:
helm repo add appcircle https://helm-package.appcircle.io && \
helm repo update
6. Install the Appcircle Server
Run the following Helm command to install the Appcircle server chart.
In this example, we deploy the Appcircle server to a single namespace, using appcircle as the namespace and appcircle-server as the Helm release name.
helm install appcircle-server appcircle/appcircle \
  -n appcircle \
  -f values.yaml
To install specific version of the Appcircle Helm chart, you can use the example command below:
helm install appcircle-server appcircle/appcircle \
  -n appcircle \
  -f values.yaml
  --version 0.1.1
If you need or want to change the release name, please note that it should be 18 characters or fewer.
Since we disabled a a module before the migration, Helm will likely wait for the module to be installed before reporting the installation as successful. This will cause the installation to timeout.
Don't worry, this is expected behavior. After completing the data migration steps, we will complete the Helm installation by re-enabling the job, allowing the installation to finalize successfully.
You can watch the Appcircle server installation using any Kubernetes monitoring tool. The installation process duration depends on factors such as network speed and the processing power of your Kubernetes nodes.
To make sure that the stateful apps are ready for migration, you can run the command below and wait for The databases are ready for migration steps. output.
kubectl wait --for=condition=Ready pod -l 'app.kubernetes.io/name=auth-postgresql' -n appcircle --timeout=300s && \
kubectl wait --for=condition=Ready pod -l 'app.kubernetes.io/name=mongodb' -n appcircle --timeout=300s && \
kubectl wait --for=condition=Ready pod -l 'app.kubernetes.io/name=minio' -n appcircle --timeout=300s && \
kubectl wait --for=condition=Ready pod -l 'app.kubernetes.io/name=vault' -n appcircle --timeout=300s && \
echo "The databases are ready for migration steps."
Migrating the Data
1. PostgreSQL Backup & Restore
Standalone Appcircle Server
-
Locate PostgreSQL Container: Find the PostgreSQL container name.
docker ps | grep postgres -
Dump Database: Save the database data to a file.
docker exec <postgres_container_name> pg_dump -U keycloak -h localhost -p 5432 -F c -b -v -f pgdump.backup keycloak -
Create a directory to save dumped files.
mkdir ~/appcircle-k8s-migration/ -
Copy Dump: Copy the file from container to Appcircle server host.
docker cp <postgres_container_name>:/pgdump.backup ~/appcircle-k8s-migration/
Bastion Host
-
Log in to the bastion host.
-
Change directory to the temporary directory that was created for storing the standalone Appcircle server files:
cd appcircle-k8s-migration -
Copy the PostgreSQL Data to Bastion Host: Copy the dumped PostgreSQL data from the Appcircle server to the bastion host.
If you have used an external PostgreSQL service instead of the one provided with the Appcircle Helm chart, please adjust the commands below for your specific use-case.
-
Get PostgreSQL Password:
kubectl get secret -n appcircle appcircle-server-auth-postgresql -ojsonpath='{.data.password}' | base64 -d -
Get the PostgreSQL pod name:
kubectl get pods -n appcircle | grep postgres -
Install PostgreSQL client tools:
To install PostgreSQL client tools, please check the official PostgreSQL documentation.
infoInstead of installing the latest
postgresql-client-*version, please install thepostgresql-client-14package.An example command should be like the one below:
sudo apt install postgresql-client-14 -
Start Port Forwarding:
kubectl port-forward appcircle-server-auth-postgresql-0 5432:5432 -n appcircle -
Restore the Database:
pg_restore -h localhost -p 5432 -U keycloak -d keycloak ~/appcircle-k8s-migration/pgdump.backup
2. MongoDB Backup & Restore
Standalone Appcircle Server
The spacetech in the example codes below are example project name.
Please find your own project name and replace spacetech with your project name.
To see projects, you can check the projects directory.
ls -l ./projects
-
Change directory to appcircle-server:
cd appcircle-server -
Expose MongoDB Port: Add a port mapping (e.g., 36300:36300) to your
docker-compose.ymlfor themongo_1service and restart.- Edit the
compose.yamlfile.
vim projects/spacetech/export/compose.yaml- Add the
portskey to themongo_1service.
services:mongo_1:image: europe-west1-docker.pkg.dev/appcircle/docker-registry/mongo:v3.25.0ports:- "36300:36300"- Restart the
mongo_1service.
cd projects/aselsan2/export/ && \docker compose up mongo_1 --no-deps --force-recreate -d - Edit the
-
Install the
mongoshtool.To install
mongoshon the standalone Appcircle server, please check the official MongoDB documentation. -
Open Mongo Shell to the standalone Appcircle server:
mongosh --host 127.0.0.1 --port 36300 -
Switch to the
admindb:use admin -
Create a user to dump the DB:
infoThe backup user
backupwith a passwordbackupcreated for dumping the MongoDB database on the standalone Appcircle server will be migrated to the target Kubernetes environment.It is strongly recommended to either delete this user after the migration is complete or change its password to a strong, unique one. Leaving this user with the default password poses a significant security risk.
db.createUser({user: "backup",pwd: "backup",roles: [{ role: "root", db: "admin"}]}) -
Exit from the Mongo Shell:
exit -
Get the MongoDB container name:
docker ps | grep mongo_1 -
Get the MongoDB connection string:
cat projects/spacetech/export/publish/default.env | grep "CUSTOMCONNSTR_PUBLISH_DB_CONNECTION_STRING" -
Dump the MongoDB:
docker exec -it spacetech-mongo_1-1 mongodump --uri="mongodb://backup:backup@mongo_1:36300,mongo_2:36301,mongo_3:36302/?replicaSet=rs&authSource=admin" --gzip --archive=/mongo-backup.gz -
Copy the dumped DB file from out of the container to the host machine:
docker cp spacetech-mongo_1-1:/mongo-backup.gz ~/appcircle-k8s-migration/
Bastion Host
-
Log in to the bastion host.
-
Change directory to the temporary directory that was created for storing the standalone Appcircle server files:
cd appcircle-k8s-migration -
Copy the file from the standalone Appcircle server to the bastion host:
infoIf you have used an external MongoDB service instead of the one provided with the Appcircle Helm chart, please adjust the commands below for your specific use-case.
-
Install MongoDB Database Tools:
To install MongoDB Database Tools, please check the official MongoDB documentation.
-
Get the MongoDB root password of the K8s installation:
kubectl get secret -n appcircle appcircle-server-mongodb -o jsonpath='{.data.mongodb-root-password}' | base64 -d -
Start port forwarding:
kubectl port-forward appcircle-server-mongodb-0 27017:27017 -n appcircle -
Restore the dumped MongoDB:
mongorestore --uri="mongodb://root:<mongodb-root-password>@localhost:27017/?authSource=admin" --gzip --archive=./mongo-backup.gz
3. MinIO Mirror
Standalone Appcircle Server
-
Log in to the standalone Appcircle server:
-
Change directory to appcircle-server:
cd appcircle-server -
Expose MinIO Port: Ensure MinIO's port 9000 is accessible. You might need to publish the port in your
docker-compose.yml.docker ps | grep snsd
The spacetech in the example codes below are example project name.
Please find your own project name and replace spacetech with your project name.
To see projects, you can check the projects directory.
ls -l ./projects
- Get MinIO credentials: Retrieve the access key and secret key from your MinIO configuration.
cat projects/spacetech/export/minio/access.env
Bastion Host
-
Log in to the bastion host.
-
Change directory to the temporary directory that was created for storing the standalone Appcircle server files:
cd appcircle-k8s-migration
If you have used an external MinIO service instead of the one provided with the Appcircle Helm chart, please adjust the commands below for your specific use-case.
-
Get the Kubernetes MinIO access and secret keys:
kubectl get secret -n appcircle appcircle-server-minio-connection -ojsonpath='{.data.accessKey}' | base64 -d && \echo && \kubectl get secret -n appcircle appcircle-server-minio-connection -ojsonpath='{.data.secretKey}' | base64 -d -
Get the MinIO service name:
kubectl get services -n appcircle | grep minio -
Start port forwarding:
kubectl port-forward service/appcircle-server-minio 9000:9000 -n appcircle -
Install
rclonetool:infoWe recommended using
rclonetool instead ofmc.To install
rclone, please check the official rclone documentation. -
Add Rclone Configuration for Standalone Server:
To configure Rclone for the standalone Appcircle server, follow these steps:
-
Start the Rclone configuration process:
rclone config -
Use the following inputs during the configuration process:
n # Create a new remotename> ac-standalone # Provide a descriptive name for the remoteStorage> 4 (might change) # Select "Amazon S3 Compliant Storage Provider" (4)provider> 7 (might change) # Select "MinIO Object Storage" (7)env_auth> "false" # Set environment authentication to "false"access_key_id> <access_key> # Enter the standalone Appcircle server's access keysecret_access_key> <secret_key> # Enter the standalone Appcircle server's secret access keyregion> # Leave this emptyendpoint> # Provide the standalone Appcircle server's IP and MinIO port. Example: http://192.168.1.220:9040location_constraint: # Leave this emptyacl: # Leave this emptyserver_side_encryption: # Leave this emptysse_kms_key_id: # Leave this emptyEdit advanced config? (y/n): n # Skip advanced configuration
-
-
Add Rclone config for Kubernetes Appcircle server:
To configure
rclonefor the Kubernetes Appcircle server, follow these steps:-
Start the
rcloneconfiguration process:rclone config -
Use the following inputs during the configuration process:
n # Create a new remotename> ac-k8s # Provide a descriptive name for the remoteStorage> 4 (might change) # Select "Amazon S3 Compliant Storage Provider" (4)provider> 7 (might change) # Select "MinIO Object Storage" (7)env_auth> "false" # Set environment authentication to "false"access_key_id> <access_key> # Enter the K8s Appcircle server MinIO access keysecret_access_key> <secret_key> # Enter the K8s Appcircle server MinIO secret access keyregion> # Leave this emptyendpoint> # Provide the K8s Appcircle server MinIO IP and MinIO port. Example: http://127.0.0.1:9000location_constraint: # Leave this emptyacl: # Leave this emptyserver_side_encryption: # Leave this emptysse_kms_key_id: # Leave this emptyEdit advanced config? (y/n): n # Skip advanced configuration
-
-
Start copying files:
rclone copy --progress --checksum --update ac-standalone: ac-k8s:
4. Vault Backup & Restore
Standalone Server Steps
-
Log in to the standalone Appcircle server:
-
Change directory to the migration directory:
cd appcircle-k8s-migration -
Create a file named
migrate.hcl:cat > migrate.hcl <<'EOL'storage_source "file" {path = "/vault/data/"}storage_destination "file" {path = "/vault/target/"}cluster_addr="http://127.0.0.1:8201"EOL -
Get the Vault container name:
docker ps | grep vault -
Copy the migration file to the Vault container:
docker cp migrate.hcl spacetech-vault-1:/vault/ -
Migrate the the Vault data to the target directory:
docker exec -it spacetech-vault-1 vault operator migrate --config=/vault/migrate.hcl -
Create a tarball of the Vault data:
docker exec -it spacetech-vault-1 sh -c "cd /vault && tar -czpvf vaultd.tar.gz -C /vault/target/ ." -
Copy the tarball to the host machine:
docker cp spacetech-vault-1:/vault/vaultd.tar.gz ~/appcircle-k8s-migration/ -
Get the full path of the copied tarball:
realpath vaultd.tar.gz
The spacetech in the example codes below are example project name.
Please find your own project name and replace spacetech with your project name.
To see projects, you can check the projects directory.
ls -l ./projects
-
Change directory to the Appcircle server:
cd appcircle-server -
Get the unseal and root keys and save, you will use for unsealing the vault:
grep -A 7 "vault" projects/spacetech/generated-secret.yaml
Bastion Host
-
Log in to the bastion host.
-
Change directory to the temporary directory that was created for storing the standalone Appcircle server files:
cd appcircle-k8s-migration -
Copy the vault data tar ball to the bastion host:
If you have used an external Vault service instead of the one provided with the Appcircle Helm chart, please adjust the commands below for your specific use-case.
-
Get the Vault statefulset name:
kubectl get statefulsets -n appcircle | grep vault -
Edit the vault
statefulsetfor safe operations:kubectl patch statefulset -n appcircle appcircle-server-vault -p '{"spec": {"template": {"spec":{"containers":[{"name":"vault","command": ["sh", "-c", "tail -f /dev/null" ], "args": null, "readinessProbe": null, "lifecycle": null }]}}}}' -
Delete the pod for it to be re-created:
kubectl delete pod appcircle-server-vault-0 -n appcircle -
Copy the vault data to the target pod:
kubectl cp "./vaultd.tar.gz" "appcircle-server-vault-0:/vault/data/vaultd.tar.gz" -n appcircle -
Open shell in the vault container:
kubectl exec -it appcircle-server-vault-0 -n appcircle -- bash -
Run the following commands in the shell:
cd /vault/datatar -xzvf vaultd.tar.gz -C ./usr/local/bin/docker-entrypoint.sh vault server -config=/vault/config/extraconfig-from-values.hcl -
Don't close the upper terminal until the process finishes:
-
Open a new terminal in the vault container:
kubectl exec -it appcircle-server-vault-0 -- bash
-
Unseal the vault with the saved keys from the steps above:
vault operator unseal dnaDMnwLuRni******M0EPJ2gAlyeHmOAyvault operator unseal FRTs/BO606ty******1nm9pJssLZjqVULRvault operator unseal f35t4MU6gojw******/bH92wR9t6MzzIYc -
Delete the vault data tar ball:
rm /vault/data/vaultd.tar.gz -
Exit from the first and second vault terminal:
-
Edit the secret with old unseal keys:
kubectl patch secret appcircle-server-vault-seal -n appcircle \--patch='{"stringData": { "token": "*hvs*.U5LLy********F2bOy", "unseal_keys": "dnaDMnwLuRni******M0EPJ2gAlyeHmOAy FRTs/BO606ty******1nm9pJssLZjqVULR f35t4MU6gojw******/bH92wR9t6MzzIYc" }}'
Post-installation Steps
1. Update the values.yaml
After the migration is completed, you need to enable the Keycloak module.
-
Remove Keycloak Replica Override:
Delete thereplicas: 0setting underauth-keycloak. -
Adjust MongoDB Resource Preset:
- MongoDB Resource Preset: You can adjust the resource allocation for your MongoDB deployment based on your needs. Here are some example
resourcesPresetvalues you can use in yourvalues.yamlfile:
Size CPU Requests CPU Limits Memory Requests Memory Limits Ephemeral Storage Requests Ephemeral Storage Limits nano 100m 150m 128Mi 192Mi 50Mi 2Gi micro 250m 375m 256Mi 384Mi 50Mi 2Gi small 500m 750m 512Mi 768Mi 50Mi 2Gi medium 500m 750m 1024Mi 1536Mi 50Mi 2Gi large 1.0 1.5 2048Mi 3072Mi 50Mi 2Gi xlarge 1.0 3.0 3072Mi 6144Mi 50Mi 2Gi 2xlarge 2.0 6.0 6144Mi 12288Mi 50Mi 2Gi For example, to set a "medium" resource preset, add the following to your
values.yamlfile under themongodbsection:mongodb:resourcesPreset: "medium" - MongoDB Resource Preset: You can adjust the resource allocation for your MongoDB deployment based on your needs. Here are some example
2. Upgrade the Helm Release
Apply the updated values.yaml configuration to the Appcircle server Helm chart:
helm upgrade --install appcircle-server appcircle/appcircle \
  --timeout 1200s \
  -n appcircle \
  -f values.yaml
3. Restart All the Deployments
Restart all the Appcircle server deployments to make sure every service is restarting with the up-to-date configurations.
kubectl rollout restart deployment -n appcircle
Delete the Vault pod to trigger its recreation with the updated configuration.
kubectl delete pod appcircle-server-vault-0 -n appcircle
4. Update the DNS Records
List the Ingresses with kubectl to check the IP address of the Appcircle services domains.
kubectl get ingresses -n appcircle
According to the example output below, you need to configure your DNS as follows:
NAME                               CLASS   HOSTS                                                          ADDRESS        PORTS      AGE
appcircle-apigateway               nginx   api.appcircle.spacetech.com,auth.appcircle.spacetech.com       10.45.140.78   80,443     24m
appcircle-distribution-testerweb   nginx   dist.appcircle.spacetech.com                                   10.45.140.78   80,443     24m
appcircle-resource                 nginx   resource.appcircle.spacetech.com                               10.45.140.78   80,443     24m
appcircle-store-web                nginx   *.store.appcircle.spacetech.com                                10.45.140.78   80,443     24m
appcircle-web-app                  nginx   my.appcircle.spacetech.com                                     10.45.140.78   80,443     24m
appcircle-web-event                nginx   hook.appcircle.spacetech.com                                   10.45.140.78   80,443     24m
appcircle-webeventredis            nginx   kvs.appcircle.spacetech.com                                    10.45.140.78   80,443     24m
Since you already have the DNS records for the standalone Appcircle server, all you need to do is update the DNS records to the new addresses of the Ingress objects of the Kubernetes Appcircle server.
5. Login to the Appcircle Dashboard
Check the output of the helm install command to see login URL, initial username and command to get initial user password.
Self-Hosted Configuration:

- Initial Organization Id : 8c23e250-4aa8-4ef6-888b-9514695aa1c7
- Initial User            : admin@spacetech.com
- Retrieve the initial user password by executing the following command:↴

    kubectl get secret -n appcircle appcircle-server-auth-keycloak-passwords -ojsonpath='{.data.initialPassword}' | base64 --decode ; echo

You can access the application dashboard at:↴

   https://my.appcircle.spacetech.com


Support:
For any issues or questions, please contact the system administrator or check the application documentation.
6. Connecting Runners
When you complete installation successfully by following above steps, you're ready for your first build. 🎉
But in order to run build pipelines, you need to install and connect self-hosted runners. After completing the migration, make sure to verify that your existing self-hosted runners are properly connected to the new Kubernetes Appcircle server. You might need to update their configurations to point to the new server endpoints.
We have dedicated section for installation and configuration of self-hosted runners.
Follow and apply related guidelines in here.
Self-hosted runner section in docs, has all details about runners and their configuration.
By default, self-hosted runner package has pre-configured ASPNETCORE_REDIS_STREAM_ENDPOINT and ASPNETCORE_BASE_API_URL for Appcircle-hosted cloud.
webeventredis.appcircle.io:6379,ssl=truehttps://api.appcircle.io/build/v1
☝ You need to change these values with your self-hosted Appcircle server's Redis and API URL.
Assuming our sample scenario explained above, these values should be:
kvs.appcircle.spacetech.com:6379,ssl=falsehttp://api.appcircle.spacetech.com/build/v1
for our example configuration.
If your Appcircle server is running with HTTPS, then Redis and API URL should be like this:
kvs.appcircle.spacetech.com:443,ssl=truehttps://api.appcircle.spacetech.com/build/v1
🎗 After download, open appsettings.json with a text editor and change the ASPNETCORE_REDIS_STREAM_ENDPOINT and the ASPNETCORE_BASE_API_URL values according to your configuration.
Please note that, you should do this before register.
Considering system performance, it will be good to install self-hosted runners to other machines. Self-hosted Appcircle server should run on a dedicated machine itself.
You can install any number of runners regarding to your needs and connect them to self-hosted Appcircle server.
7. Apply the Appcircle License
When you deploy the Appcircle server using Helm, a default license is provided. You can explore the Appcircle with the default license.
To obtain the license you purchased, please share the initial organization ID, which is printed after the helm deployment command, with the Appcircle team and follow the detailed instructions available in the Appcircle License Update section.
8. Verification
- Test the following functionalities and ensure all data and features are operational post-migration.
- Build
- Publish
- Enterprise App Store
- Testing Distribution
- LDAP / SSO Settings
9. Clean Up
Once the migration has been confirmed as successful:
- Remove old Docker containers from the standalone Appcircle server.
- Delete any residual data no longer needed.
Need help?
Get help from Appcircle's support team, or see how others are using Appcircle by joining our Slack Channel.
