Prerequisites
The following operating systems are supported for the self-hosted runner.
Linux
- Ubuntu 20.04 or later
- Debian 11 or later
MacOS
- MacOS 11 (Big Sur) or later
The following processor architectures are supported for operating systems.
x64Linux, macOSarm64macOS only
To install and execute runner, you will need to have root access. Being able to run sudo (sudoer) is sufficient for runner operations.
Also you need to have the following tools installed on your system:
- curl
- unzip
These tools are already installed on most operating systems or can be got from default package managers.
Minimum hardware requirements for self-hosted runner can be:
- 100GB or more free disk space
- 2 or more cores CPU (x64, arm64)
- 8 gigabytes (GB) or more RAM
Minimum required disk space should be enough both for iOS and android platforms. But that value is only for one Xcode version. According to your selection of Xcode versions you need more disk space for successful installation.
For linux installations, you can also prefer docker container for supported distributions. You can install linux package of self-hosted runner on a running docker container same as bare-metals.
But you must select a docker image with systemd support enabled.
You can either install and configure systemd on docker by yourself, or choose from preconfigured images.
See here for more detailed information about systemd in a container.
Or, as a quick alternative, you can use docker images from here for ubuntu containers.
Let's assume, you selected ready-to-use ubuntu:20.04 image from there.
First you should start container with command below.
docker run -d --name systemd-ubuntu --privileged -v /sys/fs/cgroup:/sys/fs/cgroup:ro jrei/systemd-ubuntu:20.04
Log in to running container with bash, interactively.
docker exec -it systemd-ubuntu /bin/bash
From now on, you will follow same installation steps seen below as other environments.
Installation
Adding a self-hosted runner requires that you download, register and configure Appcircle runner in your environment.
1. Download
Download the latest self-hosted runner package.
- macOS arm64
- macOS x64
- Linux x64
curl -O -L https://cdn.appcircle.io/self-hosted/runner/appcircle-runner-osx-arm64-1.6.0.zip
Extract self-hosted runner package.
unzip -o -u appcircle-runner-osx-arm64-1.6.0.zip
curl -O -L https://cdn.appcircle.io/self-hosted/runner/appcircle-runner-osx-x64-1.6.0.zip
Extract self-hosted runner package.
unzip -o -u appcircle-runner-osx-x64-1.6.0.zip
curl -O -L https://cdn.appcircle.io/self-hosted/runner/appcircle-runner-linux-x64-1.6.0.zip
Extract self-hosted runner package.
unzip -o -u appcircle-runner-linux-x64-1.6.0.zip
Change directory into extracted appcircle-runner folder for following steps.
cd appcircle-runner
By default, self-hosted runner package is bundled with configuration for Appcircle-hosted cloud.
🎗 If you're planning to use runner with self-hosted appcircle server, you must change ASPNETCORE_BASE_API_URL value in appsettings.json configuration file before going on.
Please refer to details here for sample configuration change.
2. Register
Go to your organization's integration settings and generate runner access token.
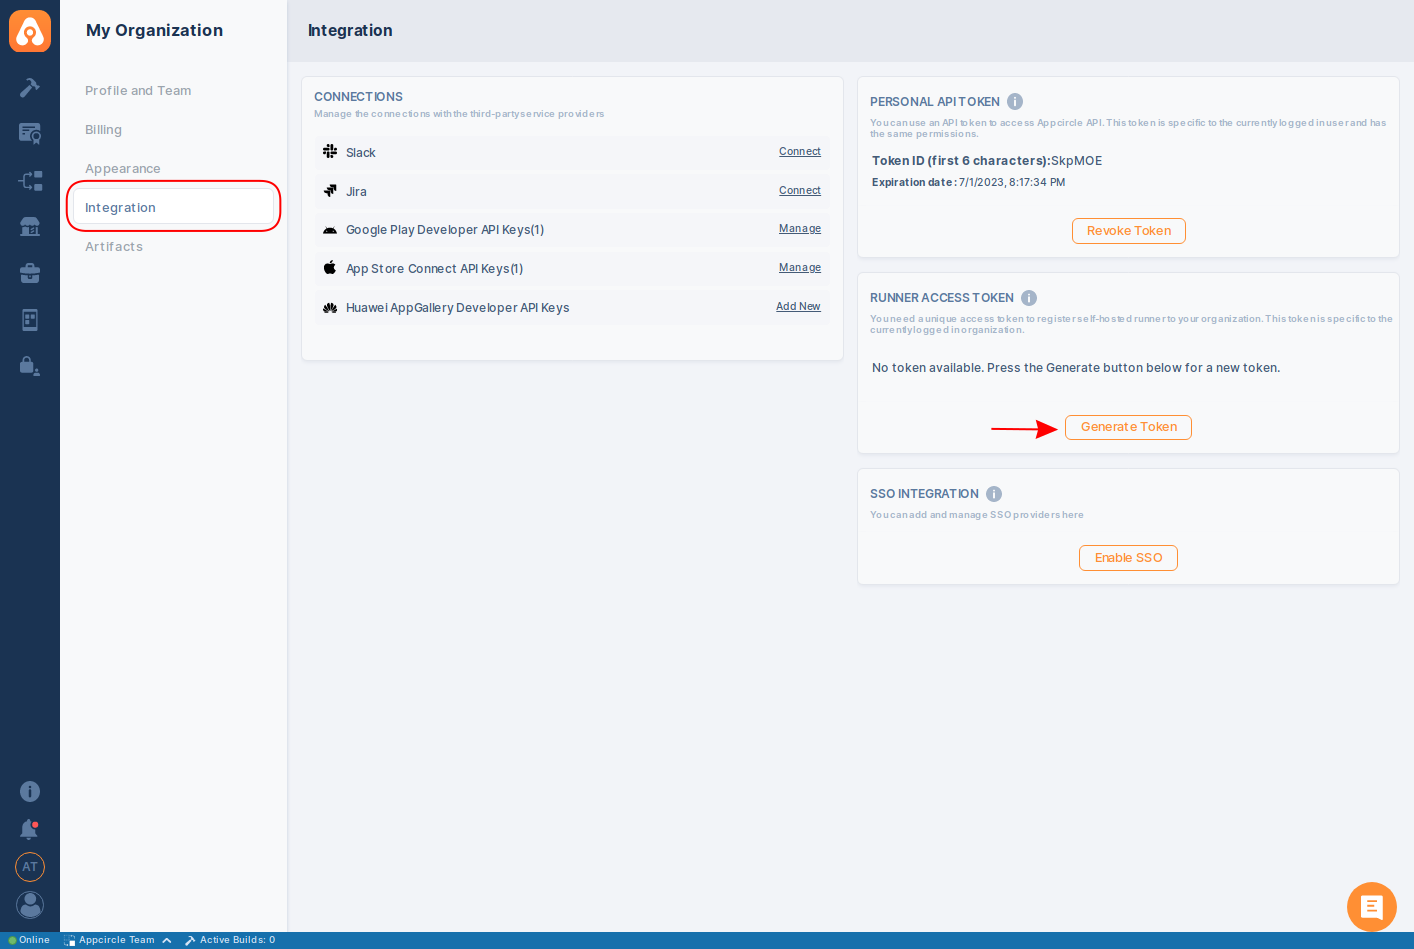
Using generated token, register self-hosted runner to your organization with desired name and pool.
./ac-runner register -t ${Access Token} -n ${Runner Name} -p ${Runner Pool}
Runner name is the text that you identify your self-hosted runner in your organization. You can use any suitable text for runner naming according to your requirements. You will find registered self-hosted runner in "Self-hosted Runners" list with the given name.
Runner pool is the text which identifies the runner pool in your organization. You can use any suitable text for pool naming according to your requirements. You will use given pool name at build profile settings and also see registered self-hosted runner in "Self-hosted Runners" list with the given pool name.
For example, below command is registering runner named "runner1" with pool named "Arm64_pool" to specified organization with using generated runner access token.
./ac-runner register -t aat_XVY27uHw7W1GA_cw5Vut0p_WOzHeYeJ2ZkTbqAVE3GX -n runner1 -p Arm64_pool
For more details on runner and pool, see Manage Self-hosted Pools and Manage Self-hosted Runners in docs.
Access token is required only for registration process and it can be used for any self-hosted runner, many times until revoked.
Revoking access token itself is not affecting already registered runners. You can't register new self-hosted runners to organization with revoked token anymore.
Only one valid access token can be used actively for an organization. There is no hard-limit on token generation and revoke. Acccording to your security requirements, you can revoke and generate new access token anytime you want.
Once you complete this step, you will see new added runner at "Build > Self-hosted Runners" list.
It's enabled by default but its state should be Offline by now.
3. Configure
You need to install some workflow required build tools once before executing any build pipeline.
You can install iOS platform tools, android platform tools or both of them according to your requirements.
Below are some example configurations which shows you some sample runner configuration scenarios:
- Install only iOS platform tools with default Xcode (15.2.x)
./ac-runner install -o ios
If your operating system is macOS 11 (Big Sur), then the default selected Xcode version will not be compatible for your system.
Set -x argument explicitly with one of the compatible versions. You can select 12.5, 13.0, 13.1 or 13.2 version for Xcode.
- Install only iOS platform tools with Xcode versions 14.3.x and 15.3.x
./ac-runner install -o ios -x 14.3,15.3
- Install only android platform tools
./ac-runner install -o android
- Install both android and iOS platform tools with Xcode version 15.3.x
./ac-runner install -o ios,android -x 15.3.x
While configuring self-hosted runner, platform argument (-o) doesn't work as append strategy. Your latest platform argument will be self-hosted runner's final platform.
Let's assume, you installed iOS platform tools at first with -o ios and then want to add also android platform in order to build both iOS and android apps.
Using -o android in this case will be wrong argument. You must use -o ios,android for this purpose.
Self-Signed Certificates
If you're using self-signed certificates, you need to follow the below document to add your certificates to runners.
Self-Signed Certificates
4. Run Service
Install and start self-hosted runner service.
./ac-runner service -c install
Once you complete this step, its state should be seen as Online in "Self-hosted Runners" list.
You can install and run only one instance of self-hosted runner on a physical machine.
If you need concurrency or multiple instances of self-hosted runner but don't have multiple bare-metals, then you should use virtualization infrastructure.
You can install multiple VMs on a single bare-metal and deploy self-hosted runner to each VM seperately.
:::
You can also add or change platform tools after start of runner service.
For example, you configure runner with iOS platform tools using -o ios at first, then add android platform tools with -o ios,android to build both iOS and android apps.
Install command used for runner configuration, both adds tools to your system and makes some configurations for them. In order to activate changes and updates completely, you should restart runner service after configuration is done successfully.
./ac-runner service -c restart
Restarting runner service will first stop service and start it again.
See here for more details about runner service operations.
5. Build App
Congratulations, now your runner is waiting for build jobs. In order to use your self-hosted runner pool;
- Find your app's build profile in "Build Profiles"
- Click on "Configurations" to open branch config details
- Select your runner's pool from "Config" tab
- Check also other settings for your runner capabilities
- Save settings and pool configuration
- Start Build 🎉