Building iOS Applications
Building iOS applications may be complex and confusing. Appcircle will help you smooth the process and doesn't require any additional configuration files from you.
Before starting your first iOS app build, please make sure you first create a build profile and connect your Git repository to your build profile. You can refer to the page below for this step:
Adding a Build ProfileAfter connecting your repository, please add or create your iOS certificate and provisioning profile. You can refer to the page below for this step:
Apple Certificates and Provisioning Profiles
When you are done with the steps above, you can now start building your iOS application.
Build Configuration
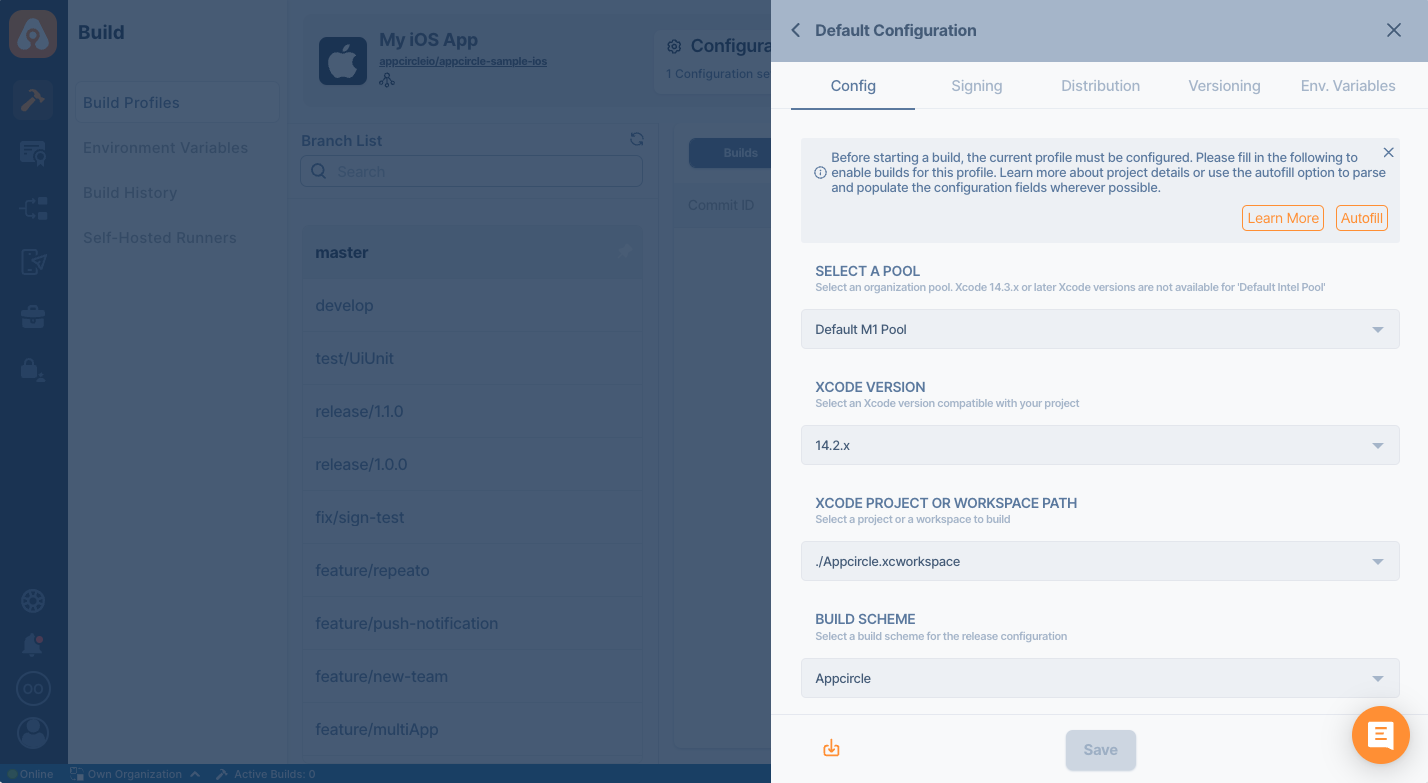
First, we need to set up a build configuration. Select the configuration from the Configuration section. The first step will be to enter project details. You can enter details manually or click on the "Autofill" button to retrieve them from your project.
Your iOS project needs to have an Xcode project or an Xcode workspace and a shared scheme to complete the build configuration successfully. Appcircle can fetch these workspaces and shared schemes from your branch automatically.
Share your iOS schemes
iOS schemes must be marked as shared in order to build your application outside of Xcode. If your application doesn't have a shared scheme, it can only be built using Xcode.
You can check the shared option in your Xcode's scheme manager to mark your application's scheme as shared.
Please don't forget to add additional scheme files to your version control.
Private Modules
If your project uses private modules, don't forget the add necessary SSH keys to your workflow steps. You can use Activate SSH Private Key step to add your private SSH keys.
You may also use Authenticate with netrc step to access your private modules.
Selecting the Xcode Version and Switching to the Xcode Beta
Major Xcode versions are available for building in Appcircle. You can select the preferred Xcode version in Build Configuration window.
The list of currently available Xcode versions can be found in the following document: iOS Build Infrastructure
By default, the most recent stable version of Xcode is selected. If available, you can also switch to the most recent Xcode beta at the top of the list.
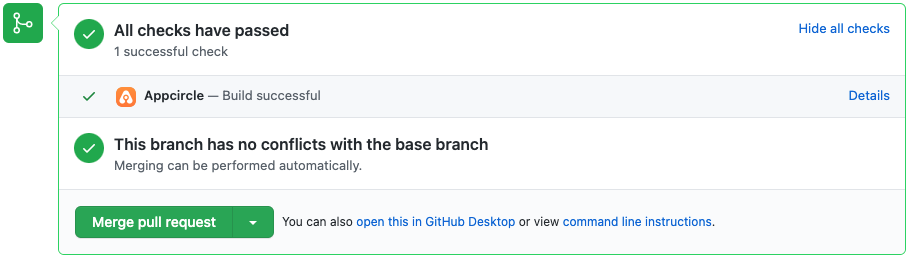
Sending the Build Status to the Repository Providers
At the bottom of the config tab, you will see the Set Commit Build Status option.
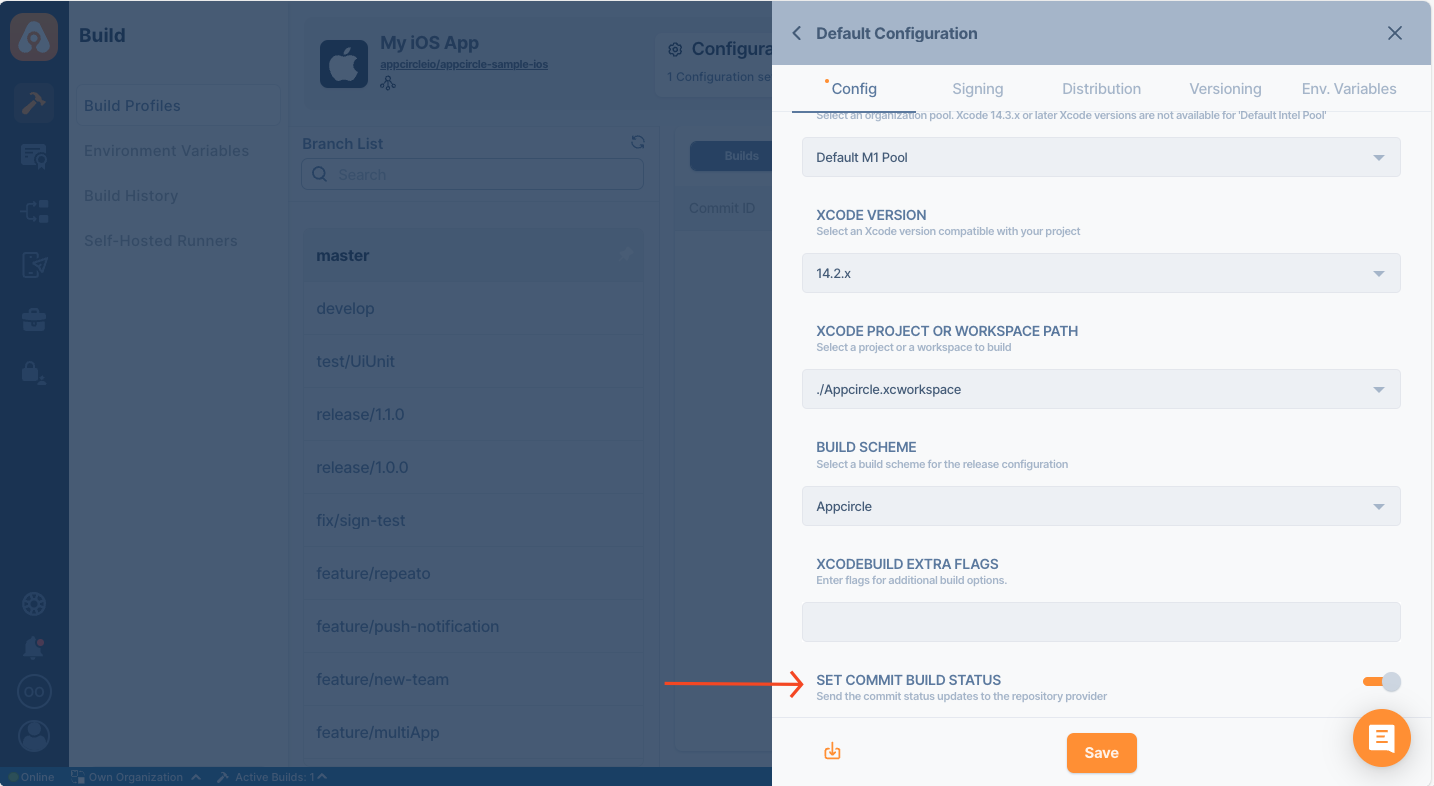
When this option is enabled, the build status for that commit is shared with the repository provider.
.png)
Build Triggers
Appcircle allows you to trigger builds manually or automatically using build triggers.
- On push: Whenever code is pushed to a configured branch, the build is triggered.
- On a tagged push: Whenever a tagged commit is pushed, the build is triggered for that commit. Commits without any tags are ignored.
- On push with selective tags: Whenever a commit includes one of the typed in tags, the build is triggered. You can specify tags with Unix shell-style wildcards to trigger builds.
You can visit the following page for details on build triggers:
Build Manually or Automatically with Webhooks and Triggers
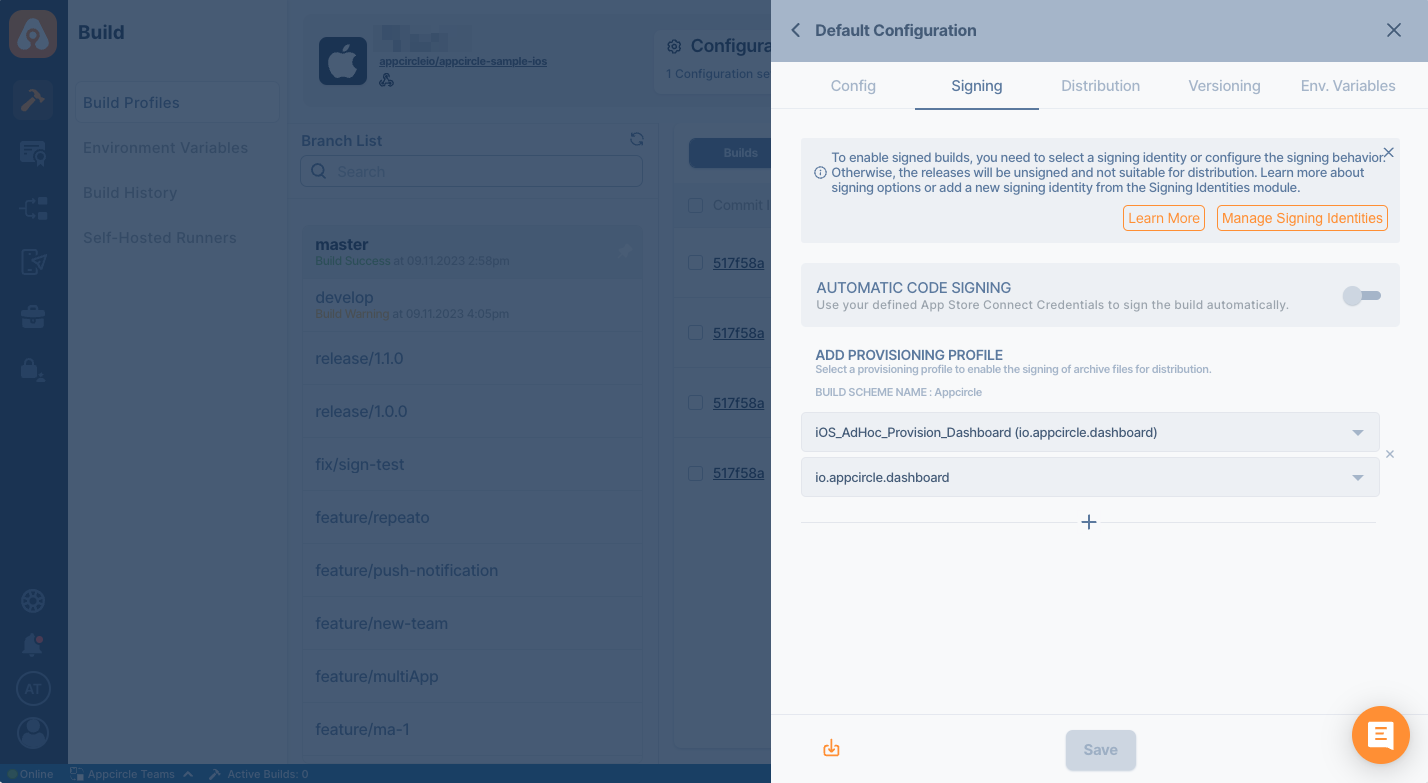
Signing
The next step on build configuration is Signing. Here, please select the provisioning profile you added at Apple Certificates & Provisioning Profiles page.
You can get both unsigned and signed build artifacts based on your configuration.
Distribution
The next step on build configuration is Distribution. You can create a new distribution profile at this screen or select a previous profile you created earlier. You can also enable auto deployment features if you need to.
Create a Distribution Profile and Sharing with Testers
Any previous build can be deployed to the Testing Distribution without the need for rebuilding.
Versioning
The versioning tab will allow you to change the build or version number during the build. You can increase the build number or version number by using different sources and strategies.
Managing iOS Build and Version Numbers
Environment Variables
The final step on build configuration is Environment Variables.
Appcircle Build module is simple and powerful. You can get your builds instantly just with a few clicks, advanced management of builds is also possible with the environment variables and workflows.
You can define variables and secrets to be incorporated during the build in the Environment Variables submodule so that you don't need to store certain keys and configurations within the repository.
Please see the following page for more information about environment variables:
Why to Use Environment Variables and Secrets?
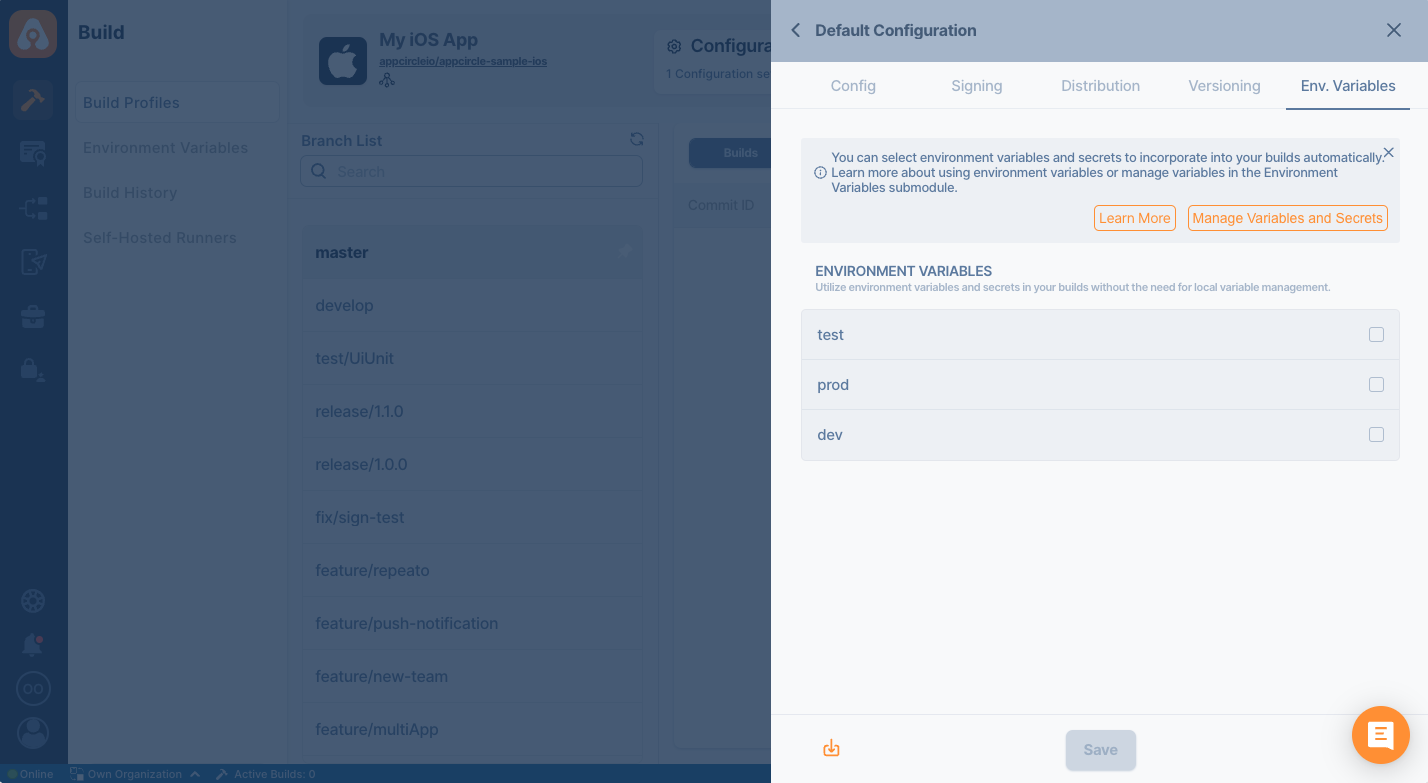
Please click on the Save button and close this modal.
Workflow Editor
You can use the workflow editor for in-depth configuration of all build steps. Please click on the workflow icon to open and use workflow editor.
Any custom operation during the build can be executed through the Custom Script step in the workflow
For details on using Appcircle's workflow editor, please see the related page below:
What are Workflows and How to Use Them?Start Build
You are now ready to start your first build. Select the branach from the left side and click on the Start Build button.
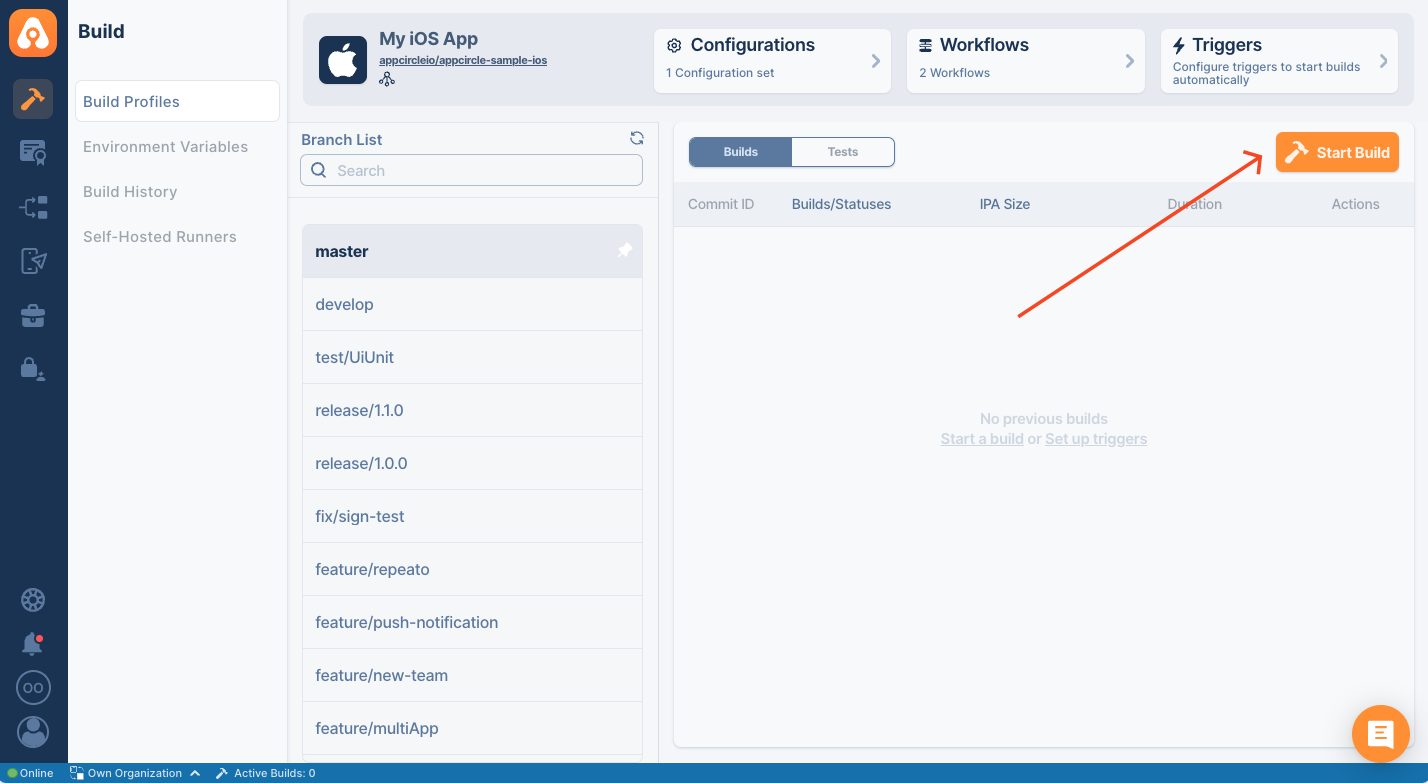
Select a configuration, workflow, commit id and click on Start Build button
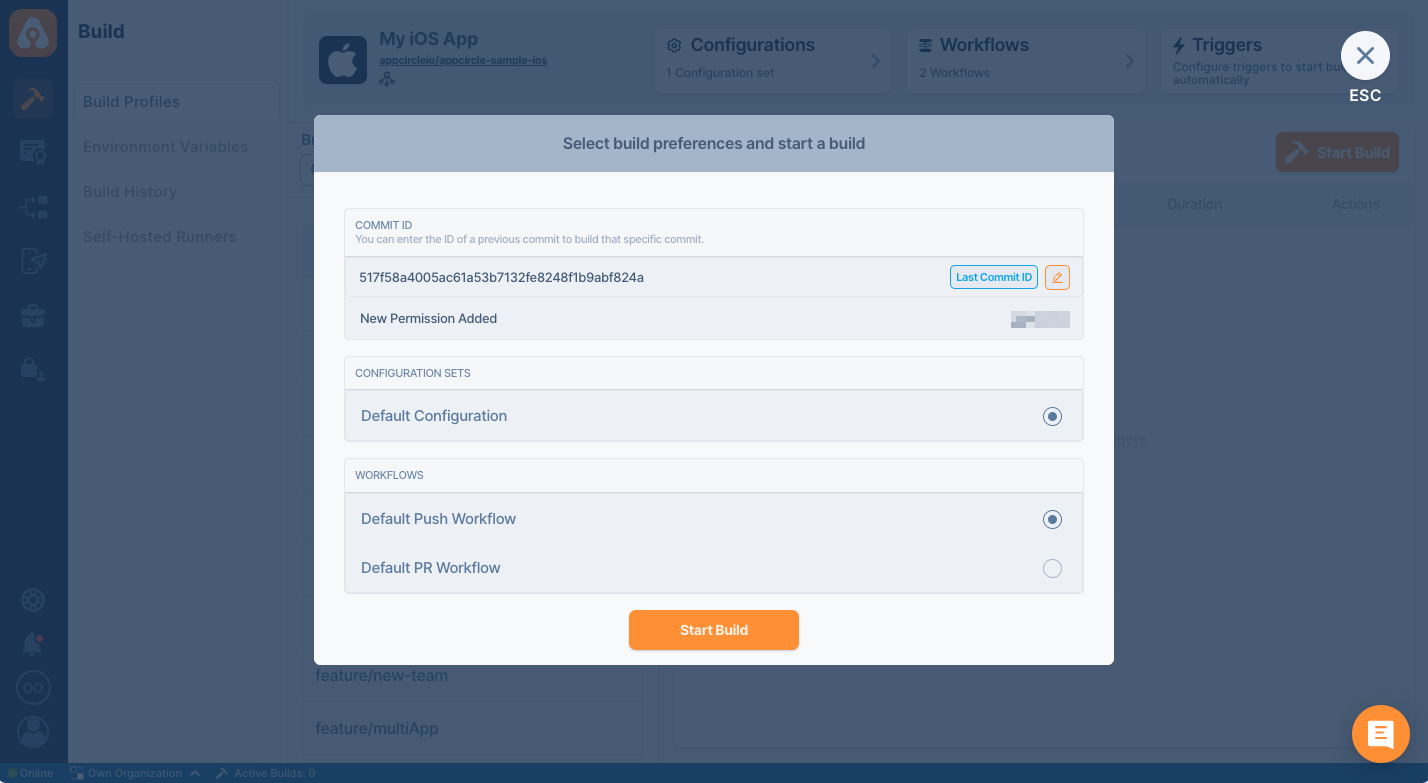
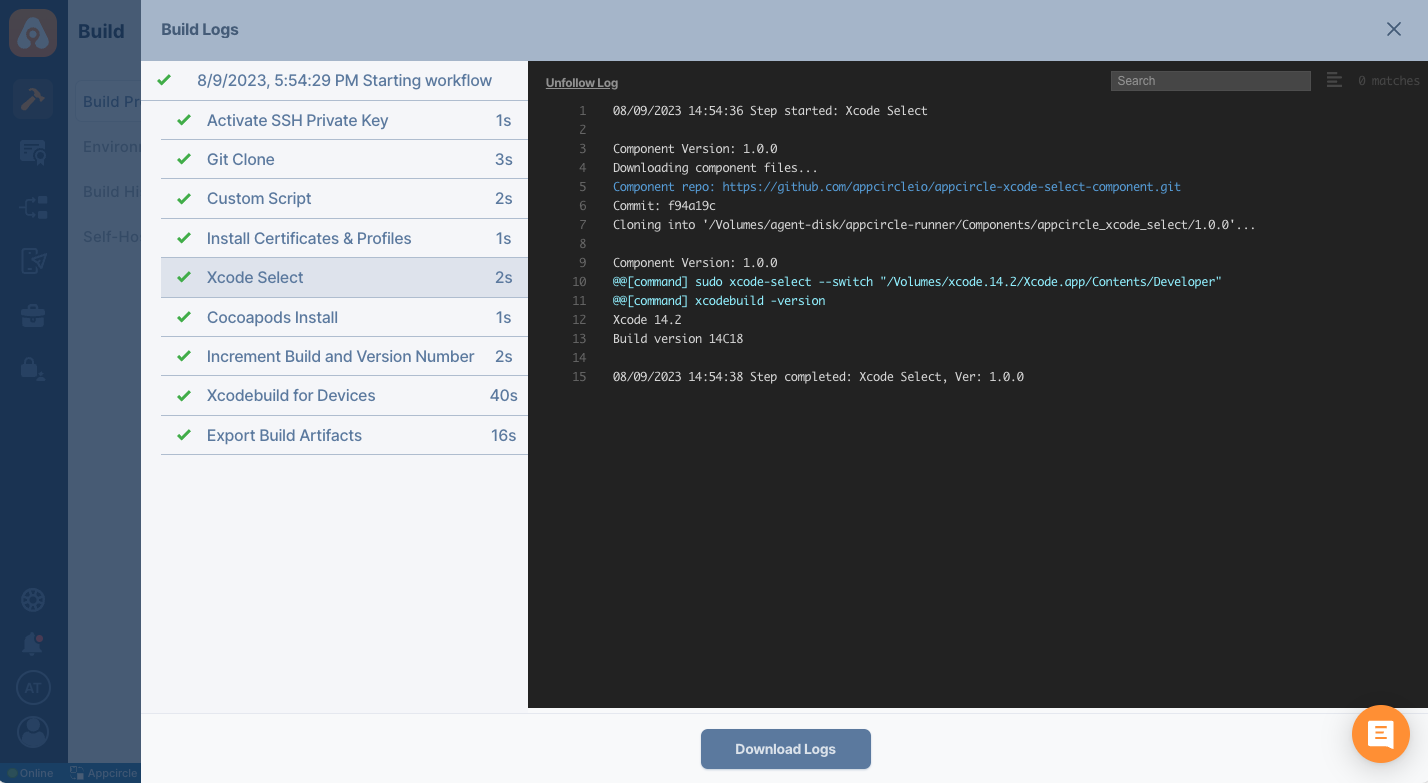
Appcircle will start building your application. Build log window will open and you can follow build process in realtime.
You can safely close the build log window, it won't affect the status of your build. You can come back and click on the build to track the status of your build.
Distribute your build
Your build will be distributed automatically if you had set up auto build earlier. You can also manually distribute builds at any time you like.
After a Build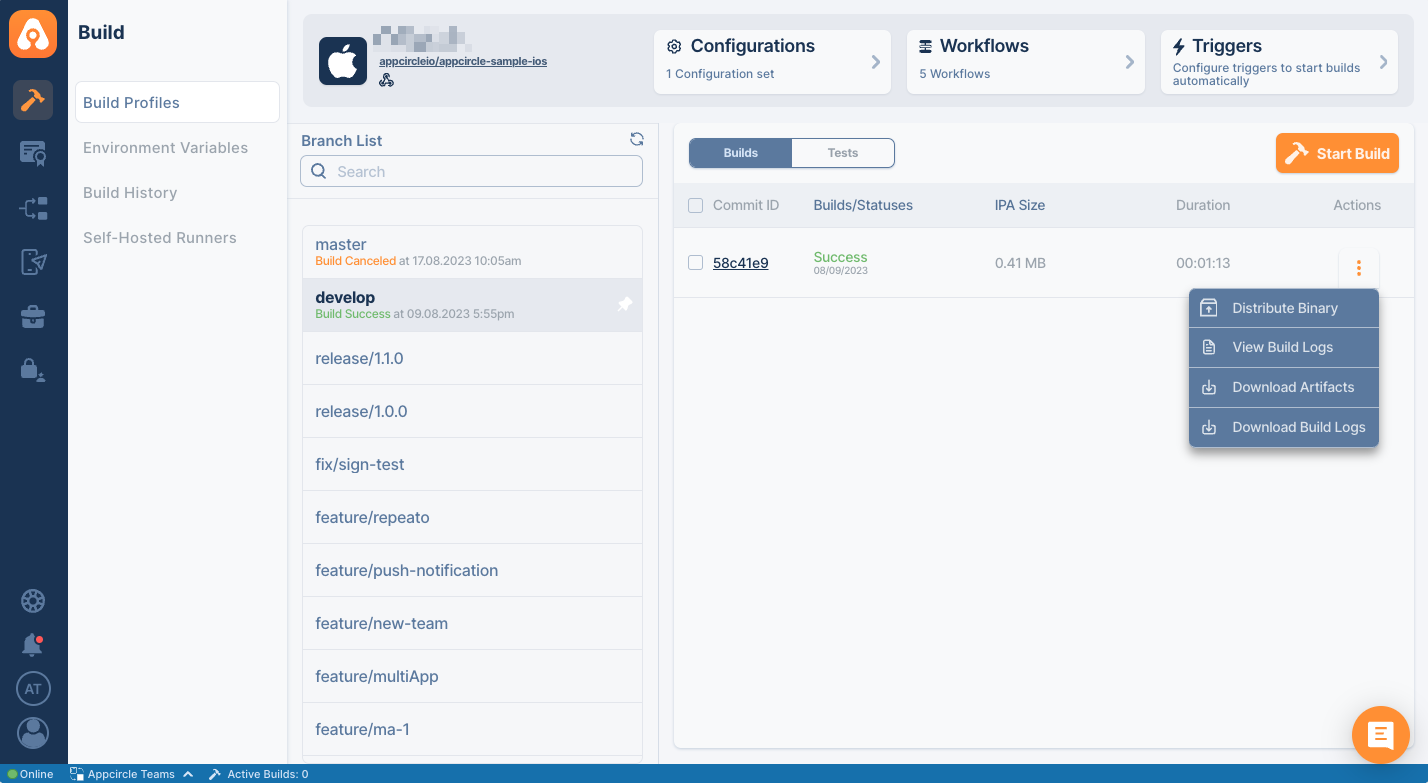
FAQ
Xcode Scheme Errors
Your iOS application project needs to have a shared scheme in order to be built outside Xcode. Xcode doesn't share schemes by default so you will have to do it manually.
- On Xcode, select Product > Scheme > Manage Schemes
- Select Shared for your
xcprojectorxcworkspace - Scheme container needs to be set to the corresponding Xcode project or workspace
- Please do not forget to add your
.xcschemefile to version control so it will be uploaded to your Git repository
Cocoapods Errors Due to Missing xcworkspace
If you receive a pod error similar to the following, this usually indicates that although pods are used, the build is done with an xcodeproj file:
error: .../_appcircle_temp/Repository/Obj-C/Pods/Target Support Files/Pods-AEPSampleAppObjC/Pods-AEPSampleAppObjC.release.xcconfig: unable to open file (in target "AEPSampleAppObjC" in project "AEPSampleAppObjC") (in target 'AEPSampleAppObjC' from project 'AEPSampleAppObjC')
If a pod is used, the xcworkspace must be pushed to the repository and it must be selected in the build configuration for a successful build.
If you don't want to push the xcworkspace to the repository, you can alternatively enter the xcworkspace path manually in the build configuration. In this case, the xcworkspace will be generated by the Cocapods workflow component.
Cocoapods Errros Due to Version Mismatch
If you don't set the version of Cocoapods in your Cocoapods Install step, Appcircle installs Cocoapods according to your Podfile.lock file. Don't forget to commit your Podfile.lock file to have the correct version.
Xcode 15 Known Issue
After the release of Xcode 15, some notable known issues have surfaced. One of them is the DT_TOOLCHAIN_DIR cannot be used to evaluate error.
When encountering this error, you will see the following log durint the Xcodebuild for Devices step;
DT_TOOLCHAIN_DIR cannot be used to evaluate LIBRARY_SEARCH_PATHS, use TOOLCHAIN_DIR instead (in target 'One of Project Target Name' from project 'Pods')
This error typically occurs with Cocoapods version 1.12.1 and older. To resolve it, update your local Cocoapods to a newer version and commit the changes, or update Cocoapods during the workflow at the Cocoapods Install step.
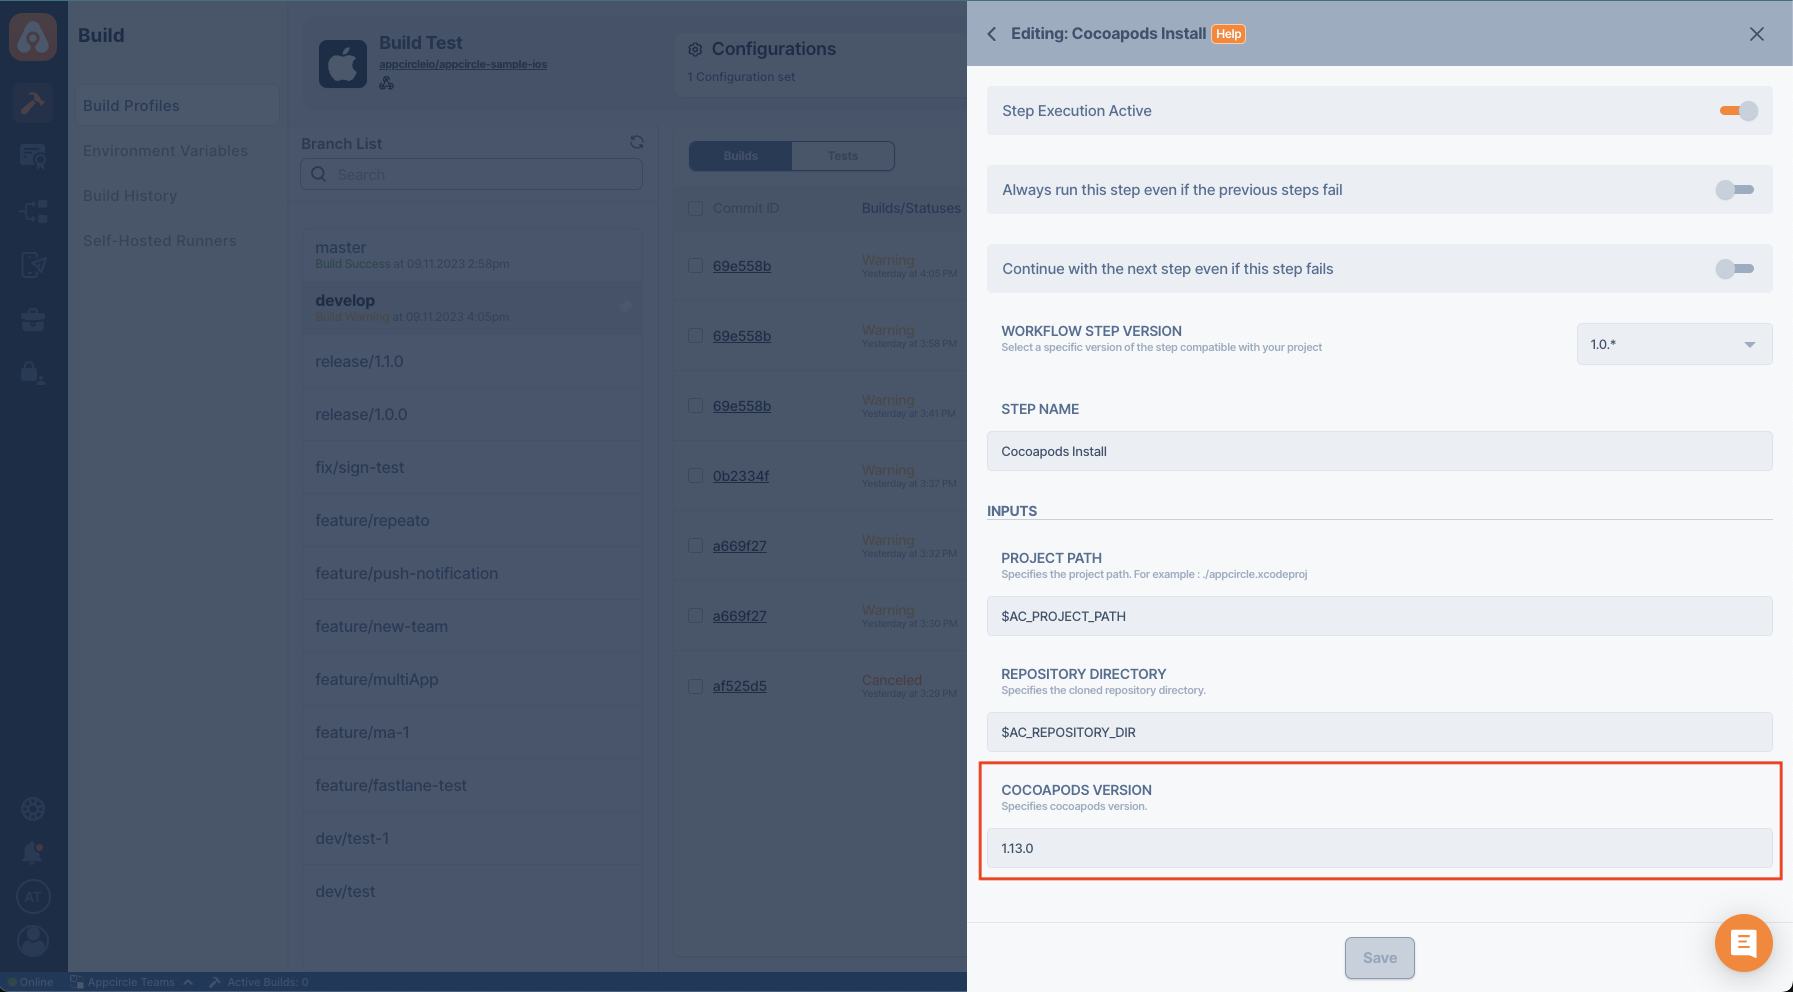
The resolution for this error is available in Cocoapods version 1.13.0 or higher.
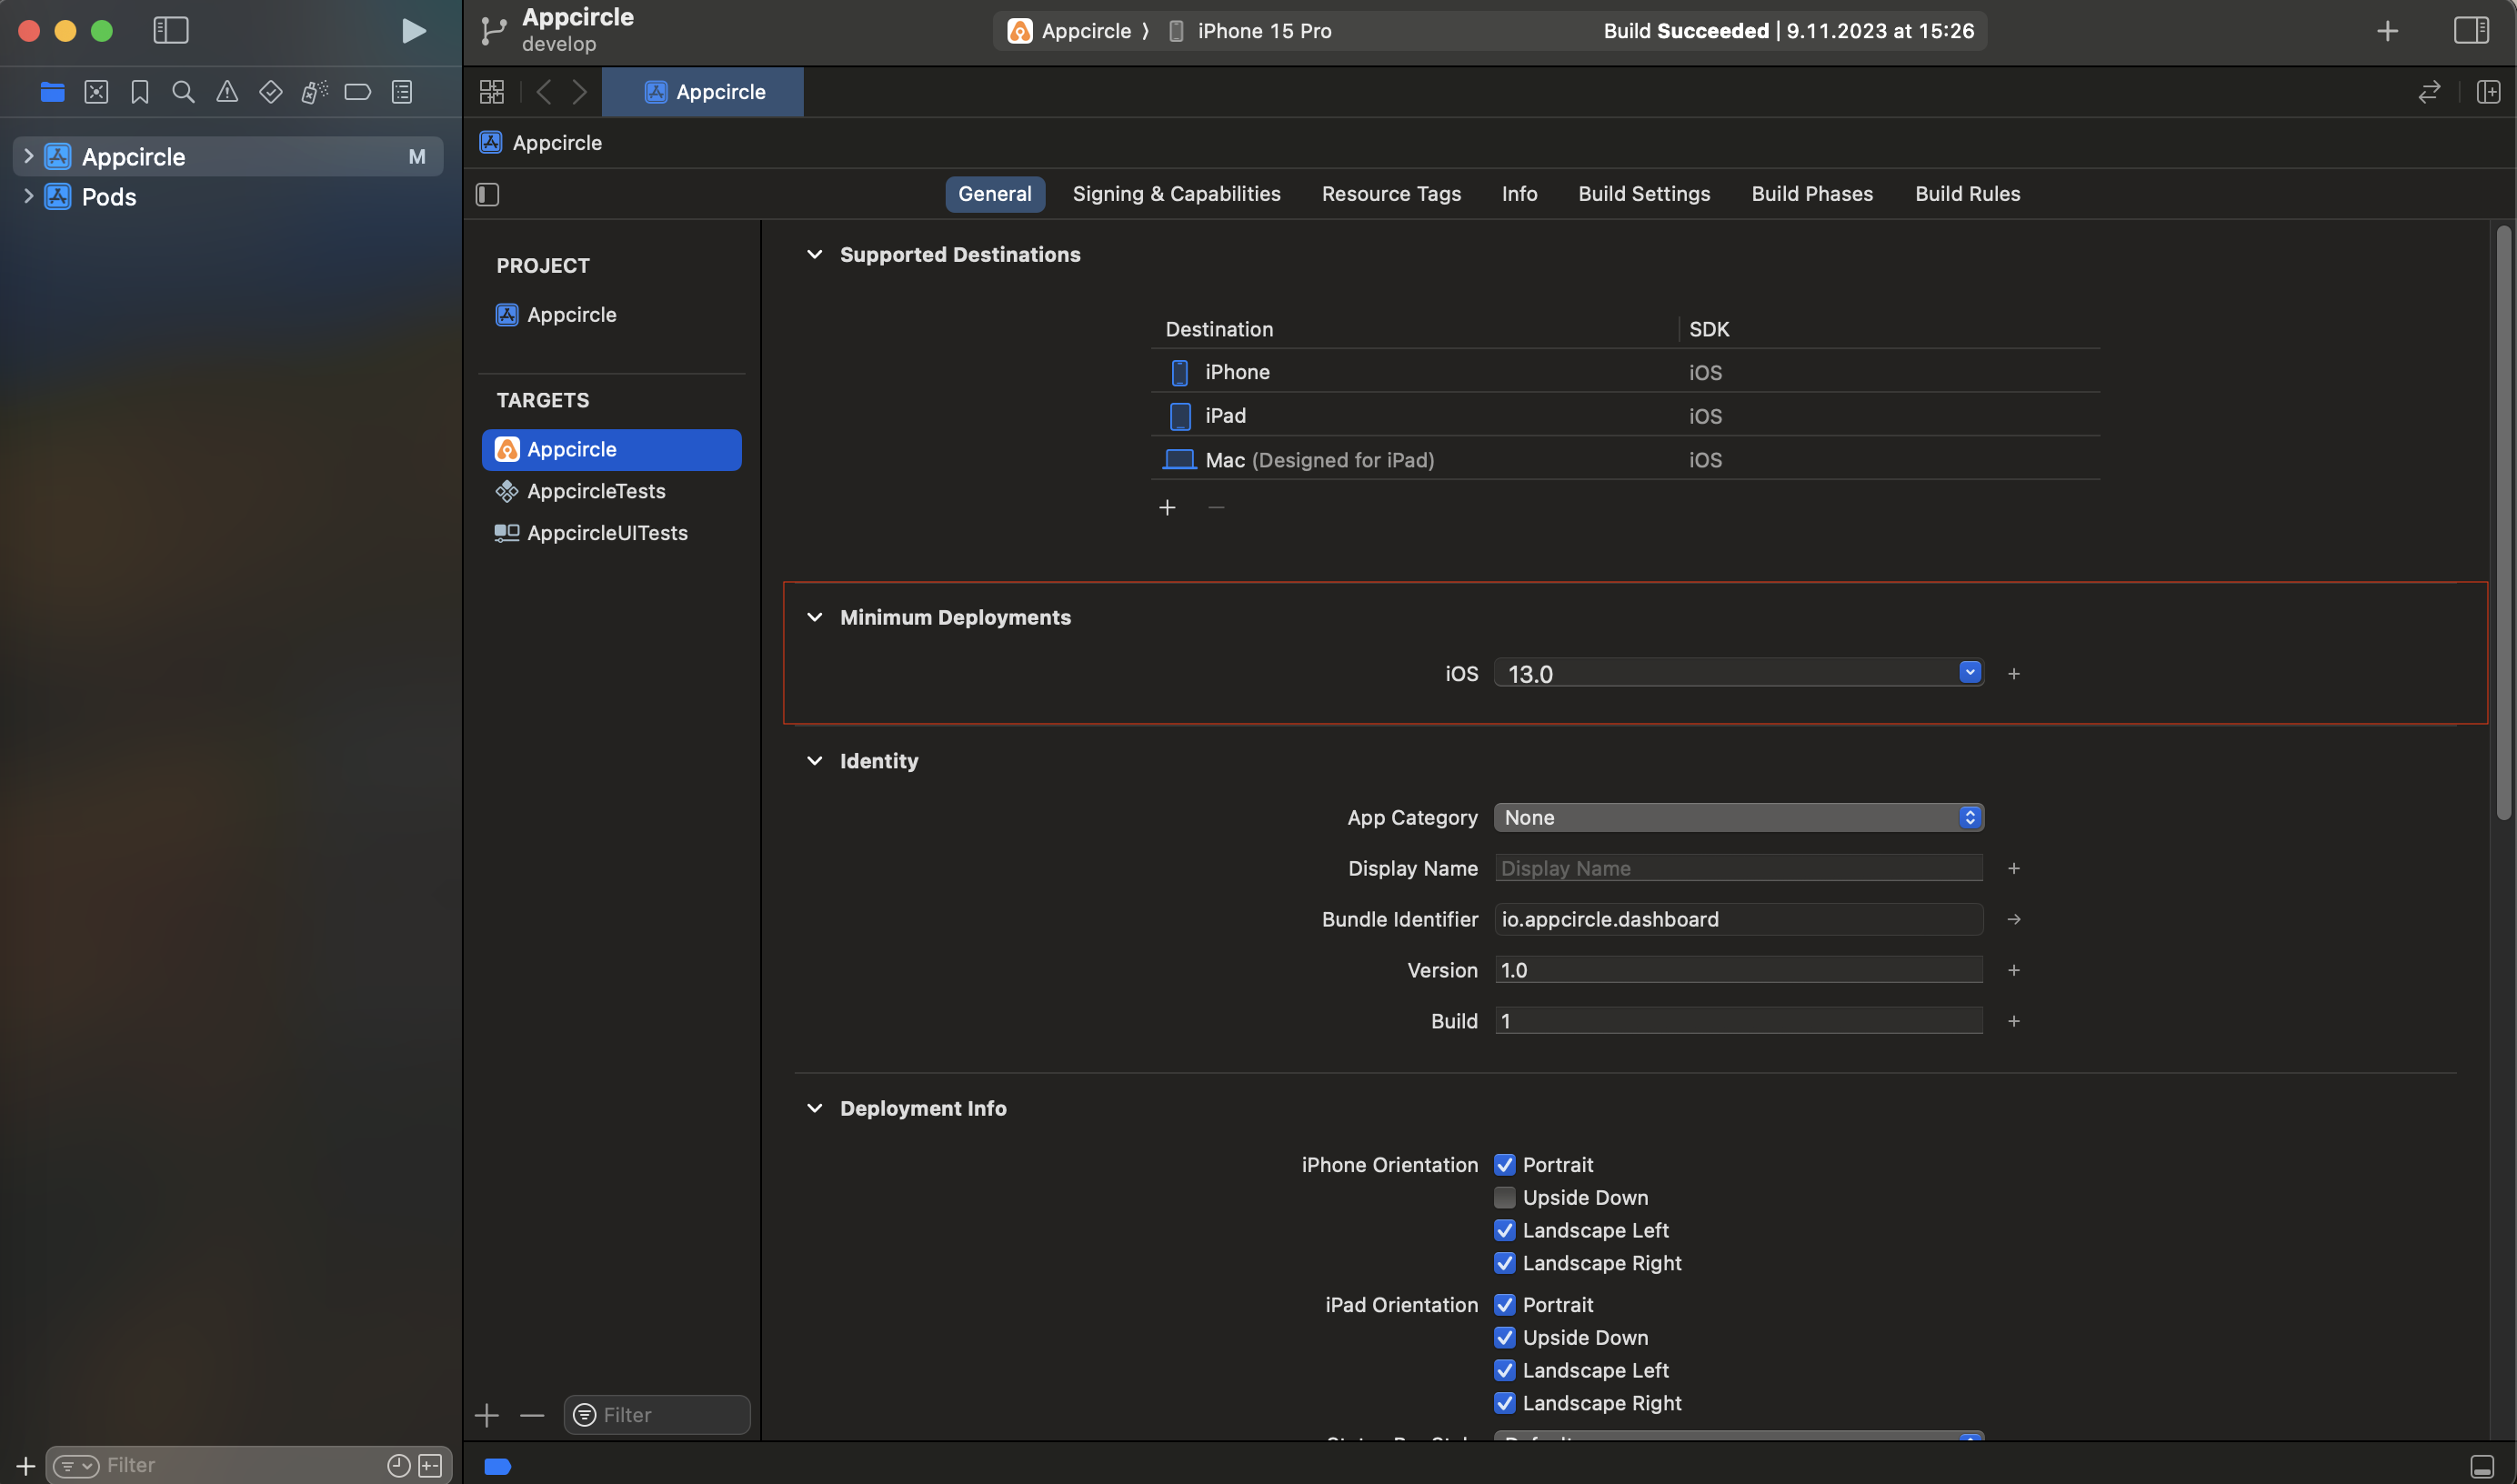
If the issue persists after updating Cocoapods, consider updating your iOS minimum deployment target to iOS 13.0 or higher. If the problem still remains, use the script provided below.
If you still encounter the same error, you can address it by making the following changes at the end of your Podfile:
post_install do |installer|
  installer.pods_project.targets.each do |target|
    target.build_configurations.each do |config|

      xcconfig_path = config.base_configuration_reference.real_path
      xcconfig = File.read(xcconfig_path)
      xcconfig_mod = xcconfig.gsub(/DT_TOOLCHAIN_DIR/, "TOOLCHAIN_DIR")
      File.open(xcconfig_path, "w") { |file| file << xcconfig_mod }
    end
  end
end
Provisioning Profile Error
If you receive a provisioning profile error similar to the following, it usually indicates a mismatch between the bundle ID selected in the build configuration and the provisioning profile.
error: "MyProject" requires a provisioning profile. Select a provisioning profile in the Signing & Capabilities editor. (in target MyProject from project MyProject)
In such an error, please check if the correct bundle ID is selected for the build. This is especially the case if you are using different bundle IDs for different release types such as debug or release.
Signing for "MyPod" requires a development team. Select a development team in the Signing & Capabilities editor
Your Cocoapods dependencies may also show this error when you try to build your project with Xcode 14. To prevent this, you may try one of the following workarounds.
- Signing with your own certificates. This requires uploading both development and distribution certificates. Therefore you either need to upload appropriate provisioning profiles or turn on Automatic Code Signing.
post_install do |installer|
    installer.pods_project.targets.each do |target|
      target.build_configurations.each do |config|
        config.build_settings["DEVELOPMENT_TEAM"] = "YOUR Team ID"
      end
    end
end
- Skip signing pod bundles
post_install do |installer|
  installer.pods_project.targets.each do |target|
    if target.respond_to?(:product_type) and target.product_type == "com.apple.product-type.bundle"
      target.build_configurations.each do |config|
          config.build_settings['CODE_SIGNING_ALLOWED'] = 'NO'
          config.build_settings['CODE_SIGNING_REQUIRED'] = 'NO'
          config.build_settings['CODE_SIGNING_IDENTITY'] = '-'
          config.build_settings['EXPANDED_CODE_SIGN_IDENTITY'] = '-'
      end
    end
  end
end
iOS Minimum Deployment Target Error
Following the release of new Xcode and iOS versions, projects containing pods or targets below certain iOS versions may experience simulator-related errors due to unsupported older iOS versions.
During the 'Xcodebuild for Devices' step, you may encounter an error similar to this:
ld: file not found: /Volumes/xcode.14.x/Xcode.app/Contents/Developer/Toolchains/XcodeDefault.xctoolchain/usr/lib/arc/libarclite_iphoneos.a
clang: error: linker command failed with exit code 1 (use -v to see invocation)
To prevent this error, please update the minimum deployment iOS versions for the targets in your project.
For your pods, append the following script to the end of your Podfile:
config.build_settings['IPHONEOS_DEPLOYMENT_TARGET'] = '13.0'
post_install do |installer|
  installer.pods_project.targets.each do |target|
    if target.respond_to?(:product_type) and target.product_type == "com.apple.product-type.bundle"
      target.build_configurations.each do |config|
        ...
        ## Other config settings
        ...
        config.build_settings['IPHONEOS_DEPLOYMENT_TARGET'] = '13.0'

      end
    end
  end
end
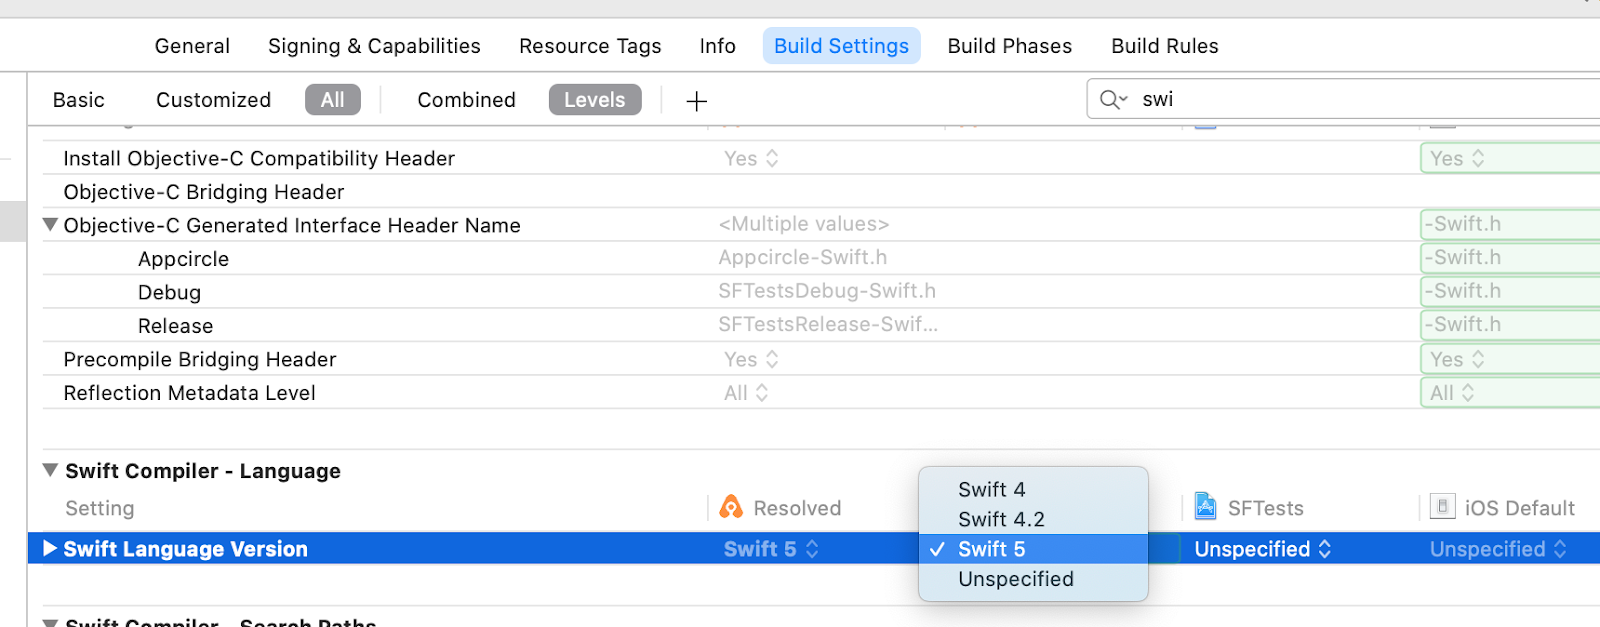
Swift Version Error
If you receive an error similar to the following, the selected Xcode version in the build configuration may be incompatible with the selected Swift version in the project settings.
SWIFT_VERSION '3.0' is unsupported, supported versions are: ...
In this case, you need to upgrade the Swift version in the project settings in Xcode and once the build is confirmed to be working locally in the specific Xcode version, it can be retried in Appcircle with the same Xcode version.
Need help?
Get help from Appcircle's support team, or see how others are using Appcircle by joining our Slack Channel.