Triggers
There are multiple ways to trigger a build in Appcircle. You can run builds manually or automate the build process with various triggers.
Triggers for Manual Builds
For the manual builds, the currently available push triggers apply, and if no trigger is configured, the following trigger is provided by default under the push triggers. If there are others, they may take precedence based on the trigger priorities.
Triggers Configuration
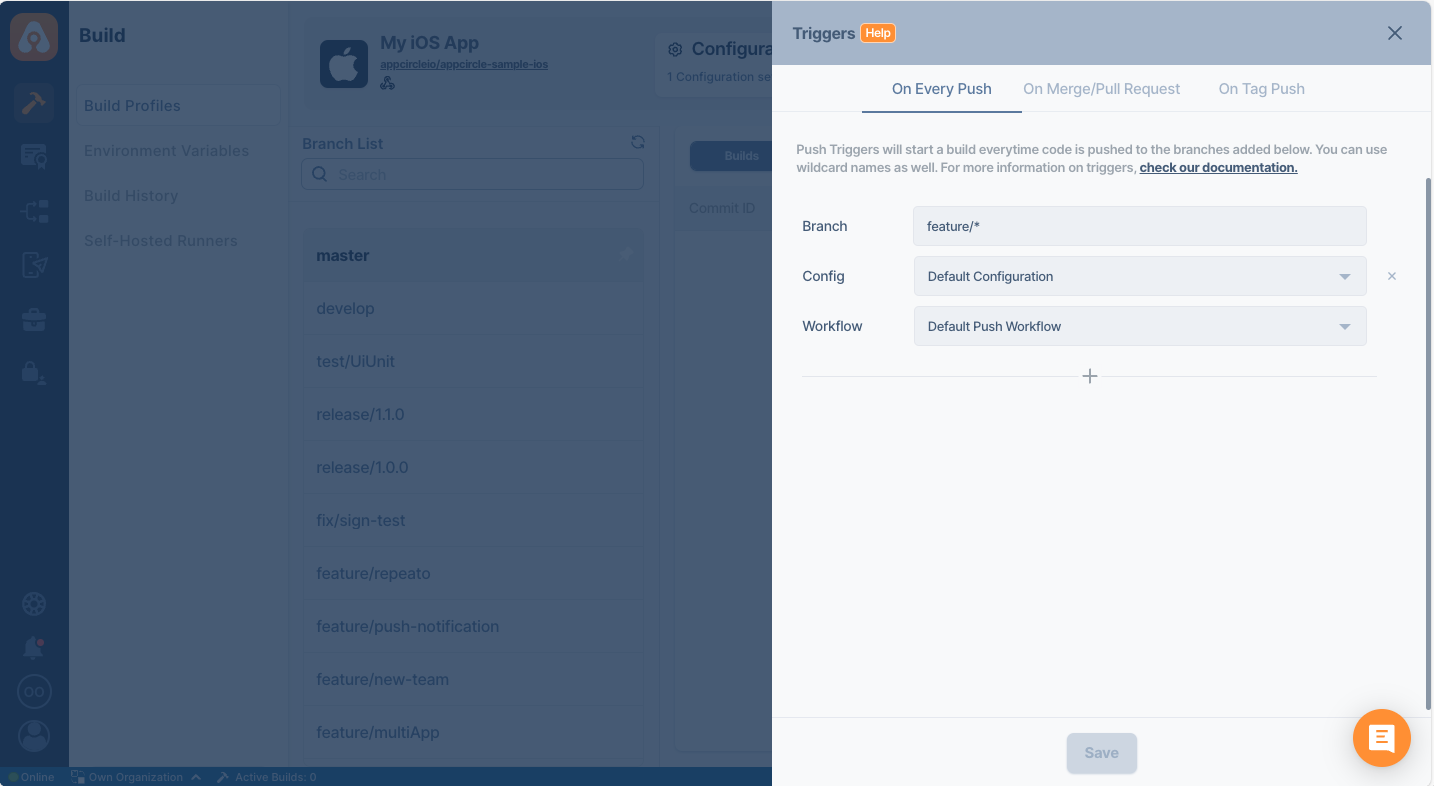
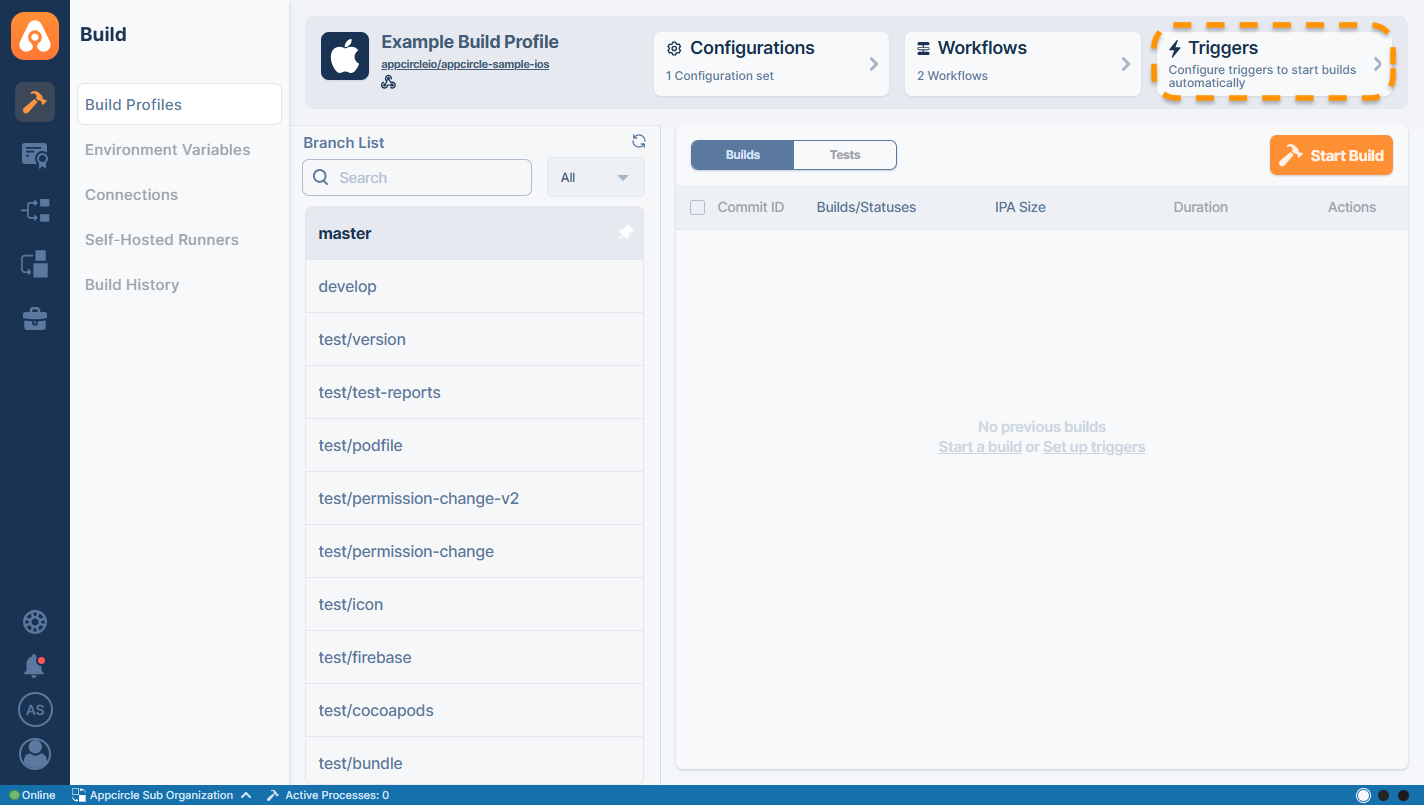
To set up or manage the build triggers, click the Triggers button in the context menu of the build profile, accessible from the top of the profile details.
The triggers are set up at the profile level, and you can specify individual branch names or utilize wildcards for branch names to trigger builds.
You also need to select a workflow for each trigger, and the build will be run with that trigger for the specified branch. You can build the same branch with different workflows (e.g., production or development), or you can use the same workflow for multiple branches (e.g., multiple feature branches built with the develop workflow).
Automatic Build
Builds can be triggered with various triggers such as every push to the repository, pull/merge requests, or tagged pushes. This requires the following:
- Webhook connection to the repository
- Setting up build triggers
There are two options to set up webhooks for automatic builds:
- You can authorize the Appcircle app for GitHub, Bitbucket, or GitLab repositories for direct integration. The triggers will be available for use immediately. (You can skip the next part about the webhook setup.)
- For the repository connections through SSH, you can add the specific webhook for that build profile manually to the compatible git provider. This enables the Git provider to send a POST request to Appcircle for the selected events, which you can then use for triggers.
Setting up Manual Webhooks Based on Repository Connection Type
Depending on how your Git provider is connected to Appcircle, the webhook setup may be handled automatically or may require manual configuration.
Setting Up Manual Webhooks for SSH and Public Repositories
For repositories connected through SSH, you can set up triggers with webhooks in compatible repository providers.
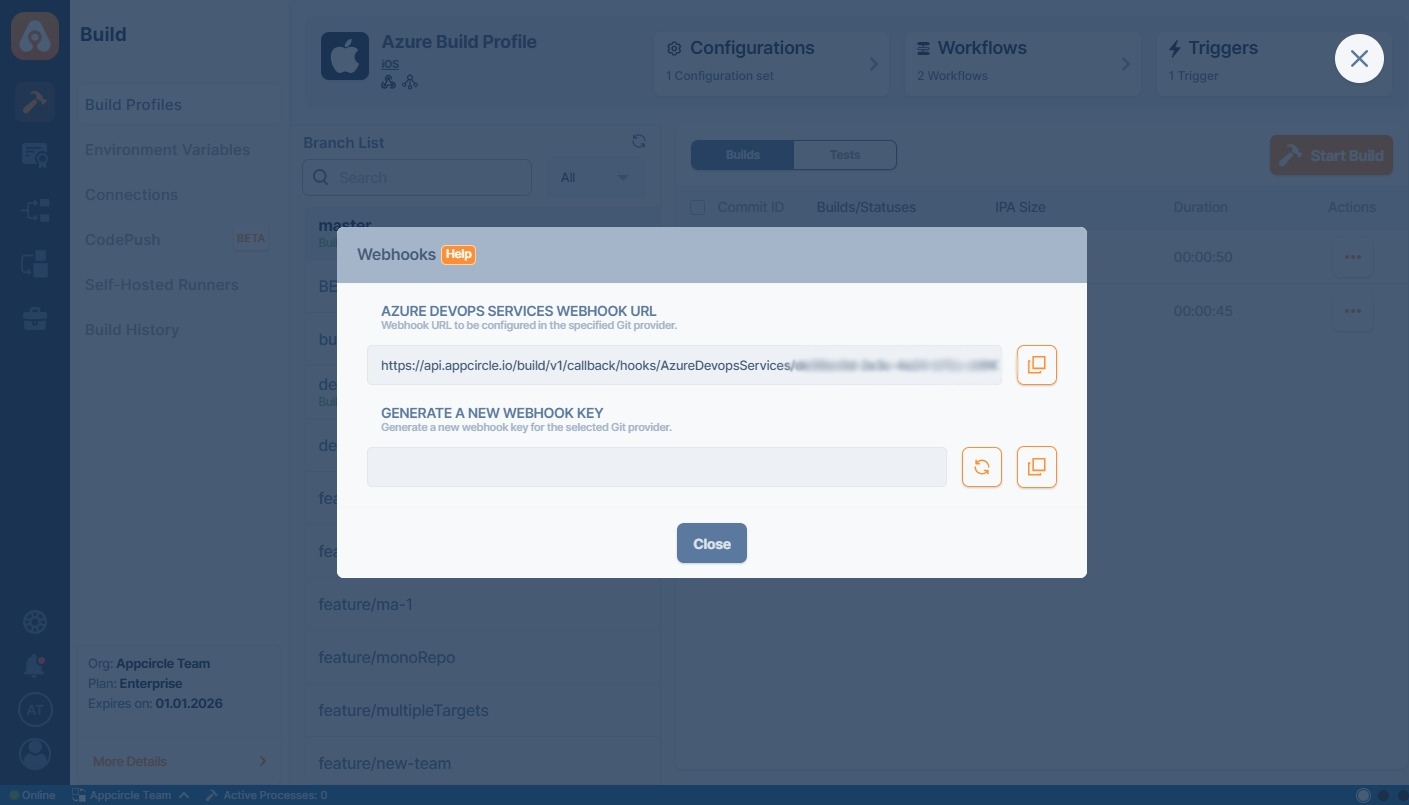
When you connect a repository through SSH or through a public URL, the Webhook URL option will be enabled in the context menu of the build profile, accessible from the top of the profile details.
You can copy this URL and paste it in the related section in the git provider repository settings with the copy button.

To manually configure a webhook:
1. Go to your build profile.
2. Click the Webhook icon and select Repository Webhook URL.
3. In the Repository Webhook URL popup:
-
Select a Git Provider: If the Git provider is detected, a compatible URL will be displayed automatically. If not, choose your Git provider (e.g., GitHub, GitLab, Bitbucket) from the dropdown list.
-
Copy the Webhook URL: The generated Repository Webhook URL will appear based on your Git Provider. Copy this URL and paste it into your repository’s webhook settings.
The URL Format:
https://api.appcircle.io/build/v1/callback/hooks/{GIT_PROVIDER}/{YOUR_ORGANIZATION_ID}/custom/{INTEGRATION_ID}/V
- Generate a Webhook Key: You can generate a new webhook key/secret to refresh or reset the endpoint’s security token.
4. Paste the Webhook URL in your Git repository.
The Selected Git Provider option on the Webhook Configuration screen is only available for repositories connected via SSH or Public URL.
If your repository is connected using GitHub, GitLab, Bitbucket or Azure Devops App integrations, this selection will not appear since webhooks are automatically managed.
Azure Devops has slightly different steps to configure a manual webhook. To manually configure a webhook for an Azure DevOps repository:
- Connect your Azure DevOps repository to Appcircle and create a build profile.
- In Azure DevOps, navigate to:
Project Settings → Service Hooks → + Create Subscription - Choose Web Hooks as the service.
- Select your repository and choose the required trigger events (e.g., code push, pull request).
- In the “Action” step, paste the webhook URL.
- “Accept untrusted SSL certificates“ option can stay disabled.
- Enter
appcircleas username. - Paste
{YOUR_WEBHOOK_SECRET}as password.
Binding Existing Manual Webhooks to Other Build Profiles
When a manual webhook (SSH/Public URL/Read-only PAT) is already configured for a repository, additional build profiles that are connected to the same repository can reuse this existing webhook configuration.
- When opening the Webhooks section of a build profile, if a manual webhook is already detected for the repository, a prompt will appear asking if you would like to bind the build profile to the existing webhook.
- Selected Git Provider, Webhook URL, and the existing Webhook Key/Secret will be displayed as partially masked.
- Users can directly click the Bind button to link the build profile to the existing webhook.

Webhook Setup for OAuth and PAT-Based Repository Connections
When a repository is connected to Appcircle via OAuth connection (such as GitHub, GitLab, or Bitbucket) or using a Personal Access Token (PAT), the behavior of webhook creation varies depending on the type of integration and the permission level of the token.
In some cases, Appcircle handles webhook setup automatically, while in others—particularly when using read-only access—manual configuration may be required to enable trigger-based builds.
Below is a breakdown of how webhooks are managed for each supported Git provider based on the connection method.
GitHub OAuth Connection
When your repository is connected using the GitHub OAuth connection, webhooks are created automatically. No manual configuration is needed.
GitLab OAuth Connection
Webhooks are also automatically created when connecting via the GitLab OAuth connection.
GitLab Cloud/Server - PAT Connection
The behavior differs depending on the PAT’s permission level:
- Admin Permissions: Webhooks are created automatically.
- Read-Only Permissions: Manual webhook creation is required.
To set up a manual webhook for a read-only PAT:
- Connect the GitLab repository to Appcircle using the read-only PAT and create a build profile.
- In GitLab Server, go to:
Projects → <Your Connected Repository> → Settings → Webhooks → Add Webhook - Paste the webhook URL in this format:
https://api.appcircle.io/build/v1/callback/hooks/{GIT_PROVIDER}/{YOUR_ORGANIZATION_ID}/V7
APPCIRCLE_API_URL: Useapi.appcircle.iofor cloud, or your custom server address.APPCIRCLE_BUILD_PROFILE_ID: The ID of your Appcircle build profile.
In order to create a webhook, the created PAT must have at least the role of Maintainer.
Bitbucket OAuth Connection
When using the Bitbucket OAuth connection, Appcircle automatically creates the webhook—no further action is needed.
Bitbucket Server - PAT Connection
Webhook behavior is determined by the PAT’s permissions:
- Admin Permissions: Webhook is created automatically.
- Read-Only Permissions: Manual setup is required.
To manually configure a webhook for a Bitbucket Server repository using a read-only PAT:
- Connect the Bitbucket Server repository using the read-only PAT and create a build profile in Appcircle.
- In Bitbucket Server, go to:
Repositories → <Your Connected Repository> → Repository Settings → Webhooks → Create Web Hook - Paste the webhook URL in this format:
https://api.appcircle.io/build/v1/callback/hooks/{GIT_PROVIDER}/{YOUR_ORGANIZATION_ID}/V7
Azure Devops - PAT Connection
When using the Azure Devops PAT Integration, Appcircle automatically creates the webhook—no further action is needed.
This ensures proper webhook communication across all supported Git repository configurations.
Please refer to the following guides to set up webhooks in various git providers:

![]()
![]()

Webhook Events Reference
You can enable or disable webhook event scopes according to your needs. The table below lists supported events for each Git provider along with their descriptions:
| Event | Description | GitHub | GitLab | Bitbucket | Azure DevOps |
|---|---|---|---|---|---|
| Push / Code Push | Triggered when code is pushed to any branch. | ✅ | ✅ | ✅ | ✅ |
| Tag Push / Tag Created | Triggered when a new tag is pushed. | ✅ | ✅ | ✅ | ✅ |
| Branch or Tag Creation | Triggered when a new branch or tag is created. | ✅ | ✅ | ✅ | ✅ |
| Branch or Tag Deletion | Triggered when a branch or tag is deleted. | ✅ | ✅ | ✅ | ✅ |
| Pull/Merge Request Created | Triggered when a PR/MR is opened. | ✅ | ✅ | ✅ | ✅ |
| Pull/Merge Request Updated | Triggered when commits are added or changes are made to the PR/MR. | ✅ | ✅ | ✅ | ✅ |
| Pull/Merge Request Merged | Triggered when a PR/MR is merged. | ✅ | ✅ | ✅ | ✅ |
| Pull/Merge Request Closed | Triggered when a PR/MR is closed or abandoned. | ✅ | ✅ | ✅ | ✅ |
| Issue or PR Comment Added | Triggered when a comment is added to an issue or PR. | ✅ | ✅ | ✅ | ❌ |
| Pipeline Status Changed | Triggered when a pipeline/build status changes (e.g., success/failure). | ❌ | ✅ | ❌ | ✅ |
| Work Item Updated | Triggered when a task/ticket is updated in the tracker system. | ❌ | ❌ | ❌ | ✅ |
✅ = Supported by the provider
❌ = Not supported or not applicable
Note: Terminology may vary slightly across providers (e.g., PR vs. Merge Request).
You can also use appcircle-cli to trigger your builds from the command line as well.
Managing Triggers for Builds
To set up or manage the build triggers, click the Triggers button in the context menu of the build profile, accessible from the top of the profile details.
Auto build on every push
Appcircle will start building your application whenever you push a commit to your Git repository. For the specified branches, your project will be built automatically with the selected workflow.
You must choose both workflow, and a configuration when you're setting up a trigger.
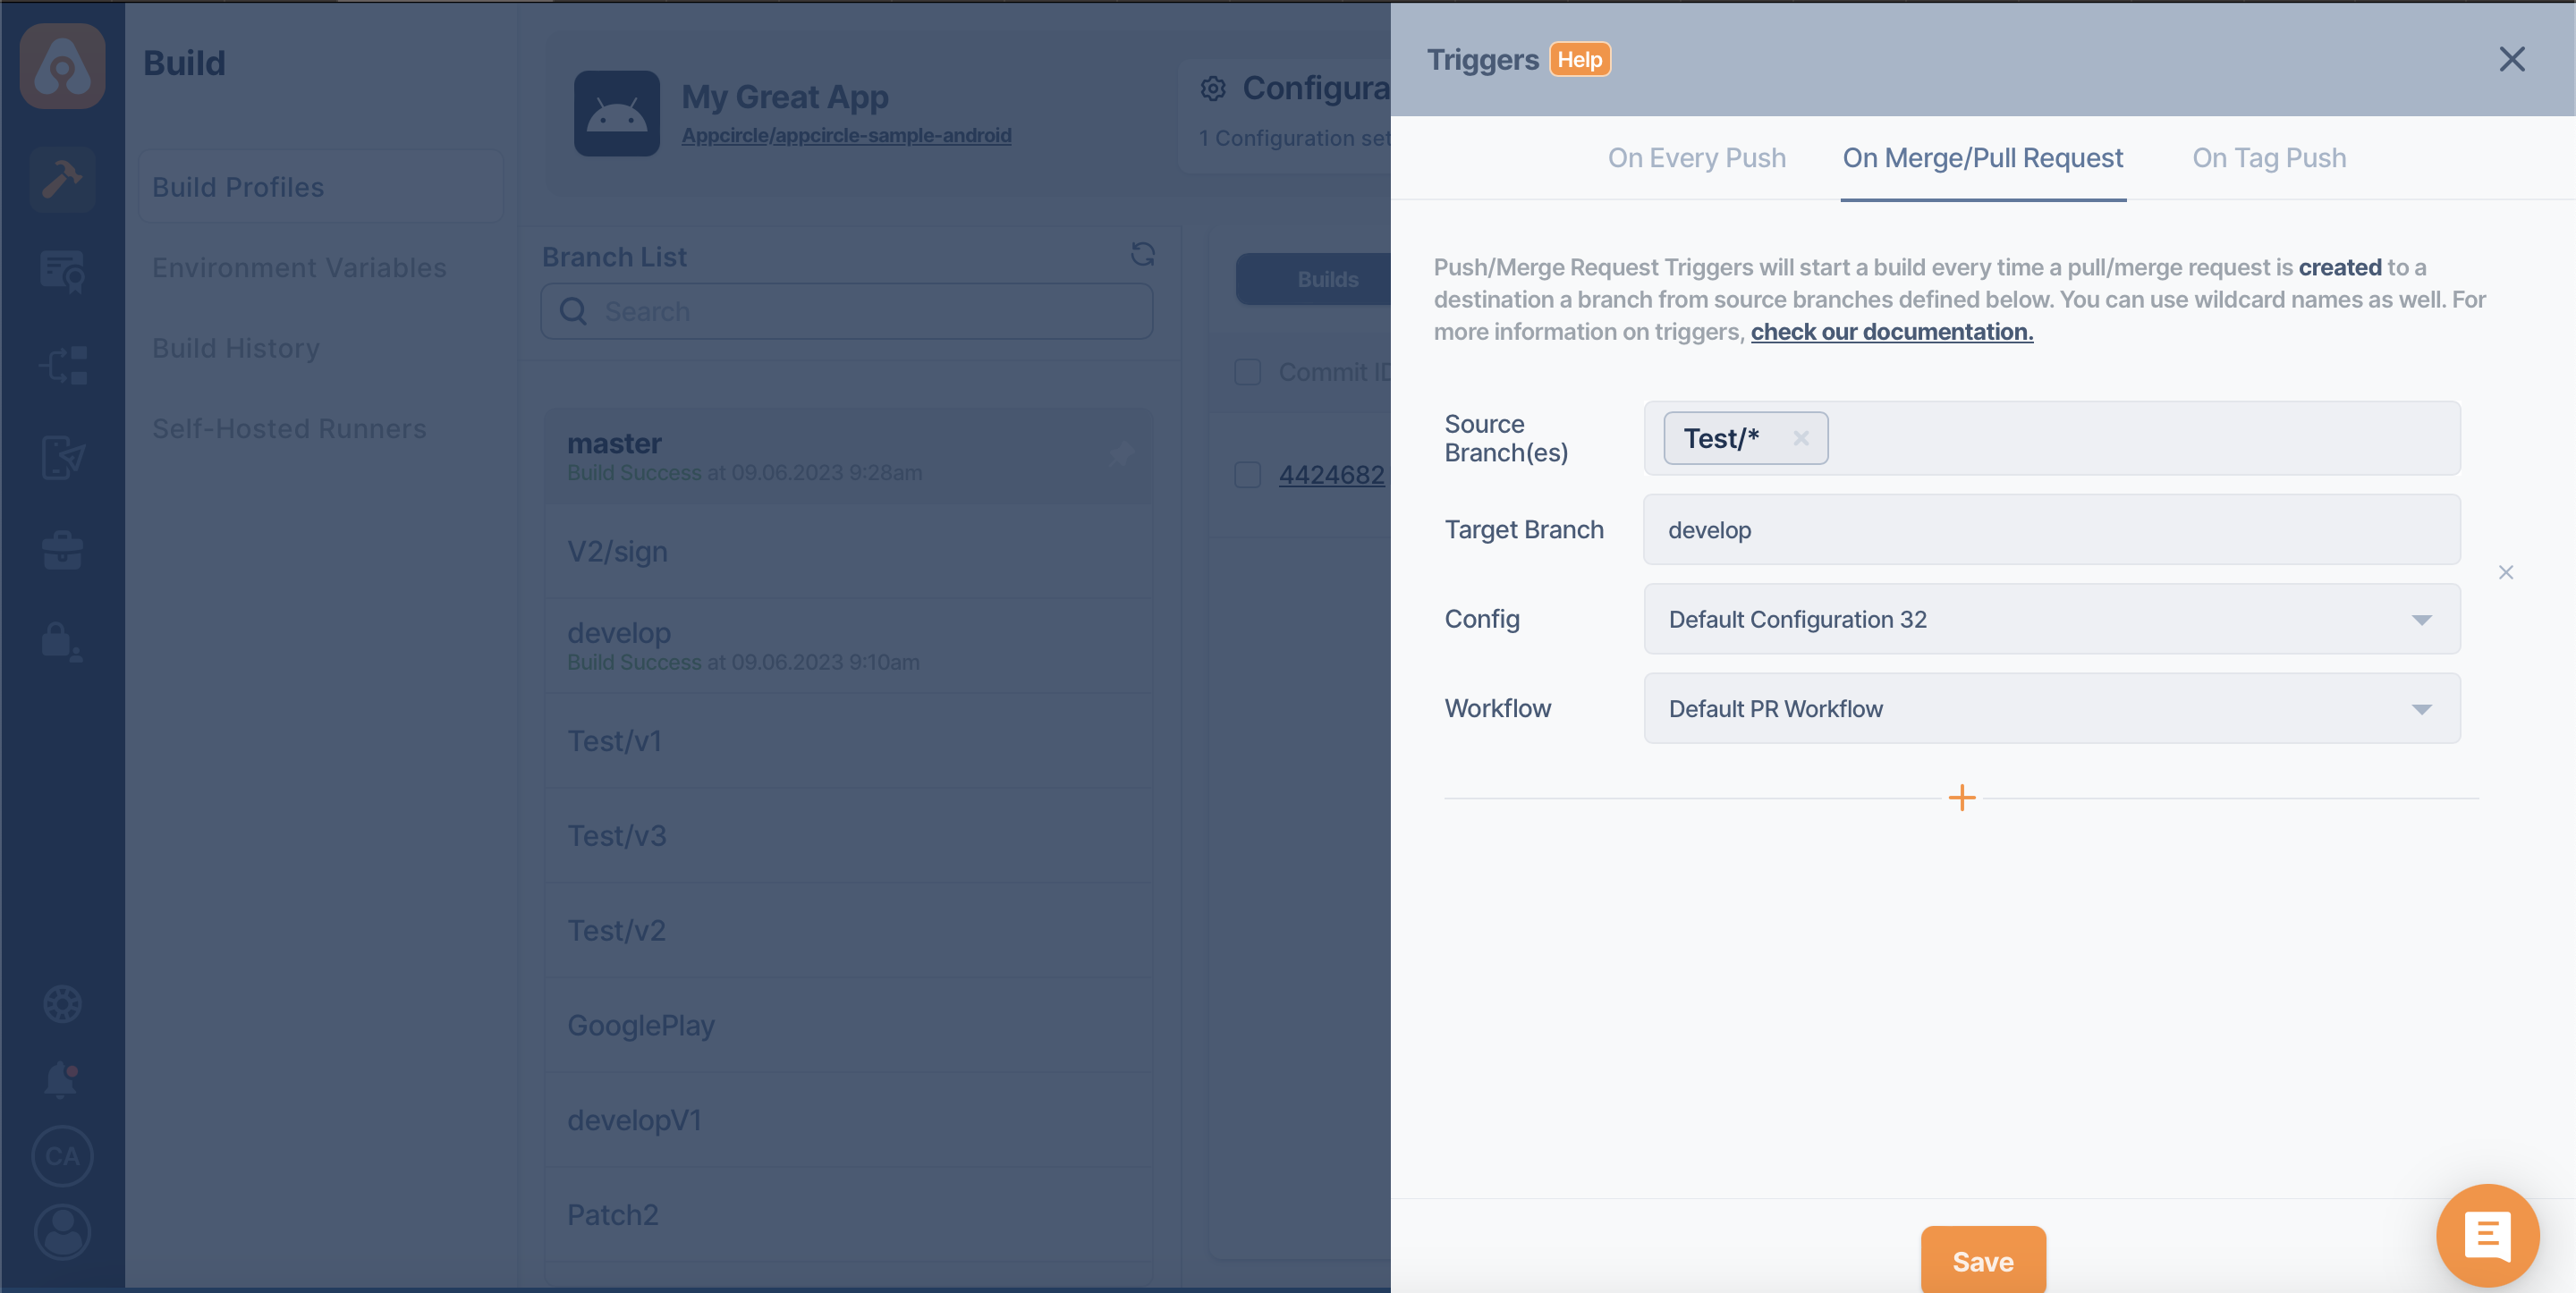
Auto build pull/merge requests
Appcircle will start building your application whenever you initiate a pull request or merge request from the source branch(es) to the target branch.
The build will be done with the pull/merge result using the selected workflow. This allows testing of the PR/MR result before the actual approval of the request.
Make sure that the names of the source branch and the target branch are spelled correctly.
If spaces are used in the name, Appcircle will trim it without spaces.
If you are using Azure DevOps Server or Azure DevOps Services Cloud as a Git provider, the Appcircle build trigger will not run for PR status updates (Approve, Approve with suggestions, Wait for author, Reject, etc.) or action changes (Complete, Mark as draft, Abandon).
Appcircle will only run the trigger for PR creation or PR updates.
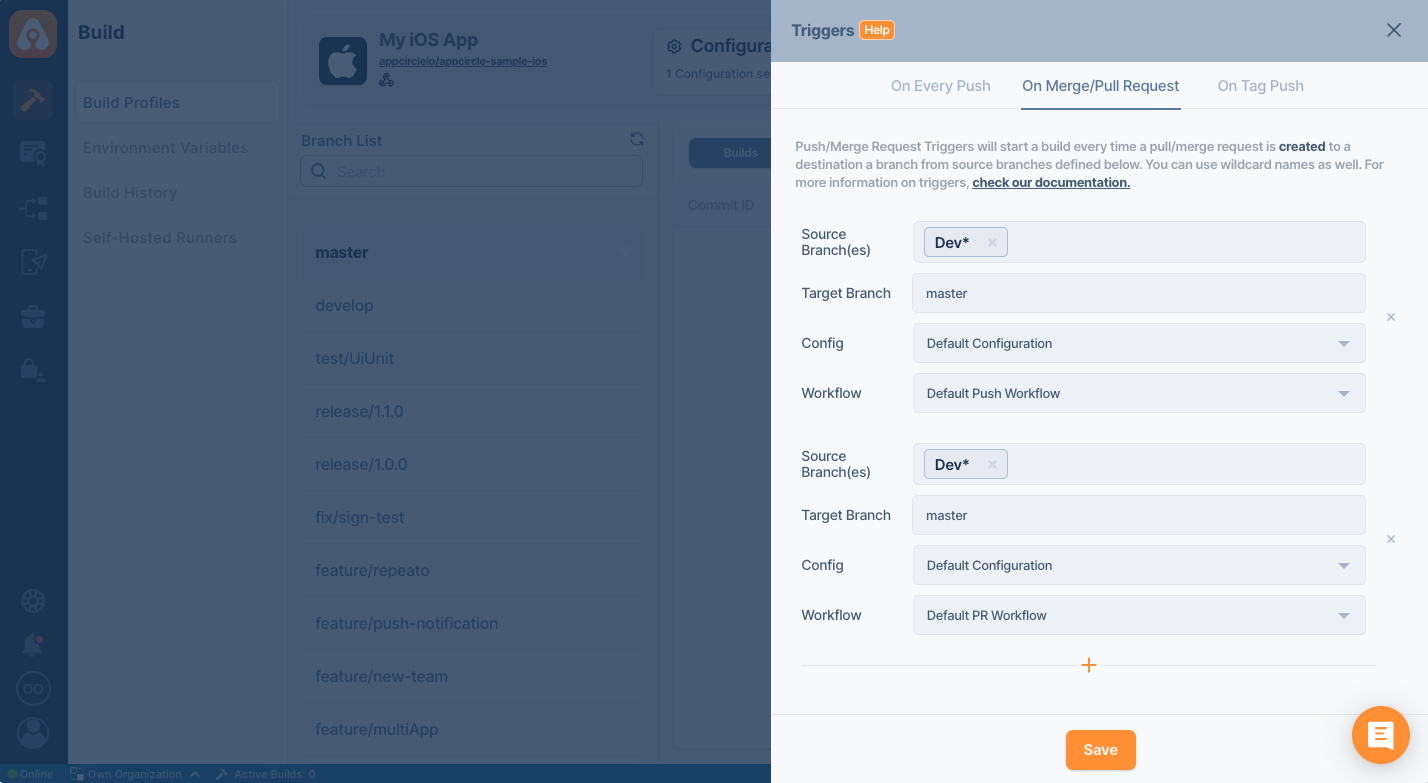
Triggering different workflows at the same time
Now you will be able to trigger different workflows in the same source branch and target branch on Appcircle at once. As soon as the trigger is triggered, Appcircle will start running all the triggered triggers in the build queue, starting from the first place in the established trigger queue.
Selective auto build with specific tags
Appcircle will start building your application with the selected workflow whenever you perform a push with certain tags to your Git repository. Your project will be built automatically only if the push has the tags you specify, or you can specify a wildcard tag to build all tagged pushes.
This allows building scenarios like building only specific pushes that have the "release" in the tag.

Skipping a workflow
If your commit message includes [skip ci] or [ci skip], your workflow will be skipped.
Retrying a workflow
If your merge request comment includes [retry], your workflow will be retried.
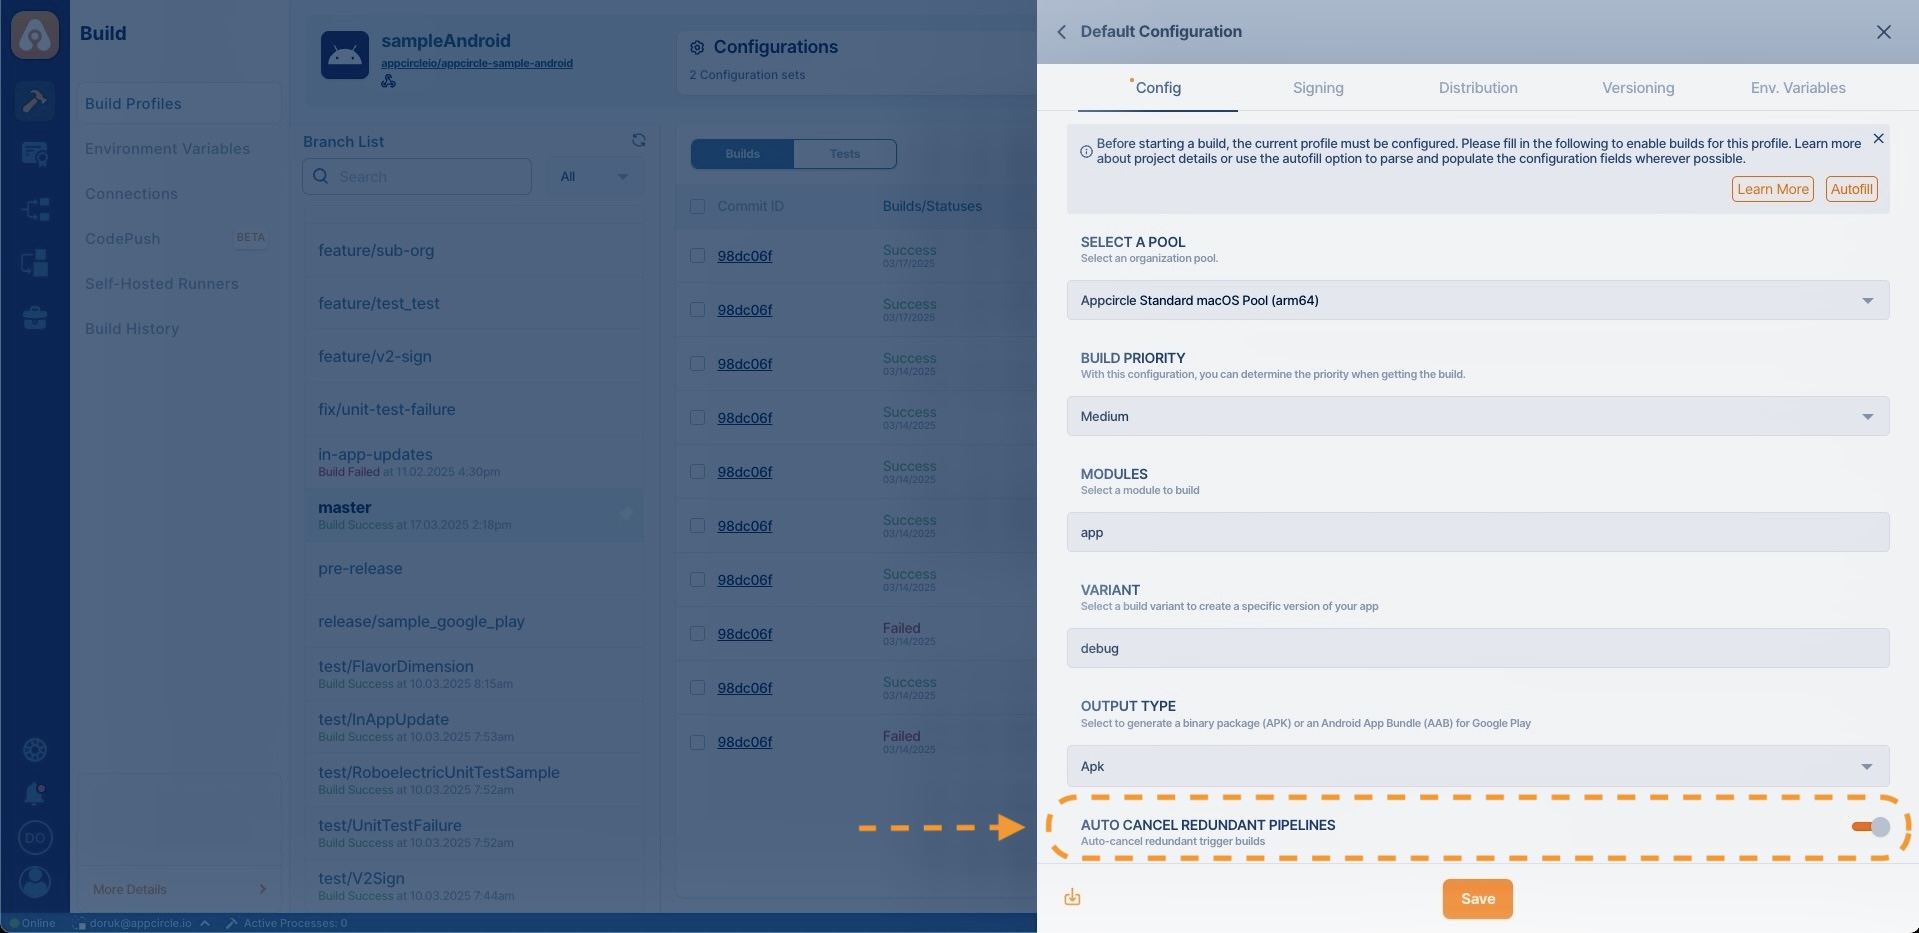
Auto Cancel Redundant Pipeline
When enabled, this feature automatically cancels any previously running build that matches the same build configuration, build workflow, build trigger and branch if a new run is triggered. This helps prevent unnecessary resource usage and reduces queue time by skipping outdated pipeline runs.
To enable this feature:
- Go to the
Build Profilesand selectConfigurations. - Scroll down and activate
Auto Cancel Redundant Pipeline. - Click
Savechanges.
The Auto-Cancel Redundant Pipeline mechanism works based on four key parameters:
- Build Configuration
- Build Workflow
- Build Trigger
- Git Branch
If a new build is triggered with the same values for all these parameters, any previously queued or running build is automatically cancelled.
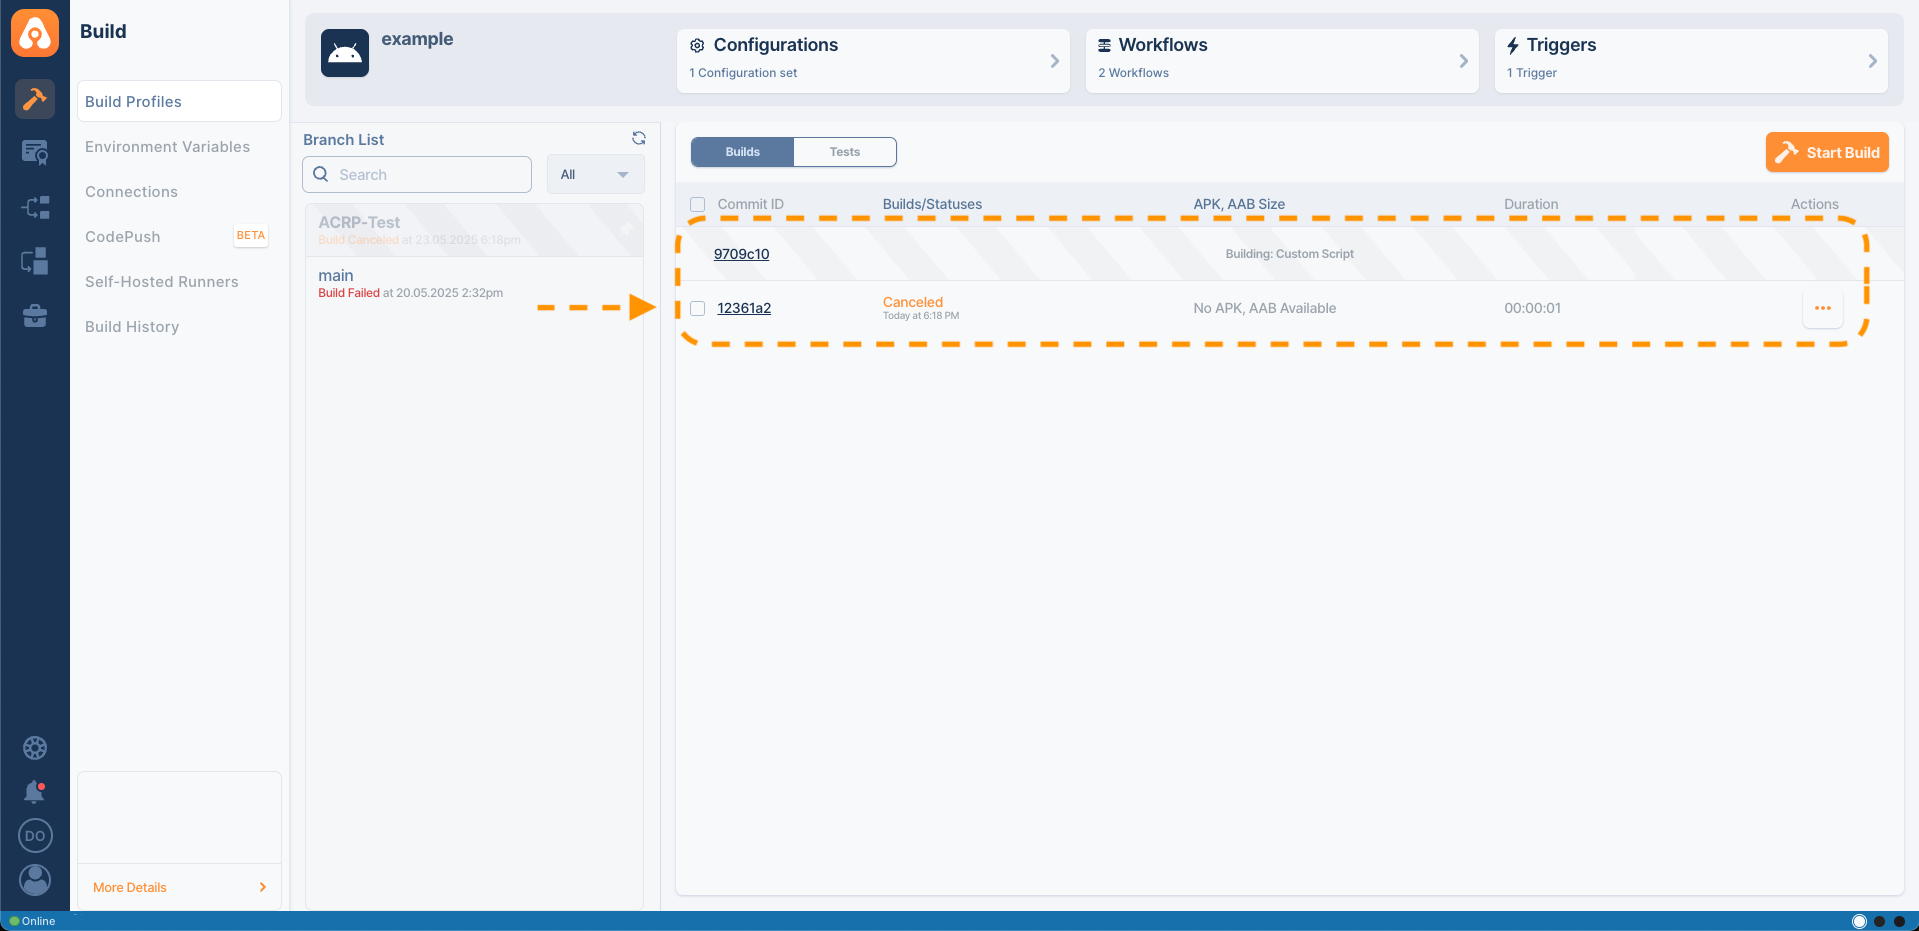
Builds that are manually started do not affect ongoing or queued builds; the auto-cancel mechanism does not apply to manually started builds.
Further Automatic Build Subjects
Trigger Priorities
If you set multiple triggers, certain branch definitions will not take precedence over wildcard definitions. They will all start at the same time. Below is an example:
Assume that you have a branch named development with three push triggers.
- Trigger branch:
*-> Trigger Workflow: Workflow 1 - Trigger branch:
development-> Trigger Workflow: Workflow 2 - Trigger branch:
develop*-> Trigger Workflow: Workflow 3
When there is a push or PR for the development branch, all triggers (since the word development contains both * and develop*) will be used to start a different build for each branch. At this point, a total of three build pipelines will begin.
If multiple triggered builds exceed your plan's concurrency limits, Appcircle will automatically queue them, and all of them will be executed unless you cancel.
Wildcard Reference
You can specify branch names or tags with an asterisk wildcard to automate builds. Below are some examples:
| Pattern | Description |
|---|---|
*-fix | Build if it ends with -fix |
fix-* | Build if it starts with fix- |
*-fix-* | Build if it -fix- is present anywhere in the name |
fix-*-build | Build if it starts with fix- and ends with -build |
* | Build everything |
FAQ
Why is my Appcircle trigger not working and how can I fix it?
First, ensure that the build profile triggers are set for the desired branches and actions. Please check the trigger settings from the Managing Triggers for Builds section in the documentation.
Appcircle is triggered via the Git provider's webhooks. To properly work with triggers, webhooks in the repositories are used by Appcircle. Also, ensure that the repository has webhook access to Appcircle. To connect webhooks, the Git provider connection must be set up properly while creating a build profile.
Certain Git actions to the repositories, such as push, merge, pull request, tag push, etc., activate a specified event with the repository's webhooks. It is necessary to ensure that the desired event is actually triggered by the action in the Git provider's repository.
If webhooks are disabled due to frequent use or connection-based errors, using test events may help re-enable webhooks in Git providers.
To ensure webhooks are set and working, the webhook history can be reviewed within the Git providers. Let's check the Git providers below. You can follow the steps in the Git provider's documentation to access the webhook event history.
- GitHub Webhook Deliveries
- GitLab Webhook Request History
- Azure DevOps Services Webhook History
- Bitbucket Webhook Documentations
A document detailing the history of webhooks is not provided by Bitbucket. To access the webhook history, please navigate to:
Bitbucket -> Repository -> Repository Settings -> Webhooks -> View Requests
View Requests has to be enabled before requests can be seen.
Once the webhook is created and confirmed to be properly set up and healthy in the Appcircle build profile, and it is verified to work correctly with the specific Git provider, the process works as follows:
- A Git action, such as pushing a code block, triggers a webhook event.
- This webhook event activates the trigger in Appcircle.
- Appcircle then automatically starts the build process.
Why does my tag trigger start a build on a different branch?
When you create a tag, it is applied to a specific commit, not a branch. The system does not have explicit branch information linked to the tag. Therefore, when the tag trigger starts a build in Appcircle, it may select any branch that contains the tagged commit, leading to seemingly random behavior.
To control this behavior, push an empty commit to the desired branch and then apply the tag to this new commit. This ensures that the tag trigger starts from the intended branch.
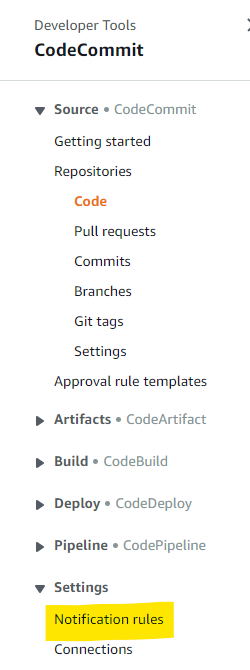
How to enable triggers for AWS CodeCommit repositories?
Appcircle supports AWS CodeCommit triggers through an Amazon SNS topic.
For more information, please refer to: ![]()
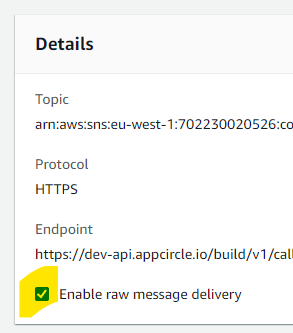
After you follow the steps in the referenced document above to create a trigger, you need to create a notification rule under CodeCommit Settings as shown below to add a webhook URL.
Then select the "Enable raw message delivery" option while adding the webhook URL as a subscription to the topic.
Need help?
Get help from Appcircle's support team, or see how others are using Appcircle by joining our Slack Channel.