General Troubleshooting
Repository Connection Issues
Please note that currently only Git repositories are supported. Any third party version control repositories need to be transferred to a proper Git repository on either Github or Bitbucket.
How to change your connected GitHub, Bitbucket, or GitLab account?
You will need to go to your Github, Bitbucket, or GitLab account and revoke access to Appcircle and then reconnect your account from Appcircle.
Unable to see the repositories in the connected repository provider
Please check if you have owner/admin access in the specific organization from which the repositories will be connected. Appcircle does not allow connections to the repositories with a member-level access.
Error accessing the repository. Please check if the repository exists or if you have the required privileges.
- Only members who have admin role on repository or are owner of the organization can install the Github App in an organization that owns that repository.
- Only members who have admin role on a repository or are owner of the organization can connect a repository to a profile.
Unable to grant access to a GitHub organization
If you are unable to grant access to a specific organization while connecting to GitHub, it is likely that the permission for Appcircle needs an update from the organization application access settings.
To resolve, go to Organization Settings ->Third-party access and press edit next to Appcircle to authorize it for the organization.
Issues in connecting to the repositories with SSH
For the SSH connections, a key pair in PEM format is required. The public key is entered/stored in the Git provider while the private key is entered in Appcircle.
Please refer to this guide for the commands to generate a compatible key pair for SSH connections.
Using multiple SSH keys is not recommended. Instead, you should create a single SSH key that has access to all the private modules.
If you want to use multiple SSH keys, you need to complete the below steps:
- Add your SSH key(s) as environment variable group as a file.
- Select that environment group on your config screen
- Use the below custom script to add that key.
- Each key name should be unique. Appcircle's Activate SSH component uses
appcircle_sshas a key name.
set -e

if [ -z "$MY_OTHER_SSH_KEY" ]
then
echo "MY_OTHER_SSH_KEY is not provided. Skipping step."
exit 0
fi
echo "Create a file to save the RSA SSH private key"
mkdir -p ~/.ssh
echo "$AC_REPOSITORY_SSH_KEY" >> ~/.ssh/appcircle_new_ssh
chmod 600 ~/.ssh/appcircle_new_ssh

echo "Starting a new ssh-agent"
eval $(ssh-agent)

echo "Add the SSH private key to the ssh-agent"
ssh-add ~/.ssh/appcircle_new_ssh
echo "Exporting SSH_AUTH_SOCK=$SSH_AUTH_SOCK"
echo "SSH_AUTH_SOCK=$SSH_AUTH_SOCK" >> $AC_ENV_FILE_PATH
Accessing internal/on-premise repositories
The only available option for connecting to the internal/on-premise repositories is to use SSH and whitelist Appcircle resources if the repositories are not accessible from the public internet.
Please refer to this guide for connecting to the repositories in internal networks.
How to connect to AWS CodeCommit repositories through SSH?
AWS CodeCommit requires the creation of a dedicated user for repository connections through SSH (i.e. the root user cannot be used for this purpose).
Please refer to this guide for creating a user for SSH connections.
- First, create a user in AWS IAM and assign the following permissions to the user:
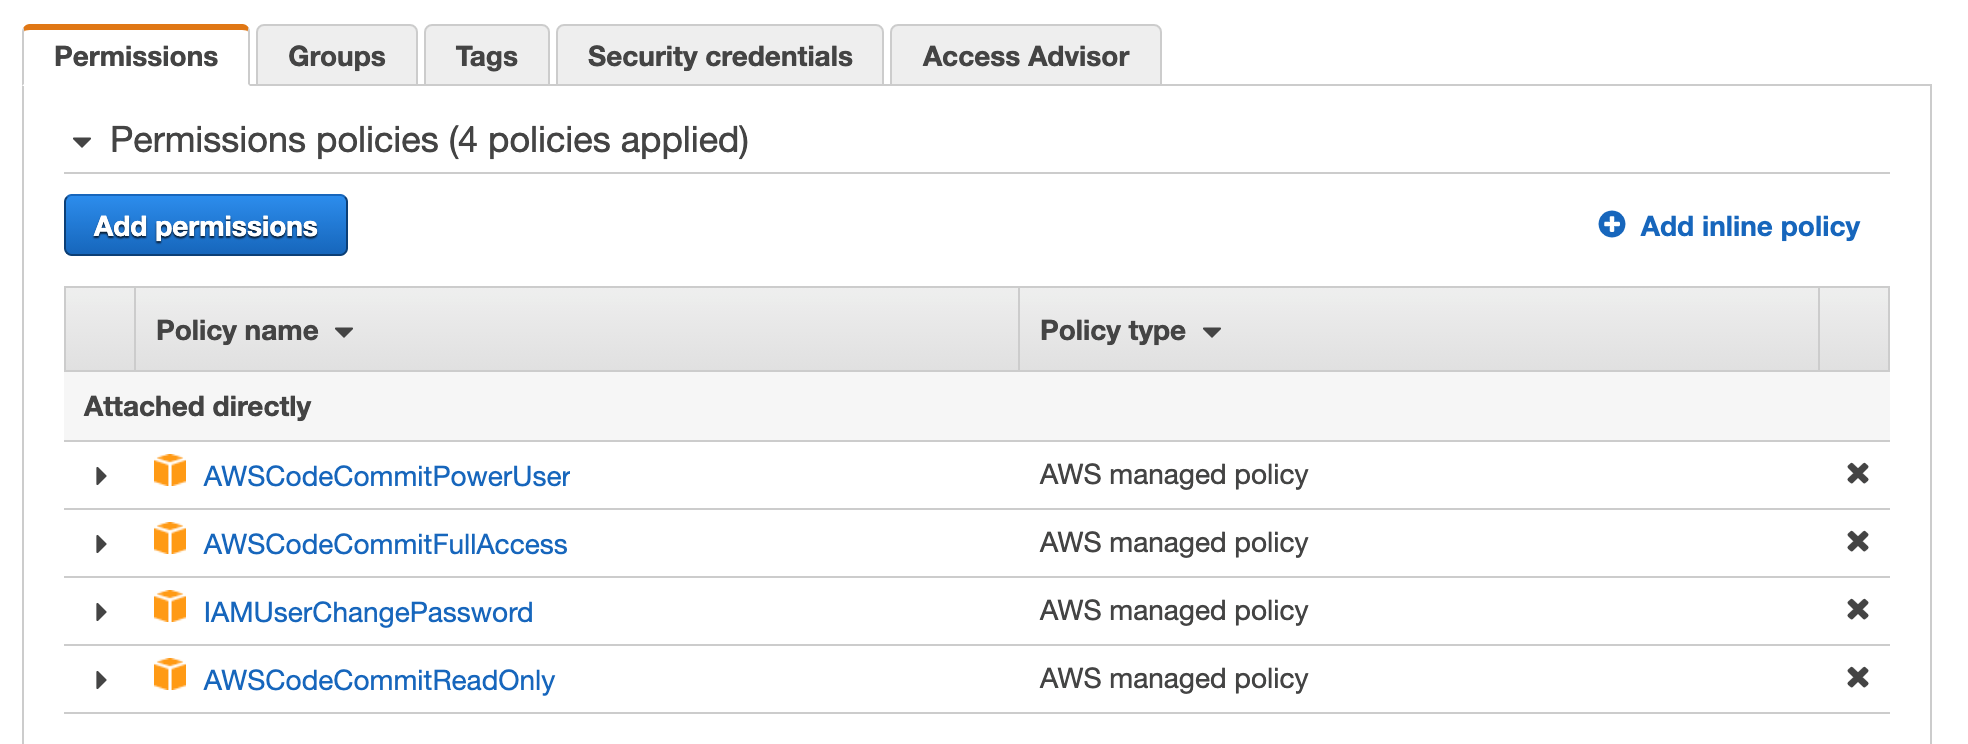
- Go to IAM -> Users -> User -> Security credentials and select "Upload SSH key".
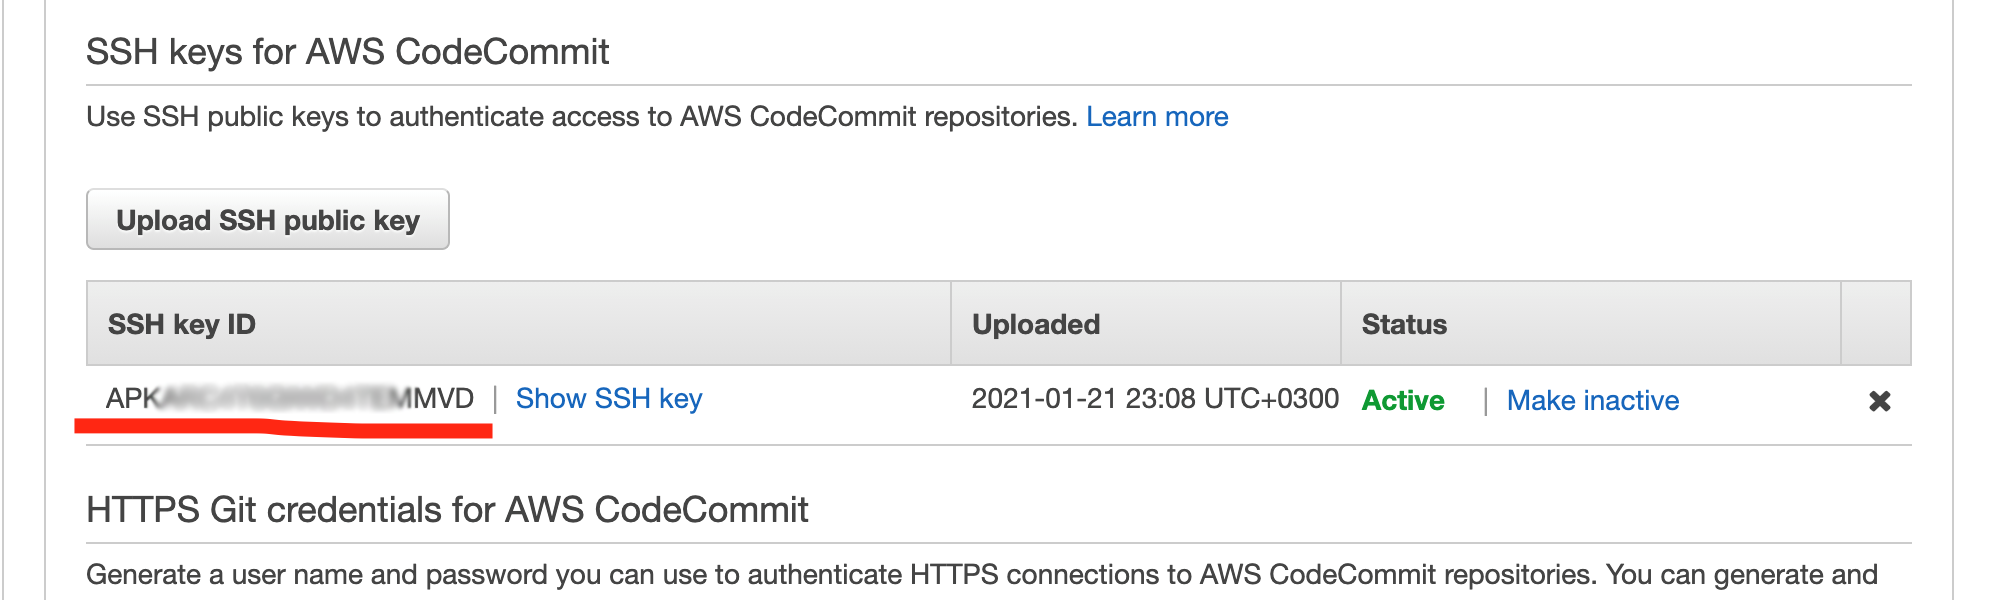
- Take a note of the SSH key ID generated by AWS as follows:
- Once you login with the newly generated user and copy the repository URL in SSH format, you will receive URL as follows:
ssh://git-codecommit.us-east-2.amazonaws.com/v1/repos/MyDemoRepo - For the SSH connection to be initialized, you need to add the public key to your URL to have it in the following format, which then can be entered in Appcircle to be used in SSH connections.
ssh://Your-SSH-Key-ID@git-codecommit.us-east-2.amazonaws.com/v1/repos/MyDemoRepo
How to enable triggers for AWS CodeCommit repositories?
Appcircle supports AWS CodeCommit triggers through an Amazon SNS topic.
For more information, please refer to: ![]()
After you follow the steps in the referenced document above to create a trigger, you need to create a notification rule under CodeCommit Settings as shown below to add a webhook URL.
.png)
Then select the "Enable raw message delivery" option while adding the webhook URL as a subscription to the topic.
.png)
General Build Troubleshooting
There may be a bunch of reasons for a build to fail.
The best way to learn the reason is to check the build logs. See Working With Build Logs section for details on this.
Build logs will display everything that happened in each workflow step in detail and let you examine what went wrong during the build.
If you are unable to determine the exact cause, feel free to get in touch with Appcircle using the in-app messaging for additional support.
Troubleshooting Workflow Steps for Build Failures
Most build failures are related with the following build steps. If you encounter any errors, please remove or edit the following steps and get a build to help isolate the cause of the issue.
- **iOS Sign Errors: **If the selected provisioning profile does not match with the selected bundle ID or if the certificate is not valid, you may have an issue in the iOS signing step. In this case, you may try getting an unsigned build
- **Xcode Build for Simulator step: **This step builds your target for either x86_64 or arm64 architecture. In some projects, there may be dependencies that are not compatible with given architecture. In this case, please remove this step from the workflow or remove the conflicting dependencies to get a successful build.
- **Android Sign Errors: **If you encounter errors while signing your Android app, you can remove this step to get an unsigned build or you can configure the app signing within your project.
The Build is Taking Too Long
With every build, a brand new virtual machine is started to perform your workflow and build your application.
Some applications may have 3rd party dependencies which need to be installed before the build is performed. With every new build, these dependencies need to be re-installed.
One way to speed up the build time may be to manage your dependencies in your project. This will speed up your builds significantly if your application has an excess amount of dependencies to be installed.
If you still think that your build is taking significantly longer than it should, please feel free to get in touch with Appcircle for additional support.
iOS-Specific Issues
Xcode Scheme Errors
Your iOS application project needs to have a shared scheme in order to be built outside Xcode. Xcode doesn't share schemes by default so you will have to do it manually.
- On Xcode, select Product > Scheme > Manage Schemes
- Select Shared for your
xcprojectorxcworkspace - Scheme container needs to be set to the corresponding Xcode project or workspace
- Please do not forget to add your
.xcschemefile to version control so it will be uploaded to your Git repository
For details on iOS builds please refer to Building iOS Applications
Cocoapods Errors Due to Missing xcworkspace
If you receive a pod error similar to the following, this usually indicates that although pods are used, the build is done with an xcodeproj file:
error: .../_appcircle_temp/Repository/Obj-C/Pods/Target Support Files/Pods-AEPSampleAppObjC/Pods-AEPSampleAppObjC.release.xcconfig: unable to open file (in target "AEPSampleAppObjC" in project "AEPSampleAppObjC") (in target 'AEPSampleAppObjC' from project 'AEPSampleAppObjC')
If a pod is used, the xcworkspace must be pushed to the repository and it must be selected in the build configuration for a successful build.
If you don't want to push the xcworkspace to the repository, you can alternatively enter the xcworkspace path manually in the build configuration. In this case, the xcworkspace will be generated by the Cocapods workflow component.
Cocoapods Errros Due to Version Mismatch
If you don't set the version of Cocoapods in your Cocoapods Install step, Appcircle installs Cocoapods according to your Podfile.lock file. Don't forget to commit your Podfile.lock file to have the correct version.
Xcode 15 Known Issue
After the release of Xcode 15, some notable known issues have surfaced. One of them is the DT_TOOLCHAIN_DIR cannot be used to evaluate error.
When encountering this error, you will see the following log durint the Xcodebuild for Devices step;
DT_TOOLCHAIN_DIR cannot be used to evaluate LIBRARY_SEARCH_PATHS, use TOOLCHAIN_DIR instead (in target 'One of Project Target Name' from project 'Pods')
This error typically occurs with Cocoapods version 1.12.1 and older. To resolve it, update your local Cocoapods to a newer version and commit the changes, or update Cocoapods during the workflow at the Cocoapods Install step.
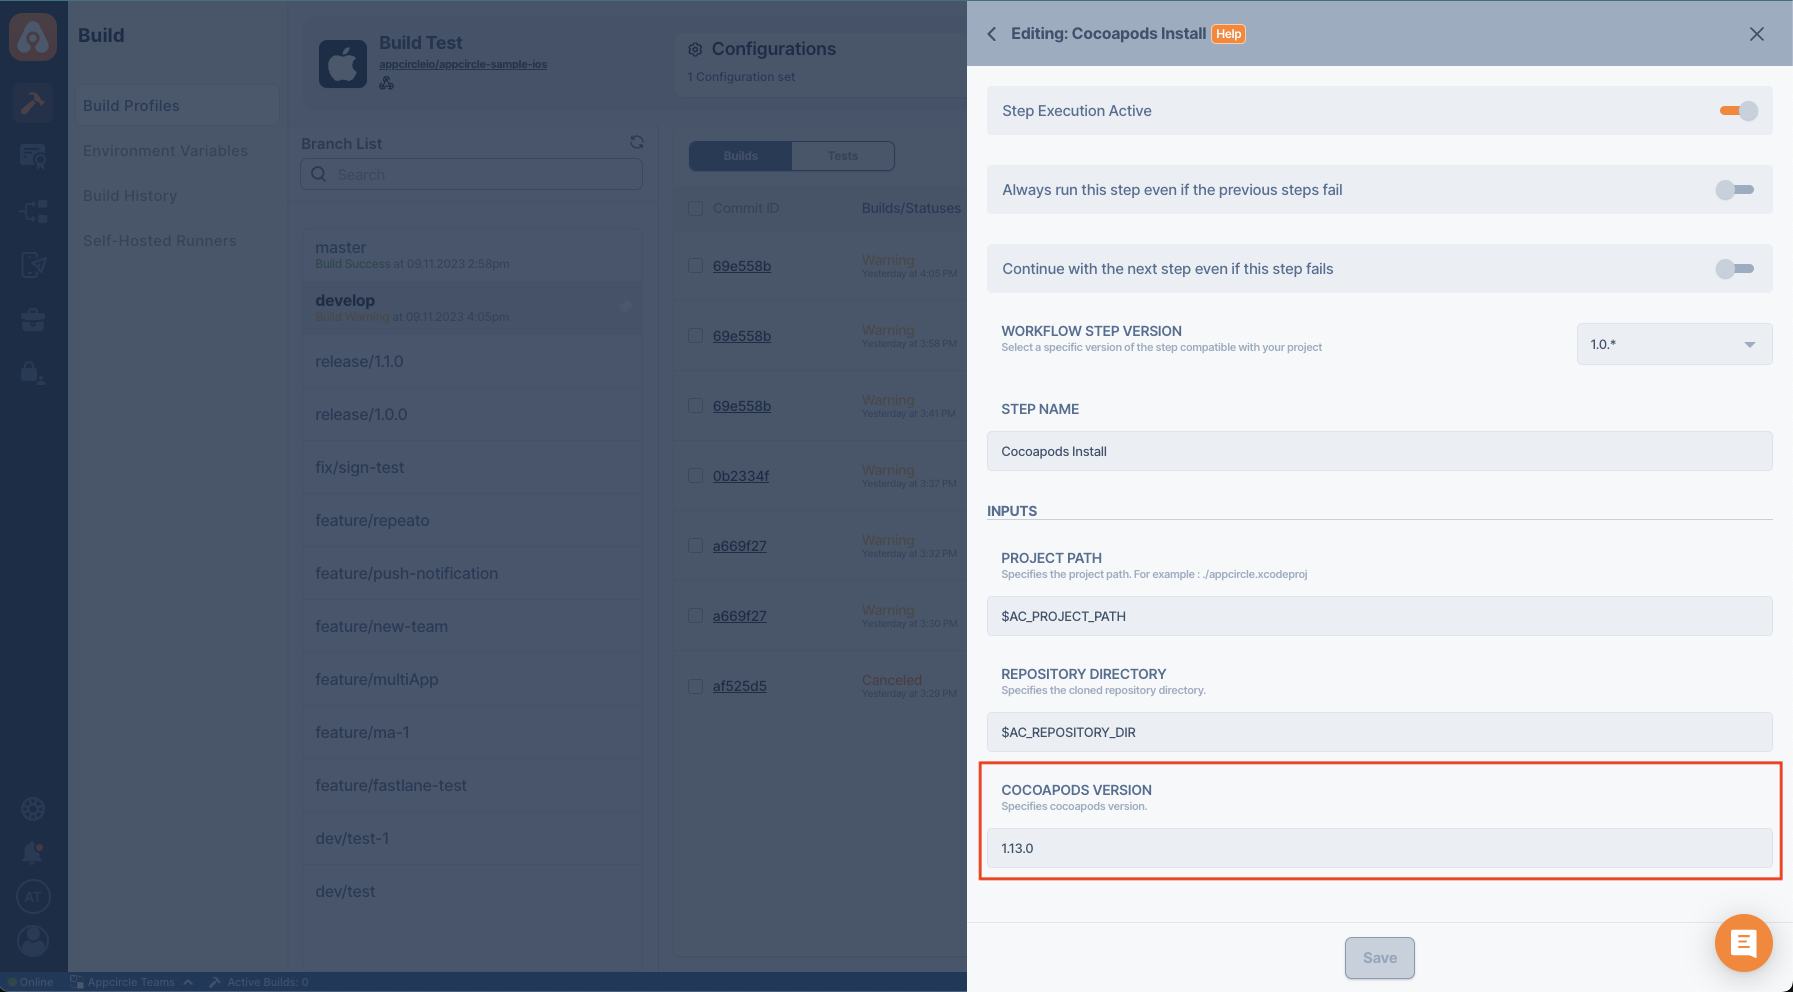
The resolution for this error is available in Cocoapods version 1.13.0 or higher.
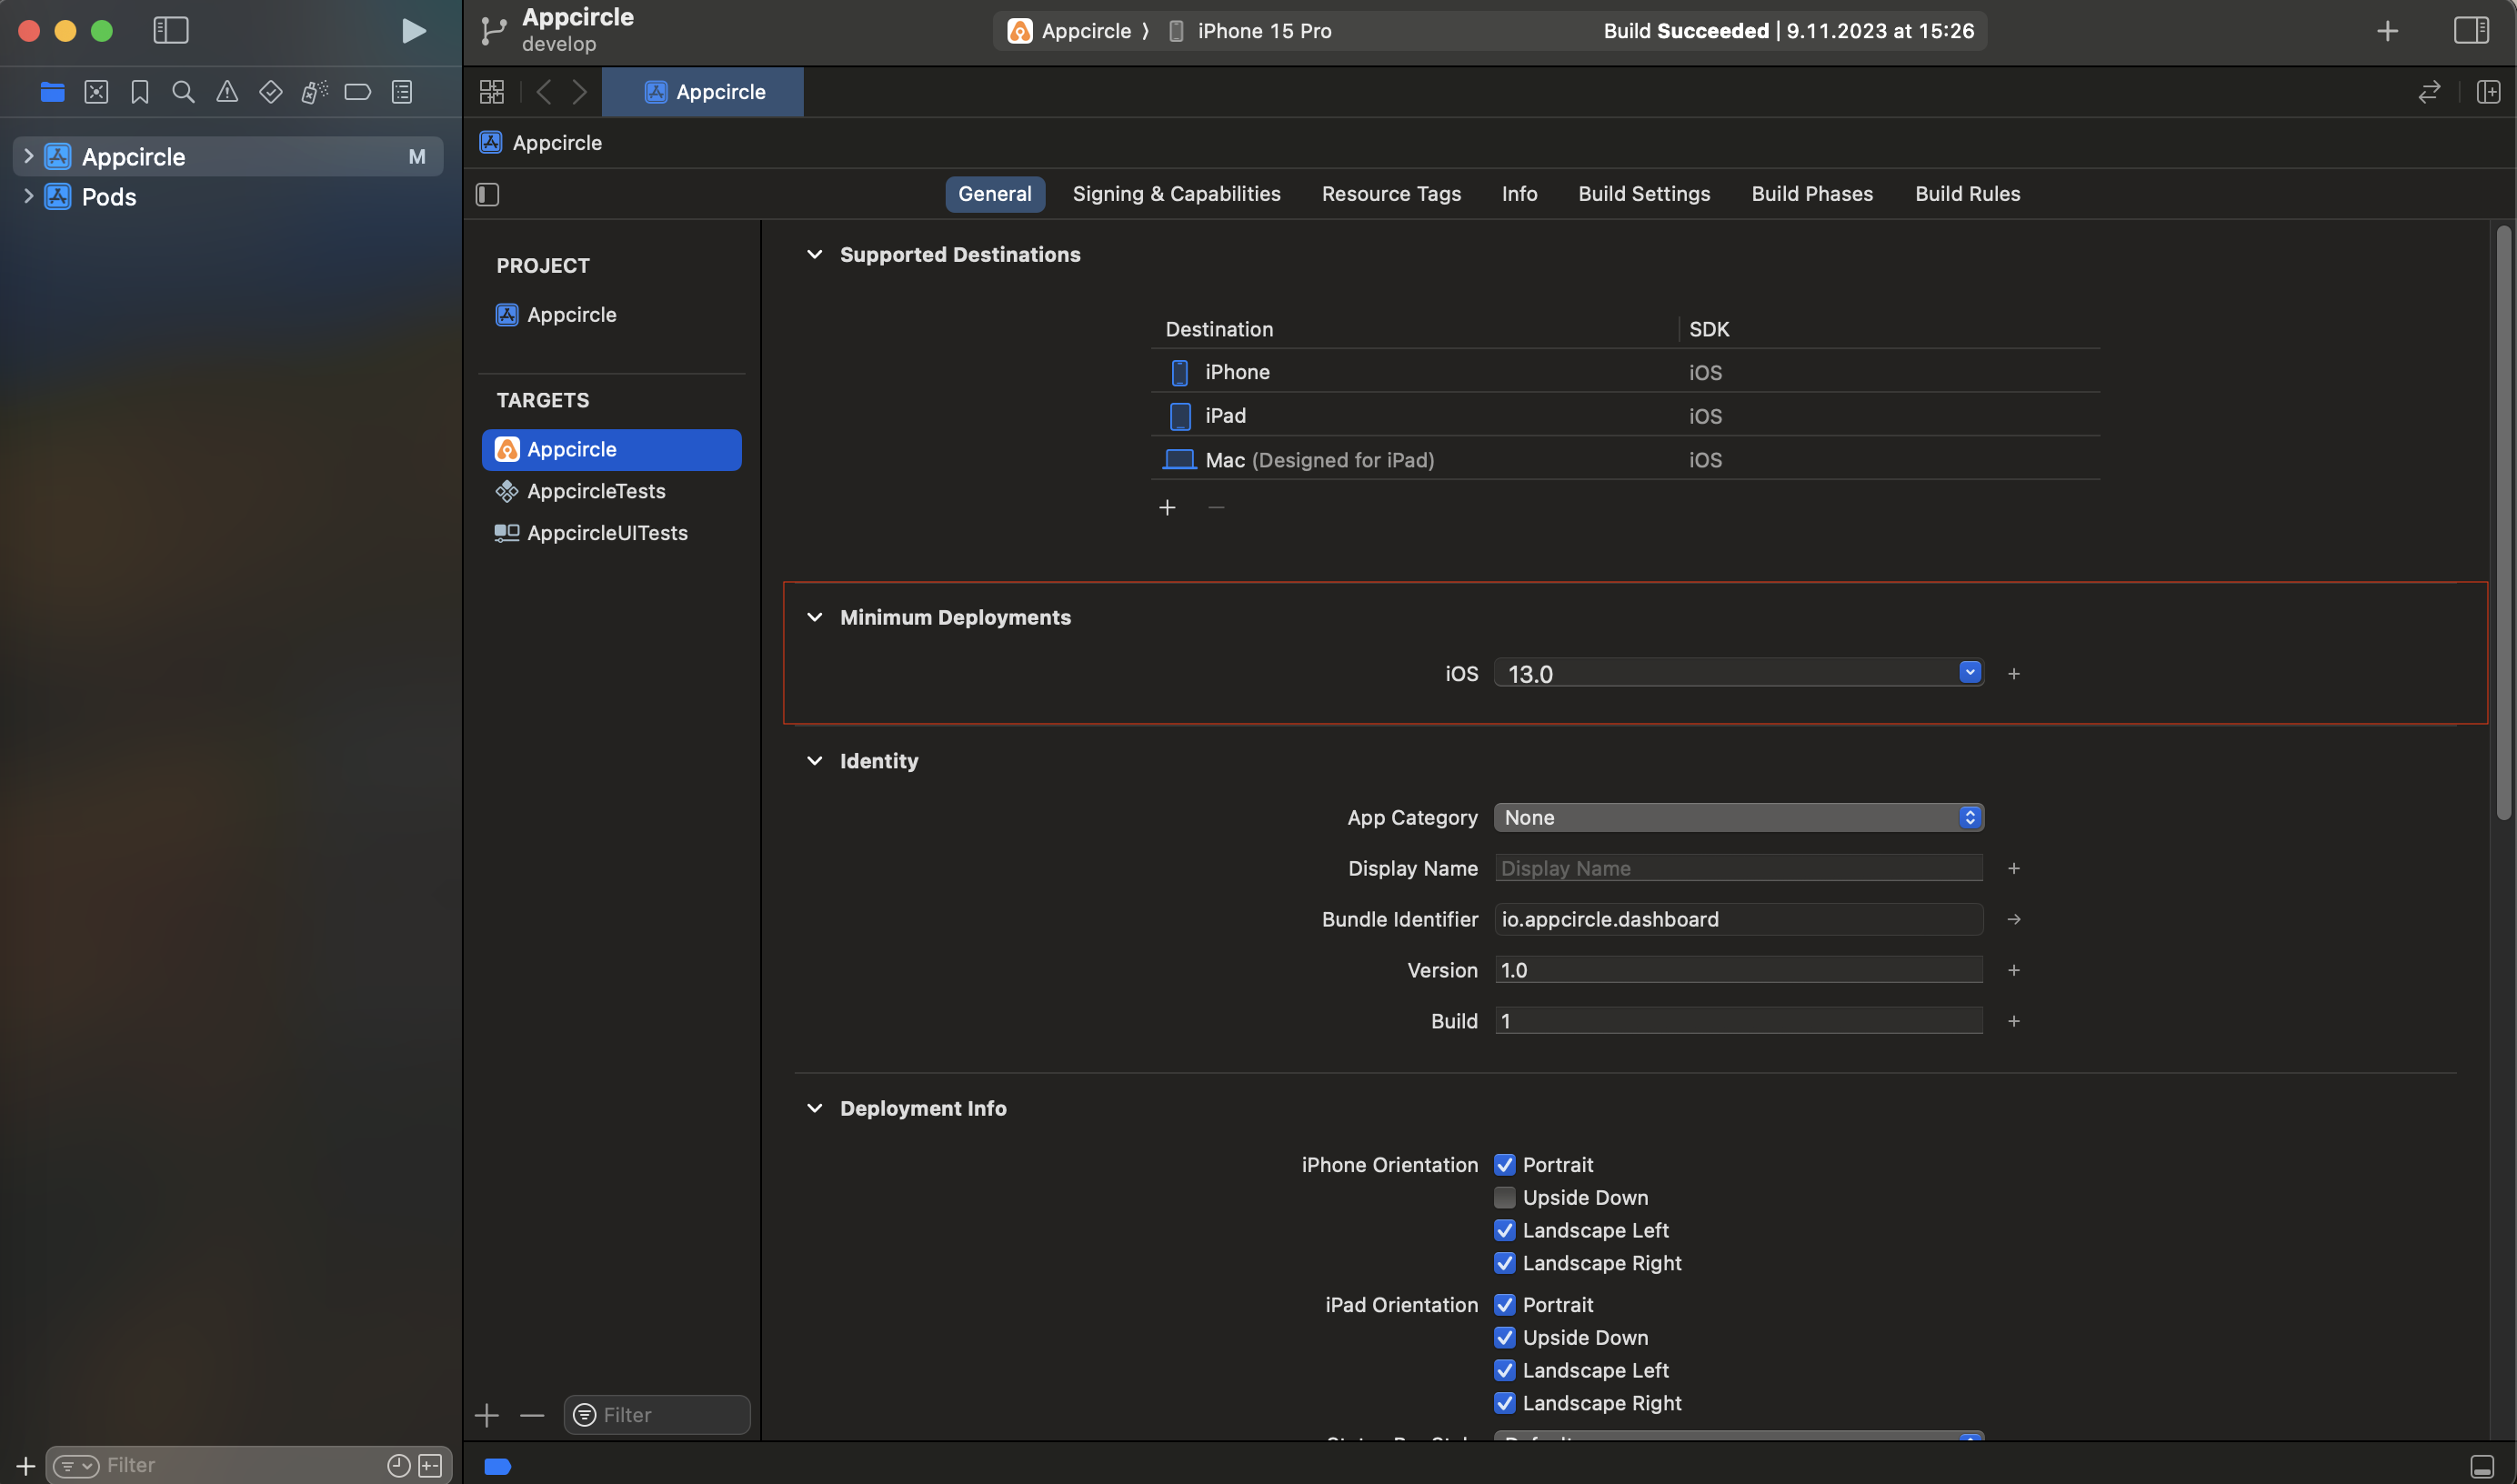
If the issue persists after updating Cocoapods, consider updating your iOS minimum deployment target to iOS 13.0 or higher. If the problem still remains, use the script provided below.
If you still encounter the same error, you can address it by making the following changes at the end of your Podfile:
post_install do |installer|
  installer.pods_project.targets.each do |target|
    target.build_configurations.each do |config|

      xcconfig_path = config.base_configuration_reference.real_path
      xcconfig = File.read(xcconfig_path)
      xcconfig_mod = xcconfig.gsub(/DT_TOOLCHAIN_DIR/, "TOOLCHAIN_DIR")
      File.open(xcconfig_path, "w") { |file| file << xcconfig_mod }
    end
  end
end
Provisioning Profile Error
If you receive a provisioning profile error similar to the following, it usually indicates a mismatch between the bundle ID selected in the build configuration and the provisioning profile.
error: "MyProject" requires a provisioning profile. Select a provisioning profile in the Signing & Capabilities editor. (in target MyProject from project MyProject)
In such an error, please check if the correct bundle ID is selected for the build. This is especially the case if you are using different bundle IDs for different release types such as debug or release.
Signing for "MyPod" requires a development team. Select a development team in the Signing & Capabilities editor
Your Cocoapods dependencies may also show this error when you try to build your project with Xcode 14. To prevent this, you may try one of the following workarounds.
- Signing with your own certificates. This requires uploading both development and distribution certificates. Therefore you either need to upload appropriate provisioning profiles or turn on Automatic Code Signing.
post_install do |installer|
    installer.pods_project.targets.each do |target|
      target.build_configurations.each do |config|
        config.build_settings["DEVELOPMENT_TEAM"] = "YOUR Team ID"
      end
    end
end
- Skip signing pod bundles
post_install do |installer|
  installer.pods_project.targets.each do |target|
    if target.respond_to?(:product_type) and target.product_type == "com.apple.product-type.bundle"
      target.build_configurations.each do |config|
          config.build_settings['CODE_SIGNING_ALLOWED'] = 'NO'
          config.build_settings['CODE_SIGNING_REQUIRED'] = 'NO'
          config.build_settings['CODE_SIGNING_IDENTITY'] = '-'
          config.build_settings['EXPANDED_CODE_SIGN_IDENTITY'] = '-'
      end
    end
  end
end
iOS Minimum Deployment Target Error
Following the release of new Xcode and iOS versions, projects containing pods or targets below certain iOS versions may experience simulator-related errors due to unsupported older iOS versions.
During the 'Xcodebuild for Devices' step, you may encounter an error similar to this:
ld: file not found: /Volumes/xcode.14.x/Xcode.app/Contents/Developer/Toolchains/XcodeDefault.xctoolchain/usr/lib/arc/libarclite_iphoneos.a
clang: error: linker command failed with exit code 1 (use -v to see invocation)
To prevent this error, please update the minimum deployment iOS versions for the targets in your project.
For your pods, append the following script to the end of your Podfile:
config.build_settings['IPHONEOS_DEPLOYMENT_TARGET'] = '13.0'
post_install do |installer|
  installer.pods_project.targets.each do |target|
    if target.respond_to?(:product_type) and target.product_type == "com.apple.product-type.bundle"
      target.build_configurations.each do |config|
        ...
        ## Other config settings
        ...
        config.build_settings['IPHONEOS_DEPLOYMENT_TARGET'] = '13.0'

      end
    end
  end
end
Adding Additional Command to Xcodebuild for Devices Step
To address the need to add a new command after completing the xcodebuild command in the "Xcodebuild for Devices" step, you can follow the following approach:
- Disable "Xcodebuild for Devices" step in your workflow.
- Add a new "Custom Script" component instead of "Xcodebuild for Devices" step.
- Go to Appcircle github profile and navigate to the repository.
- Copy all code lines from the
main.rbfile and paste them into the new "Custom Script" that you just added in your workflow. - Change the name as "Custom Xcodebuild for Devices" for this custom script.
- Change "Execute With" picker as Ruby.
- In the Ruby code, you can add the required codes to the end of the
xcodebuildcommand.
Before running the script, some variables must be changed, and new variables must be added to the custom script.
First, the output_path global variable should be changed like below in global variables.
...
## Other global variables
...
$output_path = env_has_key("AC_OUTPUT_DIR")
After this, you need to add some parameters to your custom script. The parameters below should be added right after global variables.
AC_COMPILER_INDEX_STORE_ENABLE = "NO"
AC_METHOD_FOR_EXPORT = "auto-detect"
AC_DELETE_ARCHIVE = "false"
AC_ARCHIVE_PATH = "AC_ARCHIVE_PATH"
AC_ARCHIVE_METADATA_PATH = "AC_ARCHIVE_METADATA_PATH"
AC_EXPORT_DIR = "AC_EXPORT_DIR"
In the next step for completing custom script settings, the AC_COMPILER_INDEX_STORE_ENABLE parameter should be equaled with the following parameter:
$compiler_index_store_enable = AC_COMPILER_INDEX_STORE_ENABLE
You should find the line with compiler_index_store_enable and replace it with the above statement.
After these variables were set. There is an archive() function in the Ruby code. First, find the function in the code.
## Archive Functions
def archive()
  extname = File.extname($project_path)
  command = "xcodebuild -scheme \"#{$scheme}\" clean archive -archivePath \"#{$archive_path}\" -derivedDataPath \"#{$temporary_path}/DerivedData\" -destination \"generic/platform=iOS\""
  ...
  ## Other code lines of archive() function
  ...
At the end of this function, before running the run_command_simple() function, you can add these lines to be able to add additional commands.
  ...
  ## Other code lines of archive() function
  ...
  command.concat(" ")
  command.concat("Write your command that you want to add here")
  command.concat(" ")

  run_command_simple(command)
end
For Example
When you need to reduce the verbosity of the xcodebuild logs, you can achieve this by appending the | grep -A 5 error: command to the xcodebuild command to decrease the clutter in the log file.
  ...
  ## Other code lines of archive() function
  ...
  command.concat(" ")
  command.concat(" | grep -A 5 error:")
  command.concat(" ")

  run_command_simple(command)
end
Now, the run_command_simple() function will execute your customized xcodebuild command.
Missing Entitlements
If you receive an error similar to the following, it generally means your provisioning profile doesn't have the entitlements of your project.
error: Provisioning profile "AppCircle" doesn't support the Push Notifications capability. (in target 'Runner' from project 'Runner)
error: Provisioning profile "AppCircle" doesn't include the aps-environment entitlement. (in target 'Runner' from project Runner')
Whenever you add a new capability (Push Notifications, Keychain Sharing, CloudKit...) to your project, you need to update your provisioning profile and upload it to Appcircle.
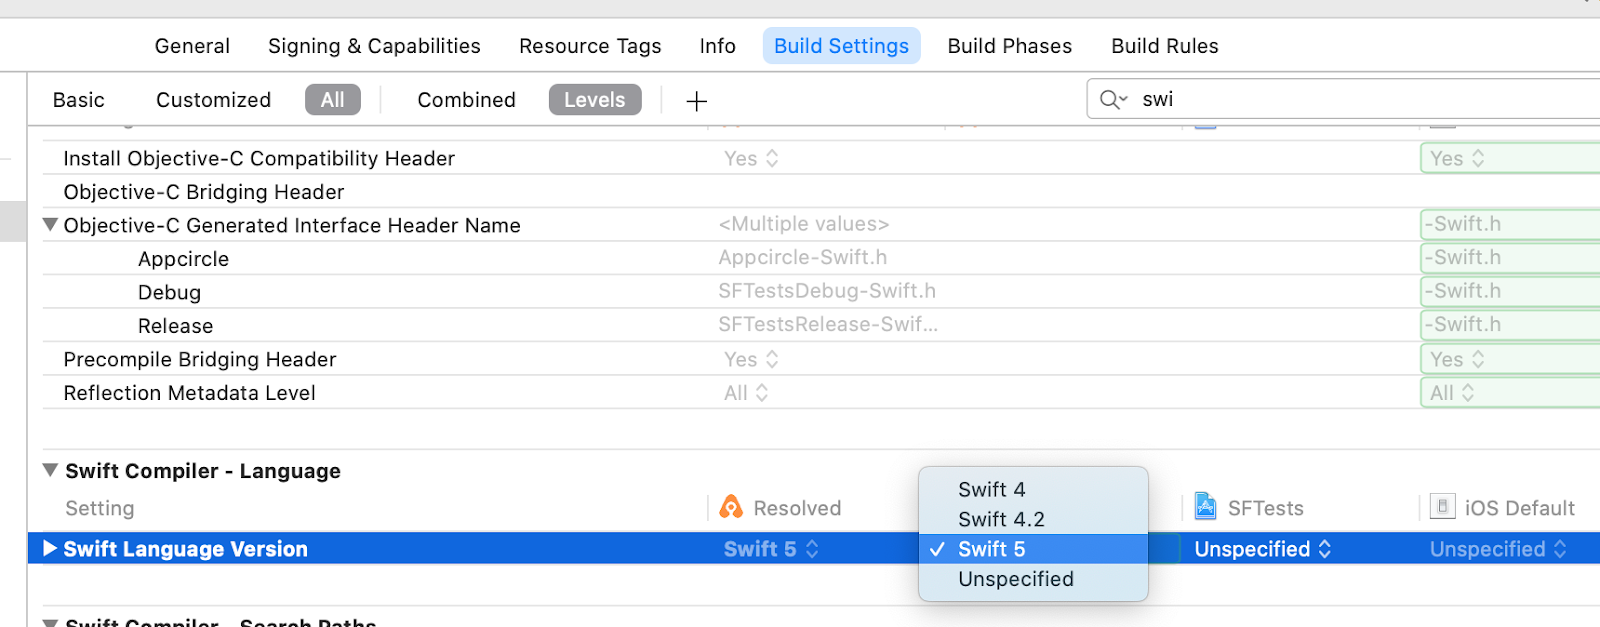
Swift Version Error
If you receive an error similar to the following, the selected Xcode version in the build configuration may be incompatible with the selected Swift version in the project settings.
SWIFT_VERSION '3.0' is unsupported, supported versions are: ...
In this case, you need to upgrade the Swift version in the project settings in Xcode and once the build is confirmed to be working locally in the specific Xcode version, it can be retried in Appcircle with the same Xcode version.
Android-Specific Issues
chmod: cannot access './gradlew': No such file or directory
Every Android project has a gradlew file in the main repository directory. If the Android Build step can't find this file, you need to edit your workflow, find the Android Build Step and edit the PROJECT PATH. If your gradlew file is in the android folder, you need to write, ./android in the edit box.
How can I change the JDK version for autofill?
Appcircle currently has OpenJDK 11 (default), OpenJDK 8, OpenJDK 17 and OpenJDK 21. If you want to use a different Java version for your build pipeline, you can follow the steps here and add a custom script to your workflow.
But unfortunately, you cannot use custom scripts for autofill operations, which make it easy to fill in configuration details while adding a new build profile.
For the autofill, we have two options to choose from.
1. Change JAVA_HOME using gradle.properties
You can add the org.gradle.java.home entry to the gradle.properties file in your Android project.
For example, the below entry can be used to change the default Java version to 17 for the "Default M1 Pool".
org.gradle.java.home=/Users/appcircle/.sdkman/candidates/java/17.0.9-zulu
You can get the JDK home paths for each build pool from Android's build infrastructure Java section.
2. Change JAVA_HOME using environment variables
You can use the environment variables to enable the JDK version your project requires.
For example, you can take the following steps to change the default Java version to 17.
- Create a variable group that has a variable with the properties below.
- The key should be
JAVA_HOME. - Value should be
/Users/appcircle/.sdkman/candidates/java/17.0.9-zulu.
- The key should be
- Go to the configuration section of the build profile that you want to autofill.
- Go to the 'Env. Variables' tab in configuration.
- You should see the variable group that you created in the list.
- Select the variable group that has
JAVA_HOMEand 'Save' settings. - Go back to the config tab and start autofilling there.
You can get the JDK home paths for each build pool from Android's build infrastructure Java section.
Gradle build after Bintray shutdown
  > Could not resolve com.google.protobuf:protobuf-java-util:3.09.0.
      > Could not get resource 'https://jcenter.bintray.com/com/google/protobuf/protobuf-java-util/3.09.0/protobuf-java-util-3.09.0.pom'.
        > Could not GET 'https://jcenter.bintray.com/com/google/protobuf/protobuf-java-util/3.09.0/protobuf-java-util-3.09.0.pom'. Received status code 502 from server: Bad Gateway
You may experience gradle build errors if your project uses Bintray resources. Since JFrog has shutdown Bintray on May 1, 2021. You should update your gradle file and move to Maven Central. Replace jcenter() with mavenCentral() in all your build.gradle files. Please be aware that some of your dependencies may not exist on Maven.
Gradle build daemon disappeared unexpectedly
If you receive a Gradle error similar to the following, it can happen due to 2 reasons
org.gradle.launcher.daemon.client.DaemonDisappearedException: Gradle build daemon disappeared unexpectedly (it may have been killed or may have crashed)
    at org.gradle.launcher.daemon.client.DaemonClient.handleDaemonDisappearance(DaemonClient.java:222)
    at org.gradle.launcher.daemon.client.DaemonClient.monitorBuild(DaemonClient.java:198)
    at org.gradle.launcher.daemon.client.DaemonClient.executeBuild(DaemonClient.java:162)
    at org.gradle.launcher.daemon.client.DaemonClient.execute(DaemonClient.java:125)
Unexpected error while writing dex file using d8: Java heap space
java.lang.OutOfMemoryError: Java heap space
java.lang.RuntimeException: java.lang.OutOfMemoryError: Java heap space
- Problem with UTF-8 characters in your project or environment variable. Please edit your gradle.properties file and add
-Dfile.encoding=UTF-8argument toorg.gradle.jvmargssection. - You have edited gradle.properties and put some arguments to the
org.gradle.jvmargssection. When you modify default JVM arguments, it resets the defaultMaxMetaspaceSizeproperty. You should always add-XX:MaxMetaspaceSize=256mto this section to prevent unlimited memory allocation.
If you're using DexGuard, you may need to above modifications to your DexGuard configuration as well.
I received a google-services.json Error but I don't want to push this file to the repository
Secret files such as the google-services.json can be added as a secret environment variable and then selected in the build configuration.
Then, you can add a custom script step before the Android build step and move the file to the expected path during the build with a code like the following (where the secret environment variable is named as GOOGLE_SERVICES_JSON) :
cd $AC_REPOSITORY_DIR/
mv $GOOGLE_SERVICES_JSON $AC_REPOSITORY_DIR/app
Flutter release mode binaries do not work on the Android emulator
To run a Flutter release mode APK in an emulator, please make sure that the emulator runs with the x86_64 ABI type and the app are configured accordingly. Emulators with x86 ABI type are not supported by Flutter . (Please refer to the following GitHub issue on the Flutter repository for more information: ![]()
Android Keystore Errors
Missing keystore path error on Android builds
You may want to build unsigned Android applications. The most common mistake done with this is Appcircle users usually forget to disable the Sign Application step in the workflow.;
If you do not select a keystore in the build configuration, you need to disable the Sign Application step or your build will fail.
Keystore was tampered with or password was incorrect
You may get this error message when the provided password doesn't match the keystore file.
If you are using a debug keystore, simply re-generate it. Otherwise, please make sure you have the correct keystore/password combination.
Firebase Errors
Authentication Error: Your credentials are no longer valid.
Error detail:
Error: failed to upload release. Authentication Error: Your credentials are no longer valid. Please run firebase login --reauth
For CI servers and headless environments, generate a new token with firebase login:ci
⚠  Unable to fetch the CLI MOTD and remote config.
If you encounter this error message, please review the following two points:
- Verify Your Firebase Credentials: Ensure that your login information is valid, as per the token or service account you are using. You can test it locally using the same token or service account to confirm its authenticity.
- Check CA Certificates: If you are a self-hosted Appcircle user and you are certain that your credentials are correct, then you should also confirm that your CA certificates are properly defined for NodeJS. You can check CA certificates using the following command:
cat $NODE_EXTRA_CA_CERTS
Point 2 exclusively applies to users who have opted for self-hosted solutions. For those utilizing Appcircle from the cloud platform (appcircle.io), there is no need to consider this particular point.
Flutter-Specific Issues
No pubspec.yaml file found error
If the pubspec.yaml file is not present in the default project path, it cannot be detected automatically by the fetch process. In such cases, the file path must be manually defined in the Flutter Build workflow step as the value of the $AC_FLUTTER_PROJECT_DIR environment variable.
For reference, please refer to the Android Flutter Build and iOS Flutter Build components.
File not found error
You may get an error like below when you're building an Android project.
lib/src/core/dependency/myservice.dart:12:8: Error: Error when reading ‘lib/src/data/repositories/CustomerRepository.dart’: No such file or directory
This error usually indicates that you didn't name your files according to Dart convention. Linux file system is case sensitive whereas Windows and macOS are not. So if your repository has customerrepository.dart but you're importing as CustomerRepository.dart, it will not work on Linux machines. To prevent this error, please rename your files and make them all lower case. Please read the following documentation related to styling and naming your files.
Firebase Version
Your build may fail with following error
[!] `GoogleAppMeasurement` requires CocoaPods version `>= 1.10.2`, which is not satisfied by your current version, `1.10.1`.
Please edit your workflow and add Cocoapods Install step and change the Cocoapods version. You may also set the Cocoapods version if you commit your Podfile.lock to your repository.
CocoaPods could not find compatible versions for pod "Amplify"
When does this occur?
On the first iOS build after upgrading the version of the Amplify packages in your pubspec.yaml. Example
Below is an example of what the error will look like:
[!] CocoaPods could not find compatible versions for pod "Amplify":
  In snapshot (Podfile.lock):
    Amplify (= 1.6.0)
  In Podfile:
    amplify_auth_cognito (from `.symlinks/plugins/amplify_auth_cognito/ios`) was resolved to 0.0.1, which depends on
      Amplify (> 1.9.2)
You have either:
 * out-of-date source repos which you can update with `pod repo update` or with `pod install --repo-update`.
 * changed the constraints of dependency `Amplify` inside your development pod `amplify_auth_cognito`.
   You should run `pod update Amplify` to apply changes you've made.
Suggested resolution
- Option 1 (recommended): Run
pod update Amplify AWSPluginsCore AmplifyPluginsfrom the ios dir. This will update the pods that are used by the amplify flutter packages. - Option 2: Delete the
Podfile.lock(in the ios dir) and rebuild. A new Podfile.lock will be generated. Please note, this may cause other non amplify related dependencies to be updated as well. - Option 3: Run pod update from the ios dir. This should update your
Podfile.lockfile. Please note, this may cause other non amplify related dependencies to be updated as well.
Cocoapods Error
Signing for "MyPod" requires a development team. Select a development team in the Signing & Capabilities editor
If you are using Xcode 14 and your Flutter version is less than 3.3, your build may fail with above message. You should modify your Podfile according to below snippet. Flutter 3.3 fixes this bug. Related Flutter Issue
post_install do |installer|
 installer.pods_project.targets.each do |target|
   flutter_additional_macos_build_settings(target)

   target_is_resource_bundle = target.respond_to?(:product_type) && target.product_type == 'com.apple.product-type.bundle'
   target.build_configurations.each do |build_configuration|
     if target_is_resource_bundle
       build_configuration.build_settings['CODE_SIGNING_ALLOWED'] = 'NO'
       build_configuration.build_settings['CODE_SIGNING_REQUIRED'] = 'NO'
       build_configuration.build_settings['CODE_SIGNING_IDENTITY'] = '-'
       build_configuration.build_settings['EXPANDED_CODE_SIGN_IDENTITY'] = '-'
     end
   end
  end
end
React Native-Specific Issues
ERR_OSSL_EVP_UNSUPPORTED
If you receive an error similar to the following, it’s likely that your application or a module you’re using is attempting to use an algorithm or key size which is no longer allowed by default with OpenSSL 3.0.
 opensslErrorStack: [ 'error:03000086:digital envelope routines::initialization error' ],
  library: 'digital envelope routines',
  reason: 'unsupported',
  code: 'ERR_OSSL_EVP_UNSUPPORTED'
You can either add the command-line option, --openssl-legacy-provider to your build scripts or change your node version to v16.x
NPM/Yarn specific errors
If you face problems during NPM/Yarn install steps on Appcircle but not on your local machine, you should confirm the following steps:
- Make sure that your packages support the node version you use.
- Make sure that the file interactions that is done on
preinstalland/orpostinstallscrips are suitable to be executed on a different machine
Queries to registry.yarnpkg.com return a 404/500/...
First, you should check the NPM status page for possible availability issues.
Our runners have yarn classic (1.x) by default. See the iOS build agent stacks and the Android build agent stacks pages for the exact versions.
On the other hand, yarn modern (2.x) has stability improvements that can fix these kinds of network errors. You can see here for details.
Upgrading to the latest versions is critical to a fast and stable yarn experience. So, if you're getting these kinds of errors in your build pipeline, we recommend upgrading your yarn version.
You can see the steps to do upgrade in the following section. 👇
Upgrading From Yarn 1 to Yarn 2 in Pipeline
- Add a "Custom Script" step to your workflow before the "npm/Yarn Commands" step.
- It should be a bash script and should have the below content.
cd $AC_REPOSITORY_DIR
yarn set version berry
yarn --version
yarn config set -H enableImmutableInstalls false
When you run the pipeline again with an up-to-date workflow, you should see the upgraded yarn version in your build logs.
Disable Flipper SDK on iOS
Flipper can be a good tool for debugging your applications. It still gets built even if it's not being used for release builds. To speed up your builds, Flipper can be disabled on Appcircle by making the Flipper SDK inclusion conditional.
Example Podfile modification:
  if !ENV['AC_APPCIRCLE']
    use_flipper!
    post_install do |installer|
      flipper_post_install(installer)
    end
  end
Appcircle uses the lts(Long Term Support) node version by default.
You can access how to change your node version and other relative information about workflow steps and configurations on the page below:
React Native Specific Workflow StepsApp Distribution Troubleshooting
No files or multiple files were received from autodistribute;
A successful distribution depends on a correctly signed binary. Please check if the signing configuration is correct.
You can also check the list of the generated build artifacts to confirm the output. In Android, you can also check the ac_post_process_output.json file in the build artifacts to see if the APKs are signed or not.
In Android, please also check if gradle sign is being used for the selected build variant. If gradle sign works alongside with Appcircle signing, you will receive multiple APKs.
Deleted versions still occupy storage space
The master version of any artifact deployed from the Build to the Testing Distribution is stored within the build artifacts section. Once you delete such a version from the Testing Distribution, only the reference is removed and the binary is still available within the build artifacts of the related build. You also need to remove the binary from the build artifacts to save storage.
Access Denied on builds
On some distributed apps, the Access Denied error can be bypassed by one of these steps:
- Launching the distribution link on a different browser and Incognito Mode
- Clearing the browser cache if the link is pasted to a browser instead of in-line browser on mail applications
- If there is an authorization configuration on Distribution, clearing the authorization temporarily
Artifact Storage is Full
Older builds and/or testing distributions will use almost all of your storage. If your artifact storage is full, you can free up some of the old artifacts.
Refer here to delete a build profile
Refer here to delete specific builds from your build profile
Refer here to delete testing distribution profiles and specific distribution artifacts
Refer here to delete a Google Play Store Publish Profile
Refer here to delete an App Store Publish Profile
In order for storage to be freed up, you should also remove the other references pointing to the artifact. In example, if you have built an app, distributed it to testers, and submitted it to the Store Submit, you should delete that build from Testing Distribution, Store Submit, and Builds respectively.
It may take a couple of minutes to see the change in your account after you have deleted some artifacts.
If you still can't solve your issues, ask on our Slack page. Our community and our support engineers will help you whenever they're available:
Need help?
Get help from Appcircle's support team, or see how others are using Appcircle by joining our Slack Channel.