Build Module Onboarding
This onboarding guide takes you from an empty Appcircle organization to your first successful, automated build. It is written for readers who are new to Appcircle or to mobile CI/CD (Continuous Integration and Continuous Delivery), where every code change is built and checked automatically instead of on a developer's computer.
Follow the steps in order. Each step explains what to do, why it matters, and how to confirm that the step is complete before you move on. Each step also links to the page that covers the topic in full detail.
This page is an ordered path for your first setup. When you need the complete reference for a feature, such as every trigger option or every configuration field, see the Build Walkthrough.
Before You Begin
Account and Roles
You need an Appcircle account and an organization. If you do not have one yet, sign up at my.appcircle.io. See Sign Up / Login.
Appcircle controls access to the Build module with roles. Check your role before you start, because most setup steps change settings that only some roles can change:
- Owner and Manager: Create and change build profiles, repository connections, configurations, workflows, and triggers.
- Operator: Start builds, distribute binaries, and download artifacts, but cannot change the setup.
- Viewer: View build profiles, builds, and reports, and download artifacts.
If you cannot see a button described in this guide, ask your organization Owner to update your role. See Role Management.
Project Requirements
Appcircle builds your project from your repository, not from your computer. Make sure that everything the build needs is committed:
- iOS (Swift / Objective-C): An Xcode project or workspace and a shared scheme. Appcircle can only build schemes that are marked as shared in Xcode, and the scheme files must be committed to your repository. See iOS Applications.
- Android (Java / Kotlin): The Gradle wrapper (
gradlewand thegradle/wrapperfolder) committed to your repository. See Building Android Applications. - React Native, Flutter, and other frameworks: See the requirements in Platform Build Guides.
To confirm that nothing is missing, clone your repository into a new folder, install the dependencies (for example, run pod install for an iOS project that uses CocoaPods), and build the project locally. Files that exist only on your computer, or that are excluded by .gitignore, are not available to Appcircle.
If your project uses libraries from other private repositories, the build must be able to access them too. Use a repository connection that can read those repositories, an SSH key, or a .netrc file. See Appcircle Onboarding Best Practices.
A build profile targets one operating system. For a cross-platform app, such as a React Native or Flutter app, plan one build profile for iOS and one for Android. Both profiles can use the same repository.
Repository Access
Decide how Appcircle will access your source code. The choice affects how webhooks are created later in Step 9.
| Option | Use It When | Webhook Setup |
|---|---|---|
| GitHub App or OAuth | Your code is on GitHub, GitLab, Bitbucket, or Azure DevOps in the cloud. | Automatic, if the connected user has webhook permissions |
| Personal Access Token (PAT) | You use a self-hosted Git server, or your company does not allow OAuth apps. | Automatic, if the token has webhook permissions |
| SSH | Your Git provider is not listed, or your company requires SSH keys. | Manual |
| Public URL | The repository is public. | Manual |
If your repository is in an internal network or behind a firewall, Appcircle must be able to reach it. See Accessing Internal Networks.
You can complete this onboarding with a sample project. Select Start with a sample repository in Step 3, or use one of the Appcircle sample apps on GitHub.
Signing Assets
A binary must be signed before it can be installed on a device or sent to a store. The signature proves who built the app.
- iOS: A certificate (
.p12) and a provisioning profile (.mobileprovision) for each bundle identifier, such ascom.example.spacetech. Alternatively, use automatic signing with a development certificate, a distribution certificate, and an App Store Connect API key. See Automatic Signing. - Android: A keystore (
.keystore) with its passwords and alias.
Add these to the Signing Identities module before you create the configuration in Step 5. You can run your first build without signing to check that the project compiles, but an unsigned iOS build produces an .xcarchive file instead of an installable .ipa file.
Checkpoint: You know your role, your project builds from a clean clone of the repository, you have chosen a repository access option, and your signing assets are in the Signing Identities module.
Step 1: Choose Your Build Infrastructure
Before you configure your build, decide where the build runs and which tool versions it uses. On Appcircle cloud runners, every build runs on a brand new virtual machine, so each build starts from the same clean state.
- Appcircle cloud runners: Ready to use, with no setup. The machine plan of your organization defines the hardware. You can see your current plan in Organization > Billing. See Machine Plans.
- Self-hosted runners: Run builds on your own machines, for example to reach internal resources or to use custom hardware. Only the Owner of the root organization can add runners. See Self-hosted Runners.
Check that the tool versions your project needs are available:
- iOS: Select the Xcode version in the build configuration. The latest stable Xcode version is selected by default. See iOS Build Stacks and Selecting the Xcode Version.
- Android: OpenJDK 17 is the default Java version. If your project needs another version, add the Select Java Version step to your workflow in Step 6. See Android Build Stacks.
Checkpoint: You know whether you build on cloud or self-hosted runners, and the Xcode or Java version your project needs is available.
Step 2: Create a Build Profile
A build profile holds everything Appcircle needs to build one app for one platform: the repository connection, configurations, workflows, and triggers.
- In the Appcircle dashboard, go to Build.
- Click New profile at the top right. If you have no build profiles yet, click the link in the middle of the page.
- Enter a unique, descriptive name, for example
spacetech-ios. - Select the target OS: iOS or Android.
- Select the target platform, for example Objective-C / Swift, Java / Kotlin, React Native, or Flutter. Appcircle uses this choice to prepare a matching build environment and default workflows.
- Click Save.
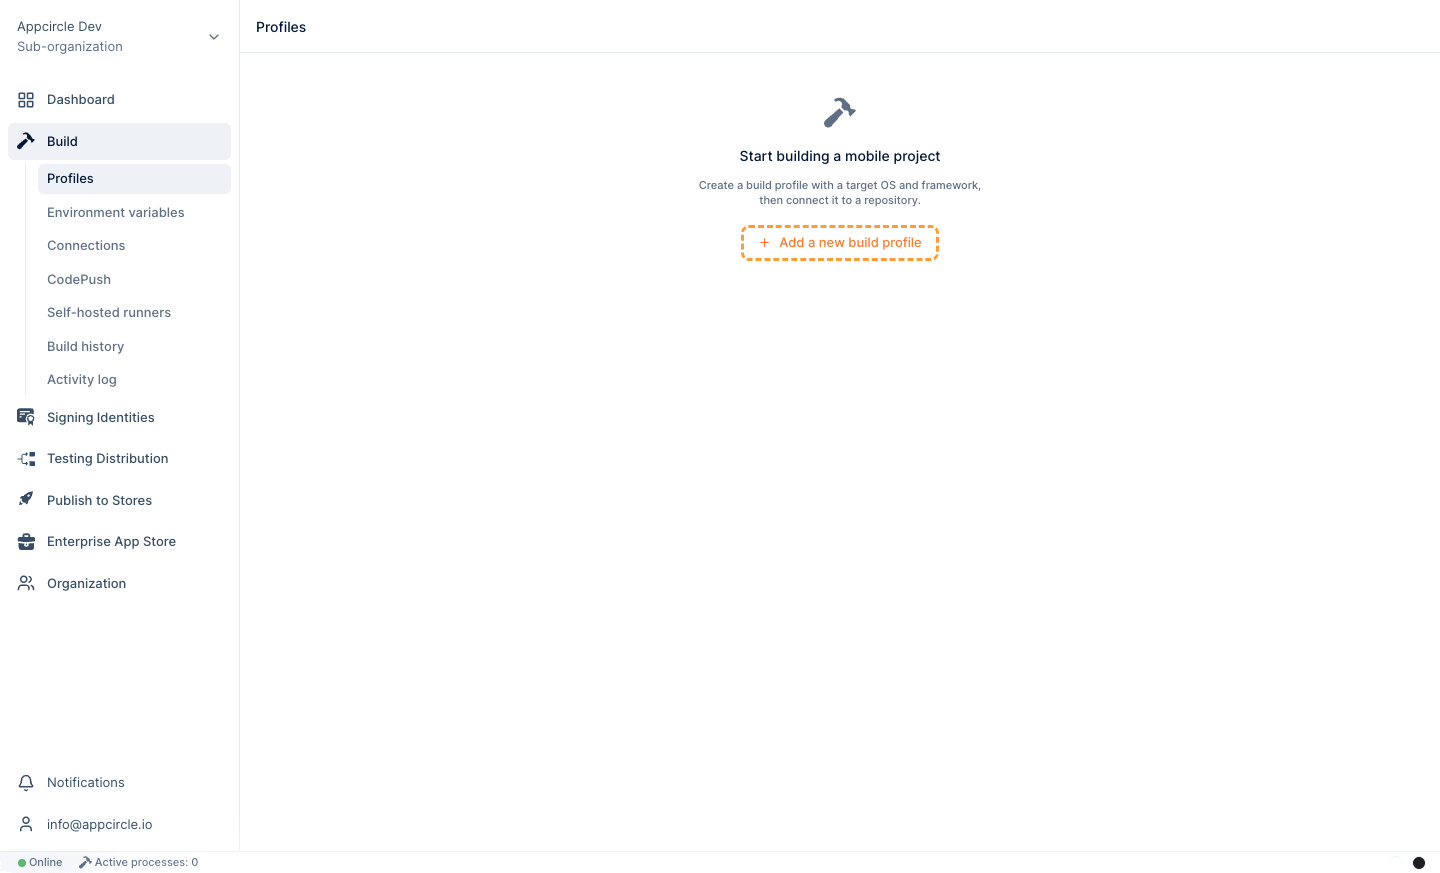
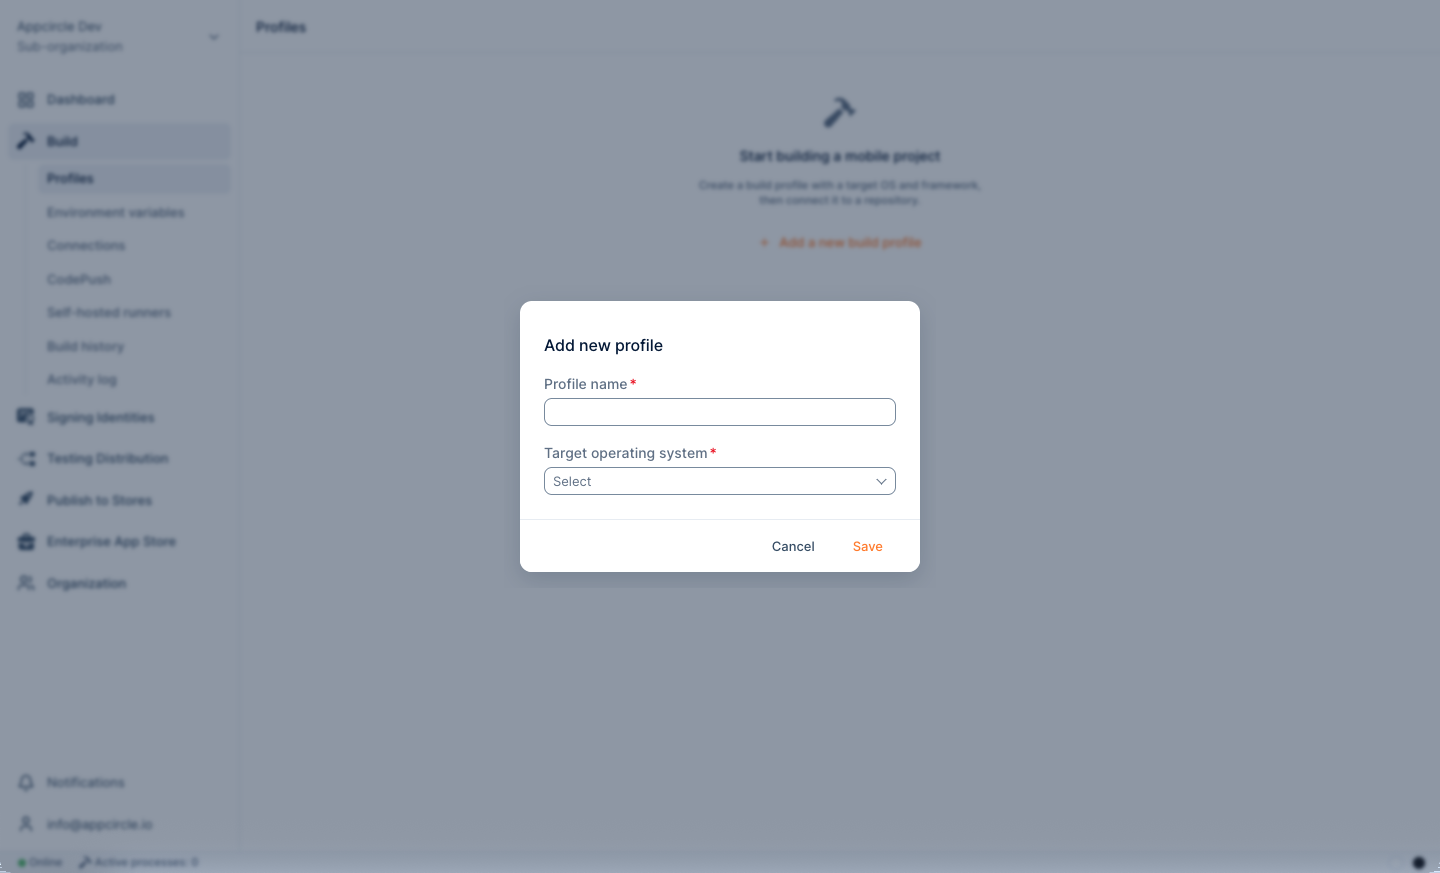 Profile Creation
Checkpoint: The new build profile opens and asks you to connect a repository.
Step 3: Connect Your Repository
- Select the repository access option you chose in Repository Access.
- Follow the connection guide for your provider:
- Select the repository.
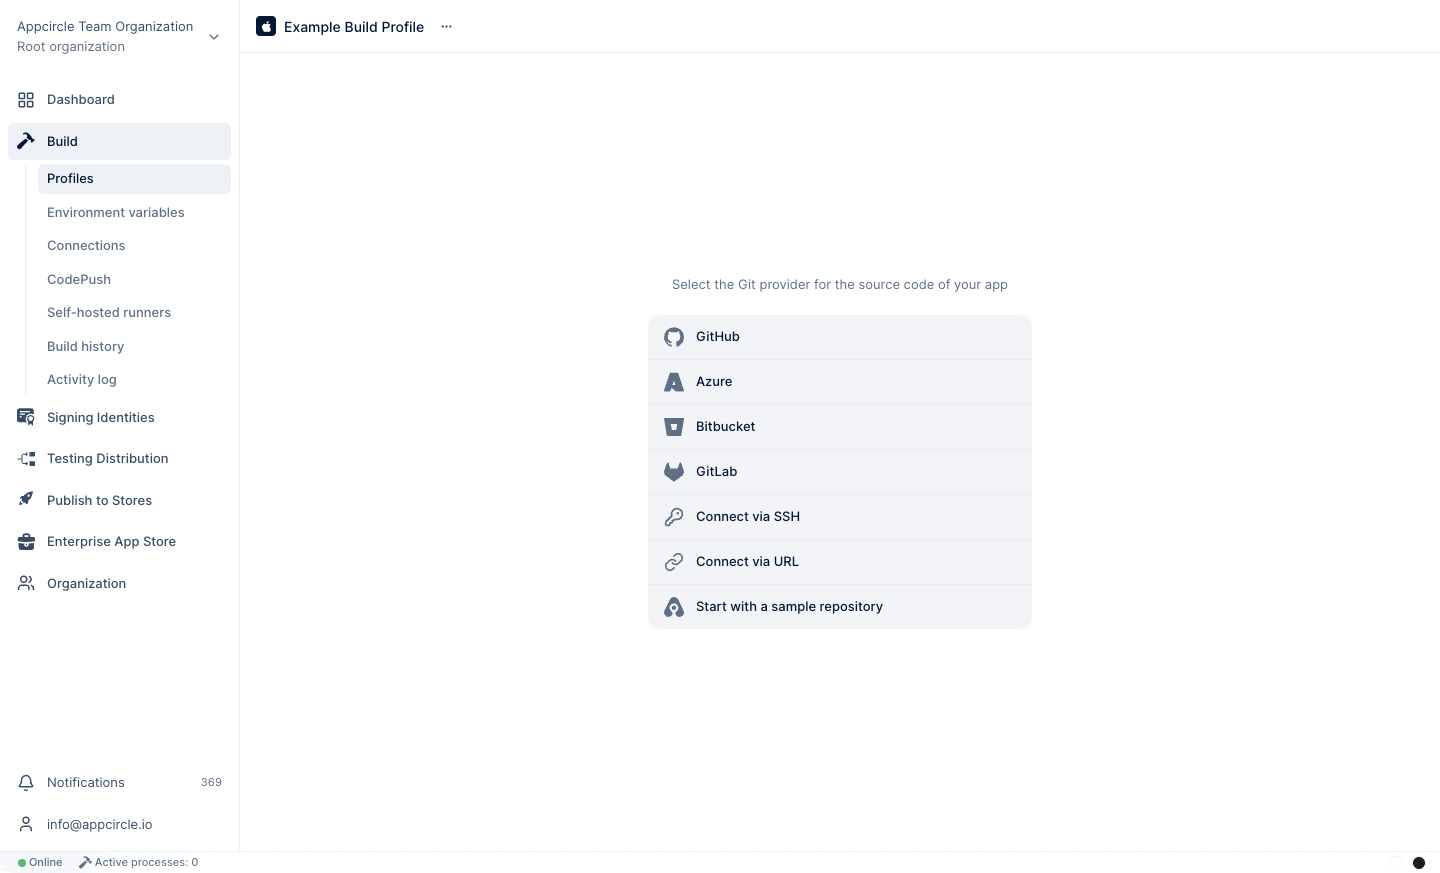
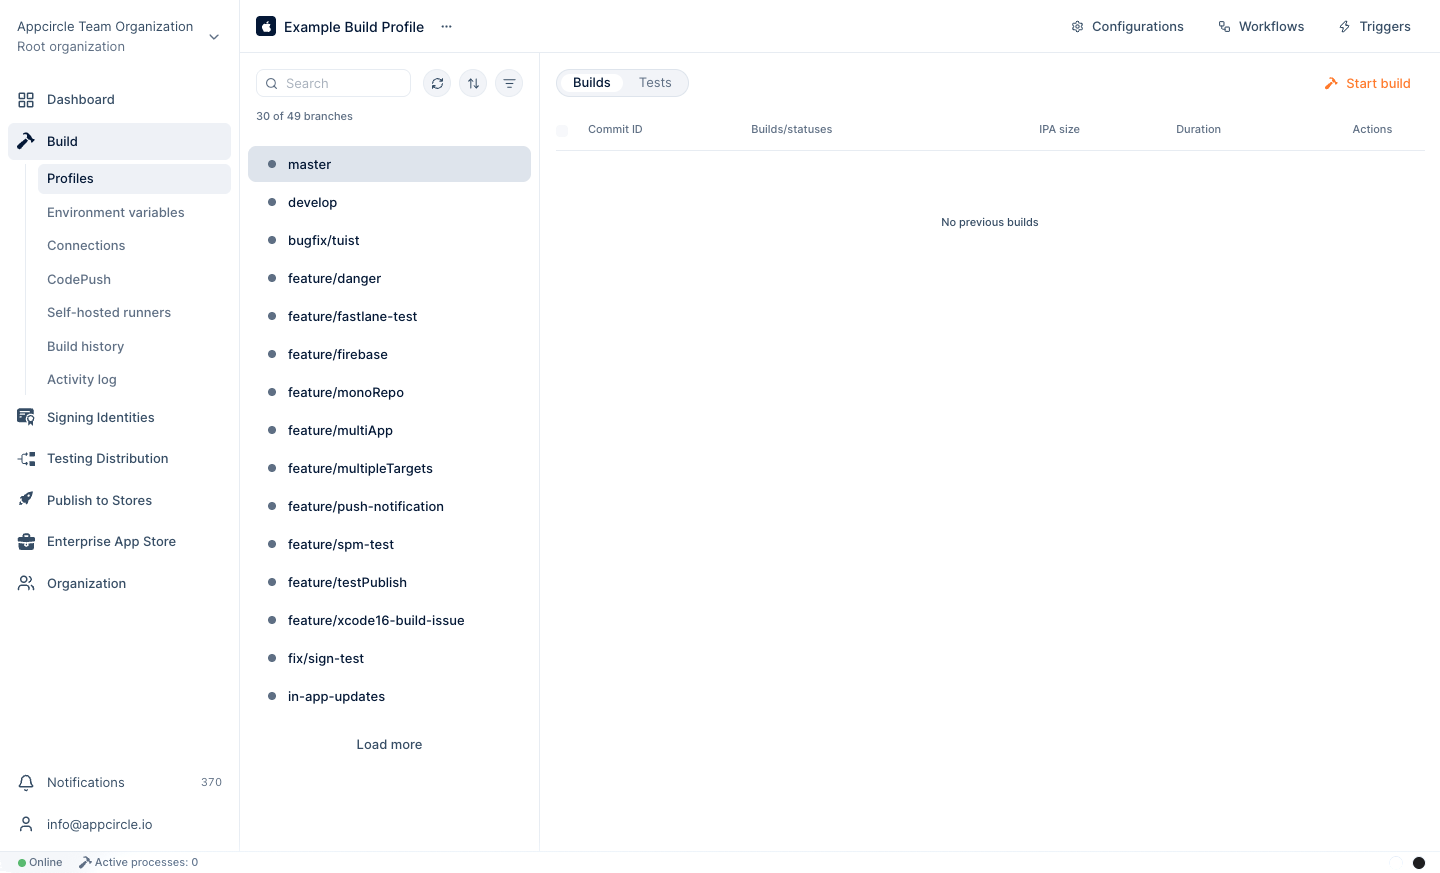
After the connection is established, Appcircle fetches your branches and the last 100 commits of each branch. Pin the branches you build most often, such as develop and main, so they stay at the top of the list. See Branch Operations.
All OAuth and PAT connections of your organization are listed in Build > Connections. See Connections.
Checkpoint: Your branches and commits are listed in the build profile.
Step 4: Prepare Environment Variables
Environment variables keep values such as API keys, passwords, and configuration files out of your repository. This protects your secrets and lets you use different values for different environments, such as development and production.
Variable groups are shared by all build profiles in your organization, so create them before you configure the build.
- Go to Build > Environment Variables and click Add variable group.
- Enter a group name, for example
spacetech-dev, and press Enter. - Add your variables as Text, Secret, or File. Use Secret for passwords and tokens, because secret values are not shown in build logs.
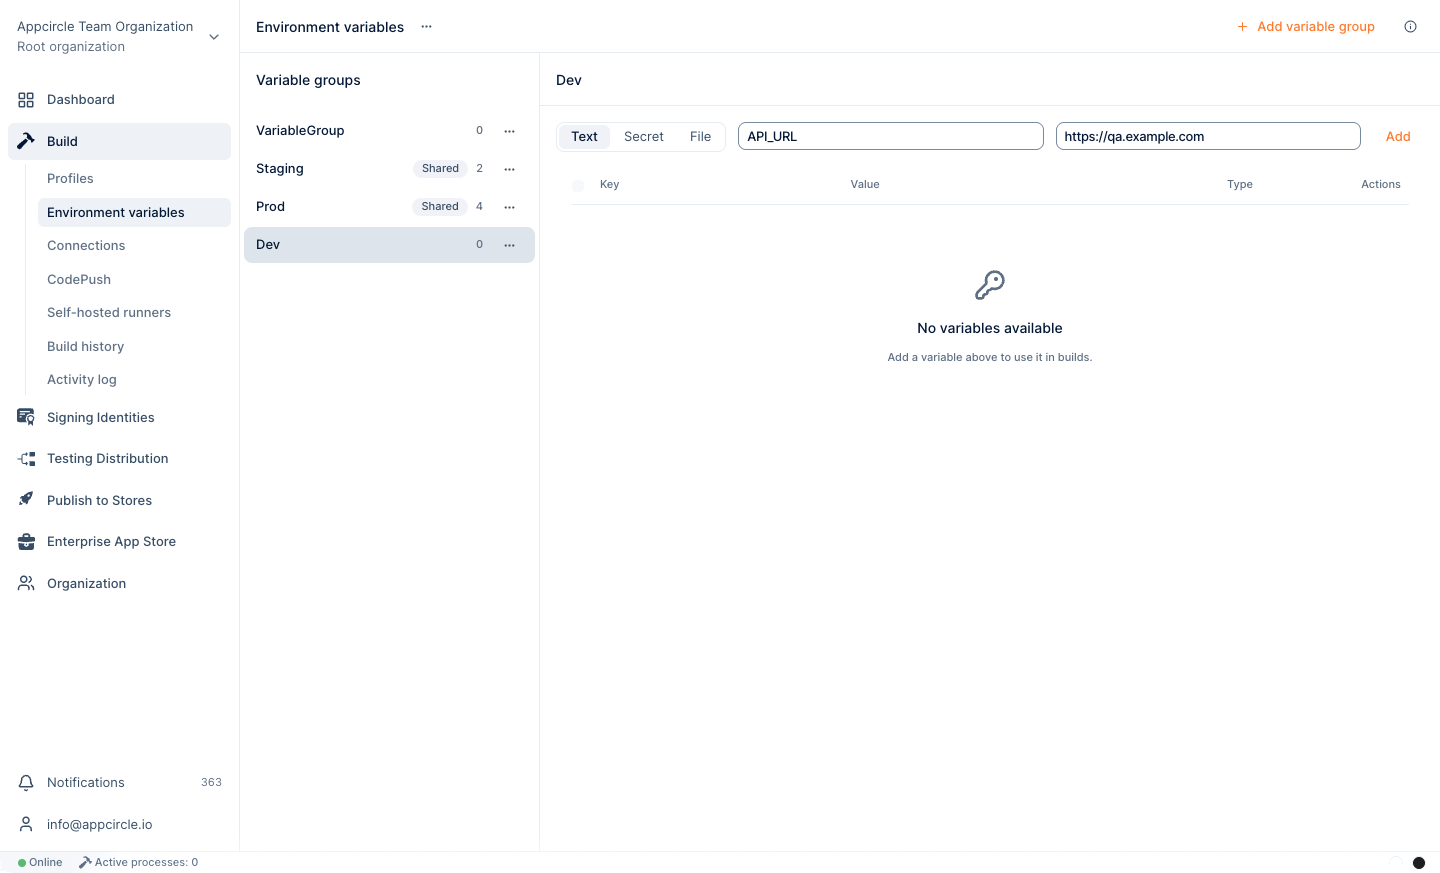
Appcircle also provides read-only variables that start with AC_ to every build, such as AC_REPOSITORY_DIR. You do not need to create these.
Checkpoint: Your variable group exists and contains every value your build needs that is not committed to the repository. If your project needs no extra values, you can skip this step.
Step 5: Create a Configuration
A configuration defines how a build runs. A build profile can have several configurations, for example one for development builds and one for release builds.
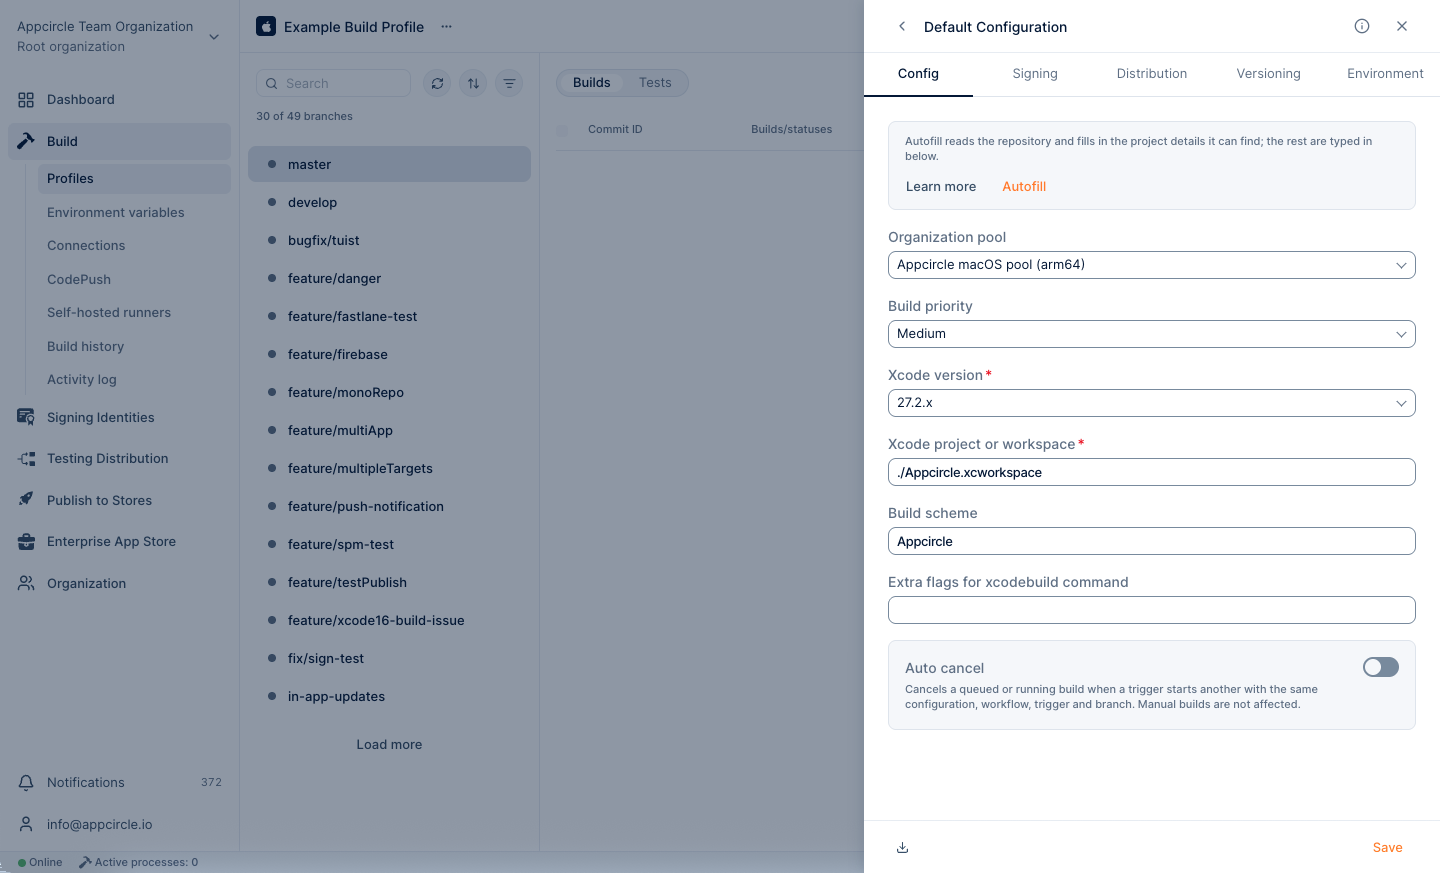
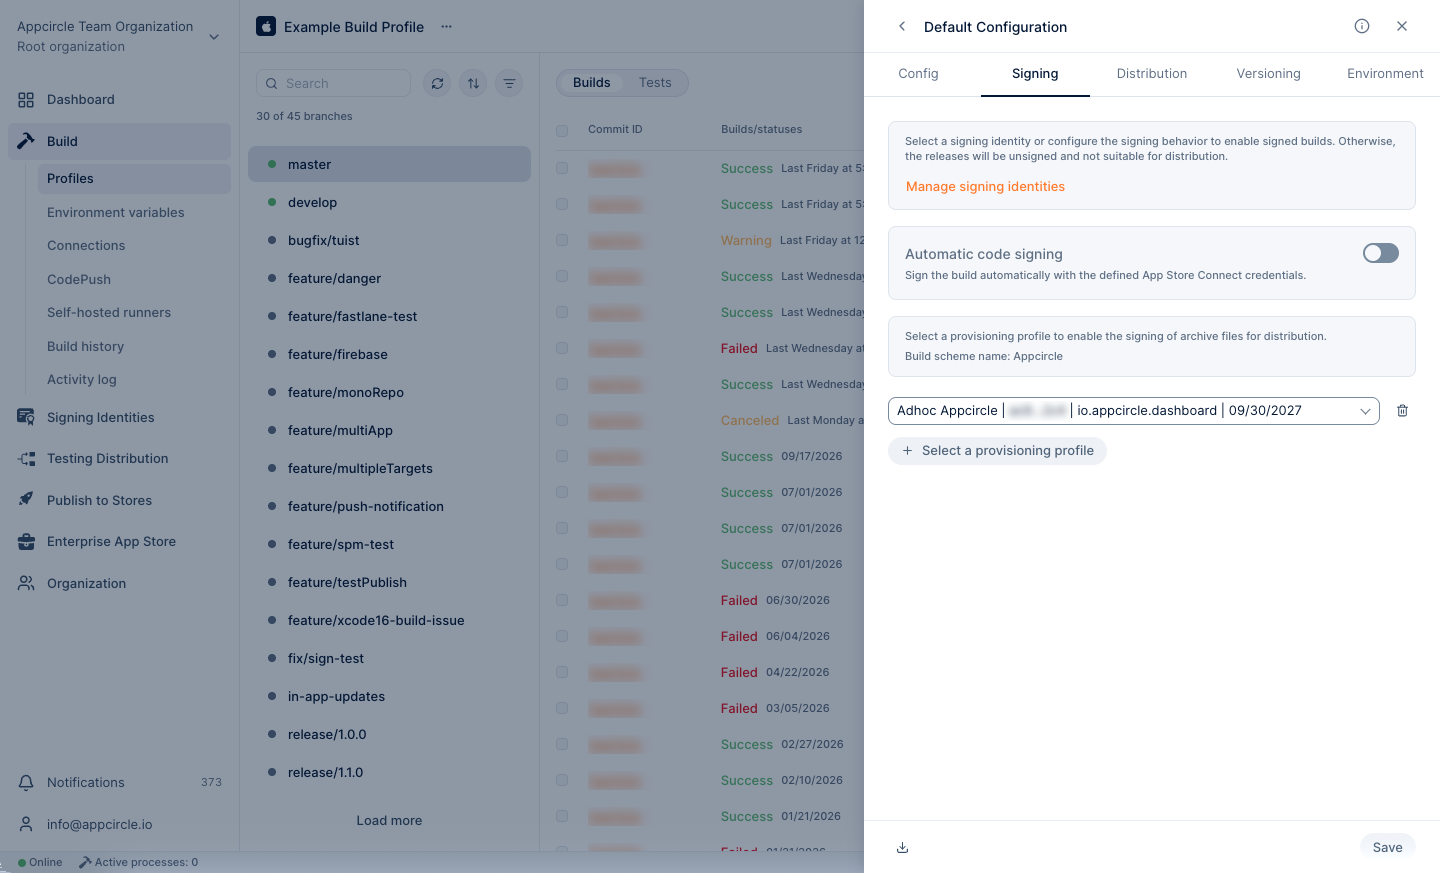
Click Configurations at the top right of the build profile, then click New. Complete the tabs in order:
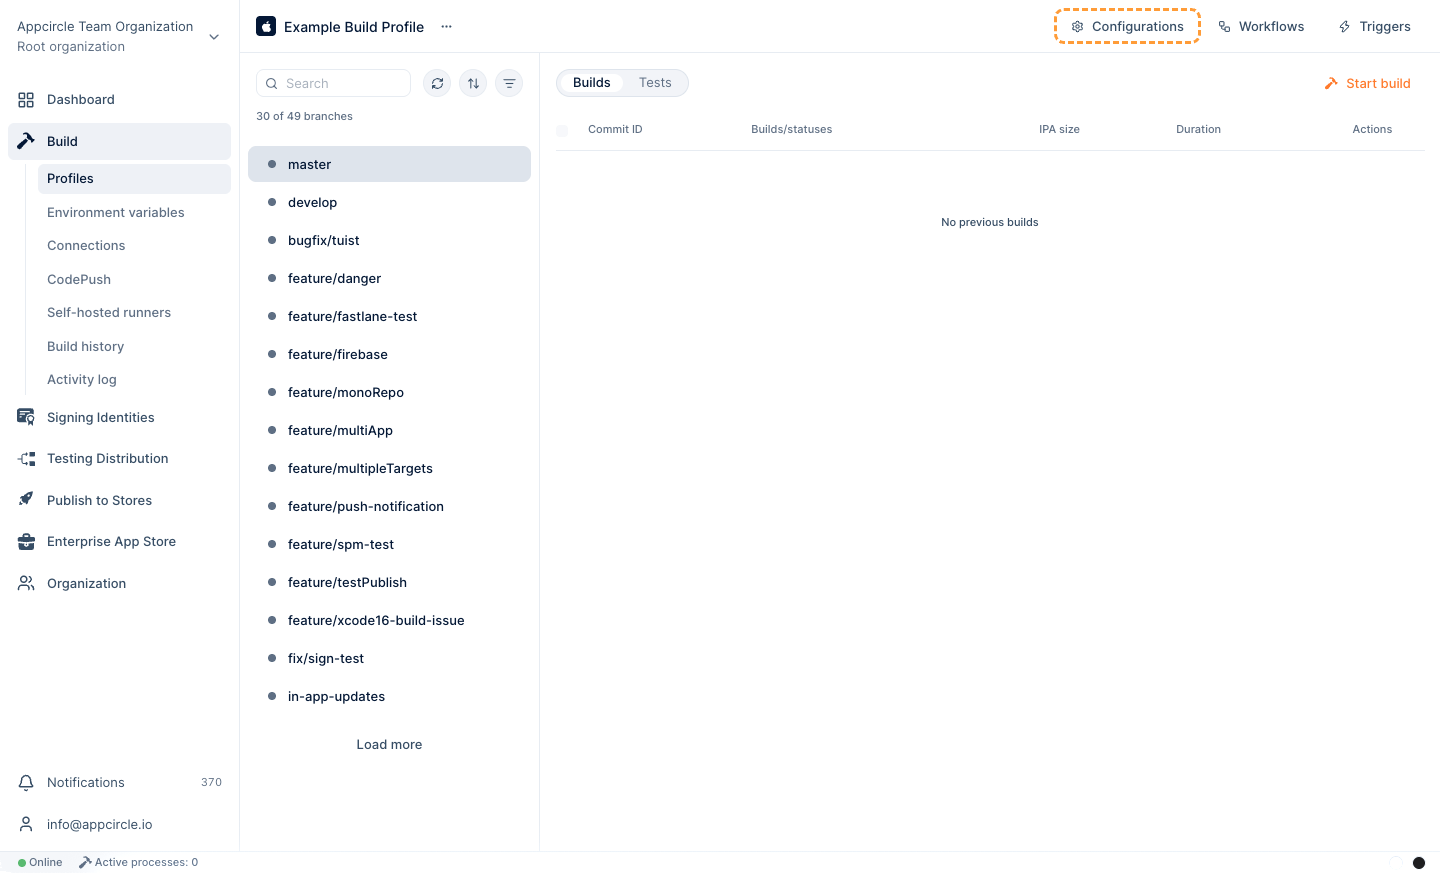
- Config: Click Autofill to let Appcircle read the project details, such as the project path, scheme, or module, from your repository. For iOS, select the Xcode version. If you use self-hosted runners, select your pool in Organization pool.
- Signing: Select the signing identities you added in Signing Assets. For iOS, select a provisioning profile for each bundle identifier, including extensions such as widgets. For Android, select the keystore.
- Distribution: Leave this tab empty for now. After your first successful build, you can send every new build to testers or stores automatically. See Next Steps.
- Versioning: Optionally, let Appcircle increase the build number for every build, so each binary has a unique version. See Versioning.
- Environment: Select the variable groups you created in Step 4.
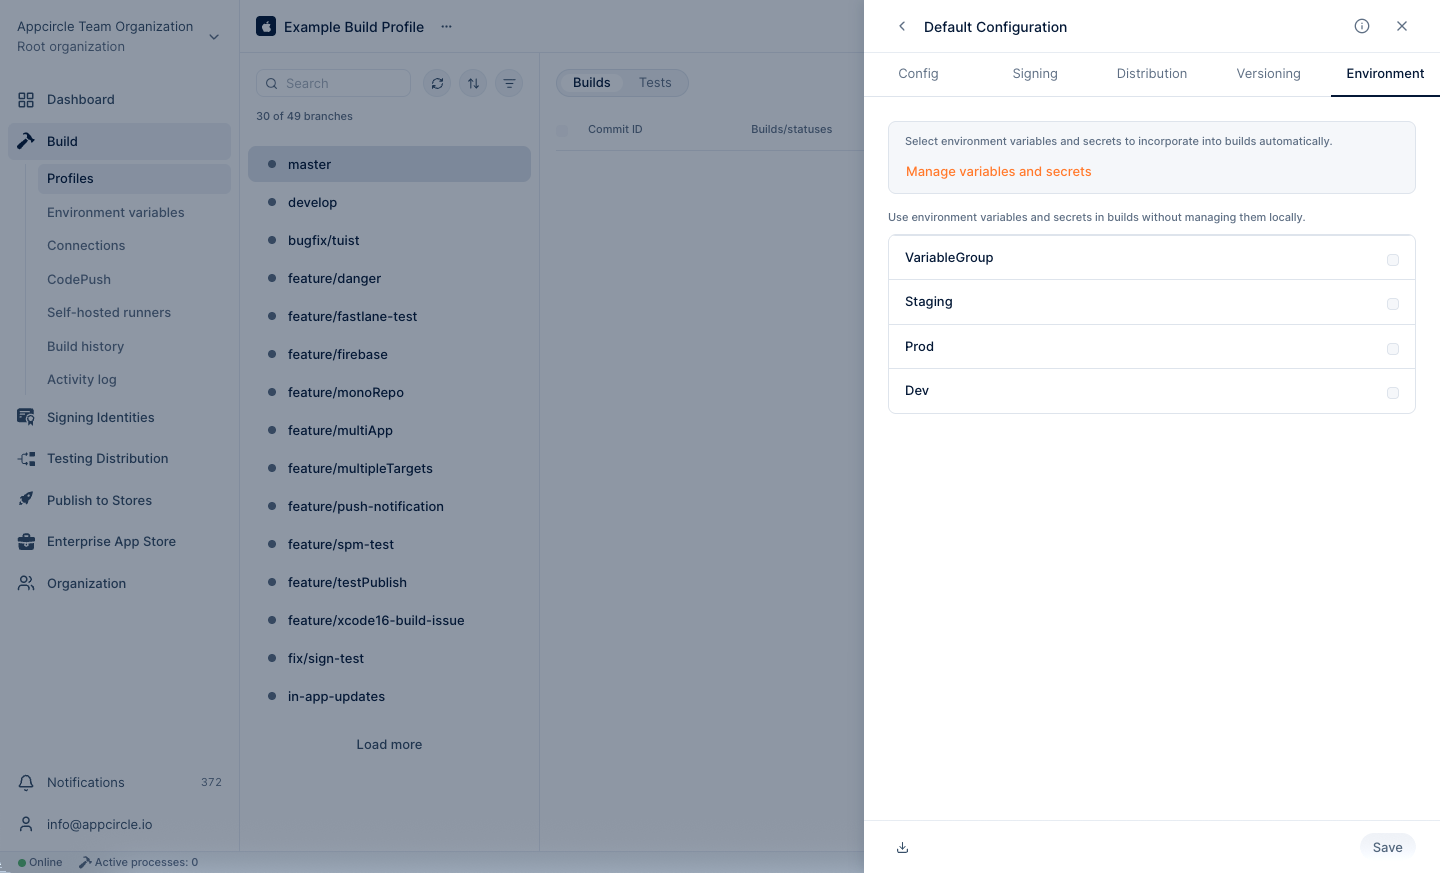
Click Save.
ConfigurationsCheckpoint: The configuration is saved, and the Config tab shows your project details without errors.
Step 6: Review the Workflow
A workflow is the ordered list of steps that run during a build, such as cloning the repository, installing dependencies, building, and signing. Each new build profile has default workflows for its platform, so you do not need to create one from scratch.
- Click Workflows at the top right of the build profile.
- Open the default workflow and review its steps. Steps run from top to bottom.
- Click Manage Workflow to add steps from the Workflow Marketplace, reorder them, or disable the ones you do not need. For example, add the Select Java Version step for Android projects that need a Java version other than the default.
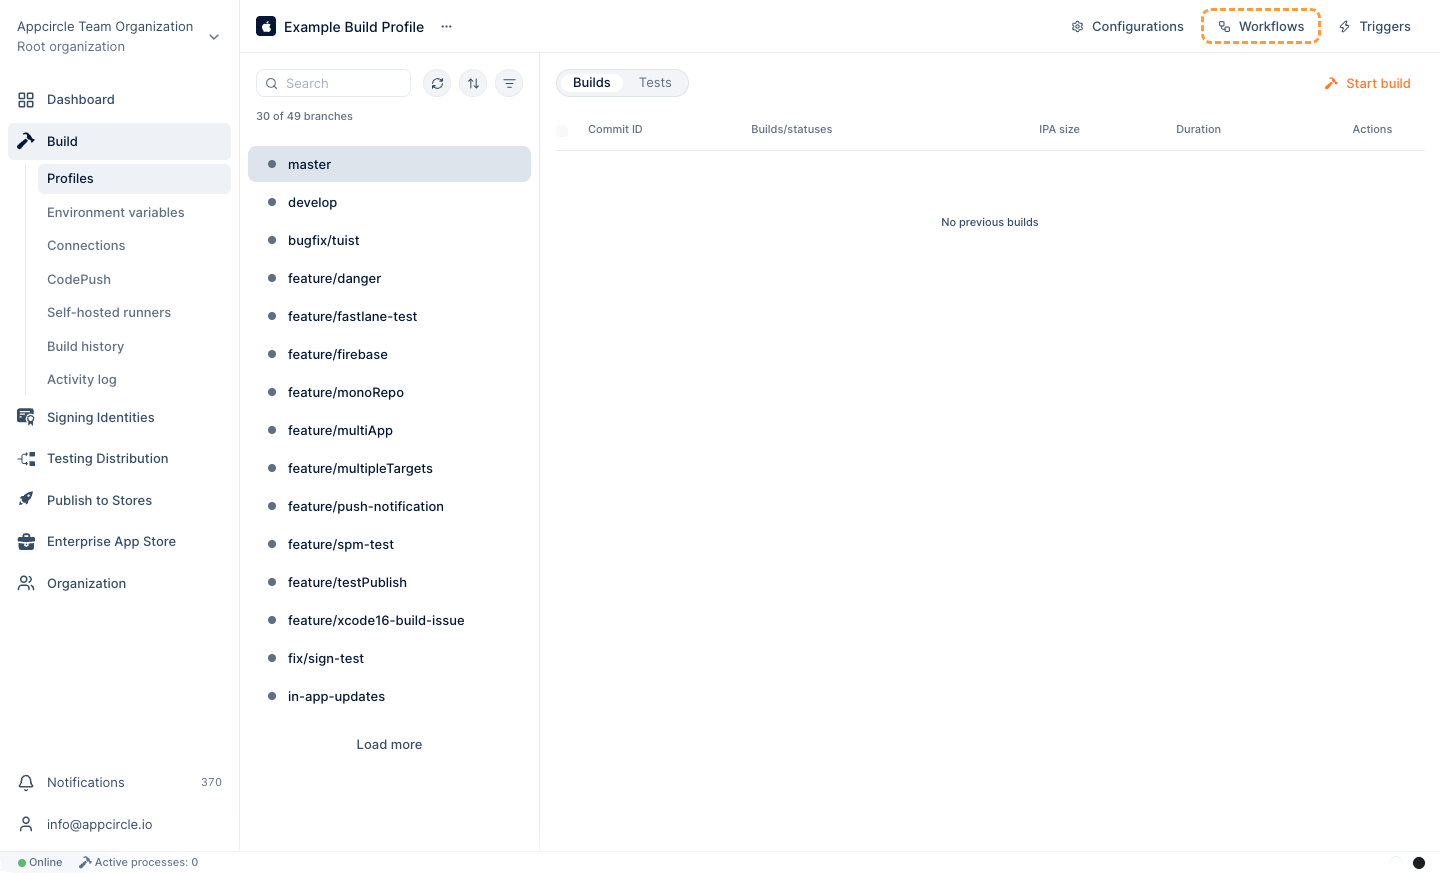
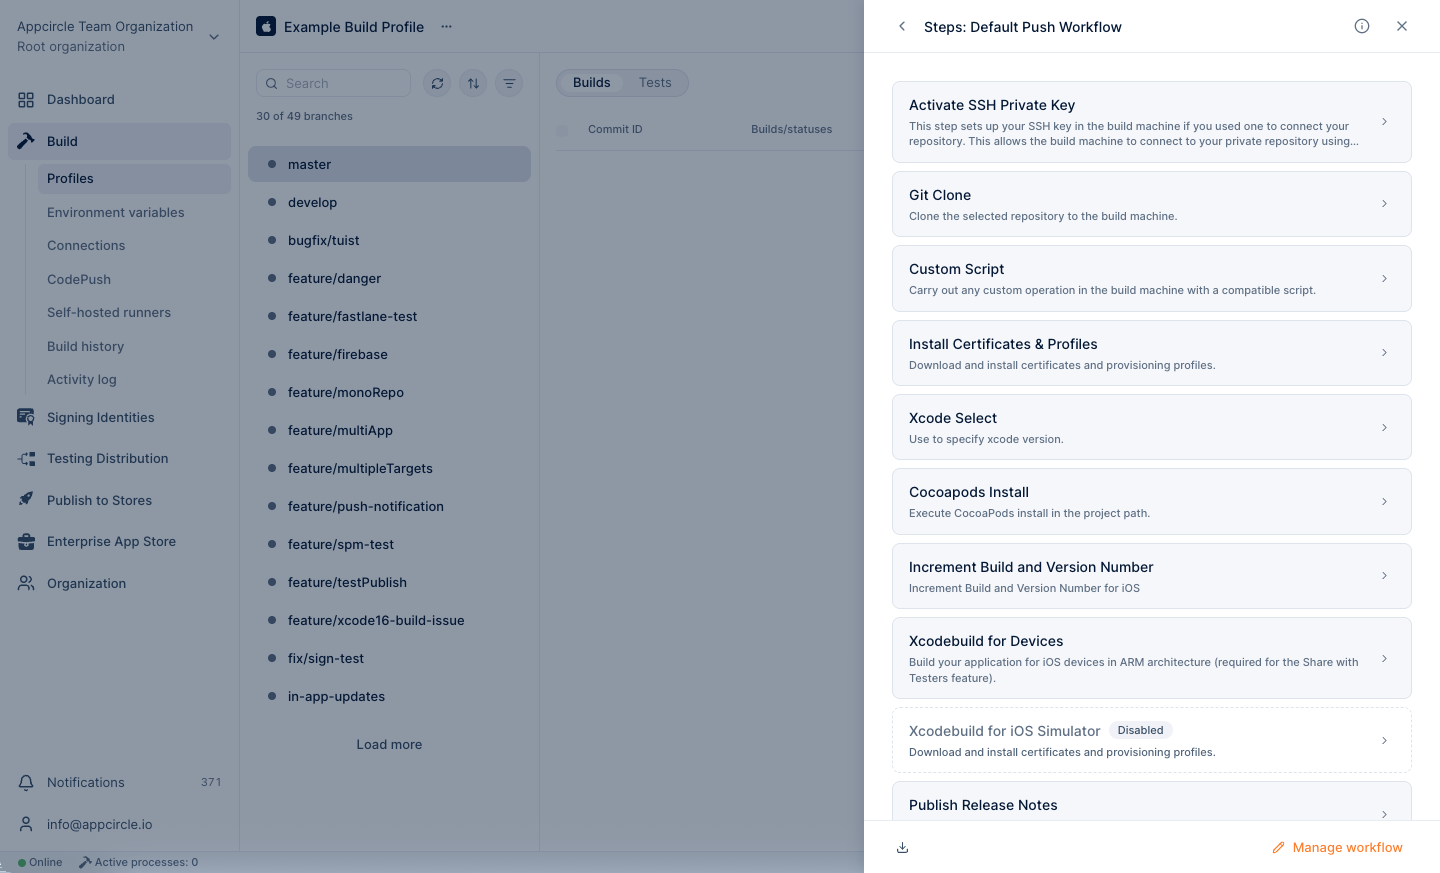
Start your first build with the default workflow, and make changes only if the build needs them. This makes it easier to find the cause of a failure.
Workflows Workflow StepsCheckpoint: You know which workflow you will use, and it contains the steps your project needs.
Step 7: Run Your First Build
- In the build profile, select the branch you want to build.
- Click Start build at the top right.
- Keep the latest commit, or enter the hash of a previous commit to build that specific commit.
- Select the configuration from Step 5 and the workflow from Step 6.
- Click Start build.
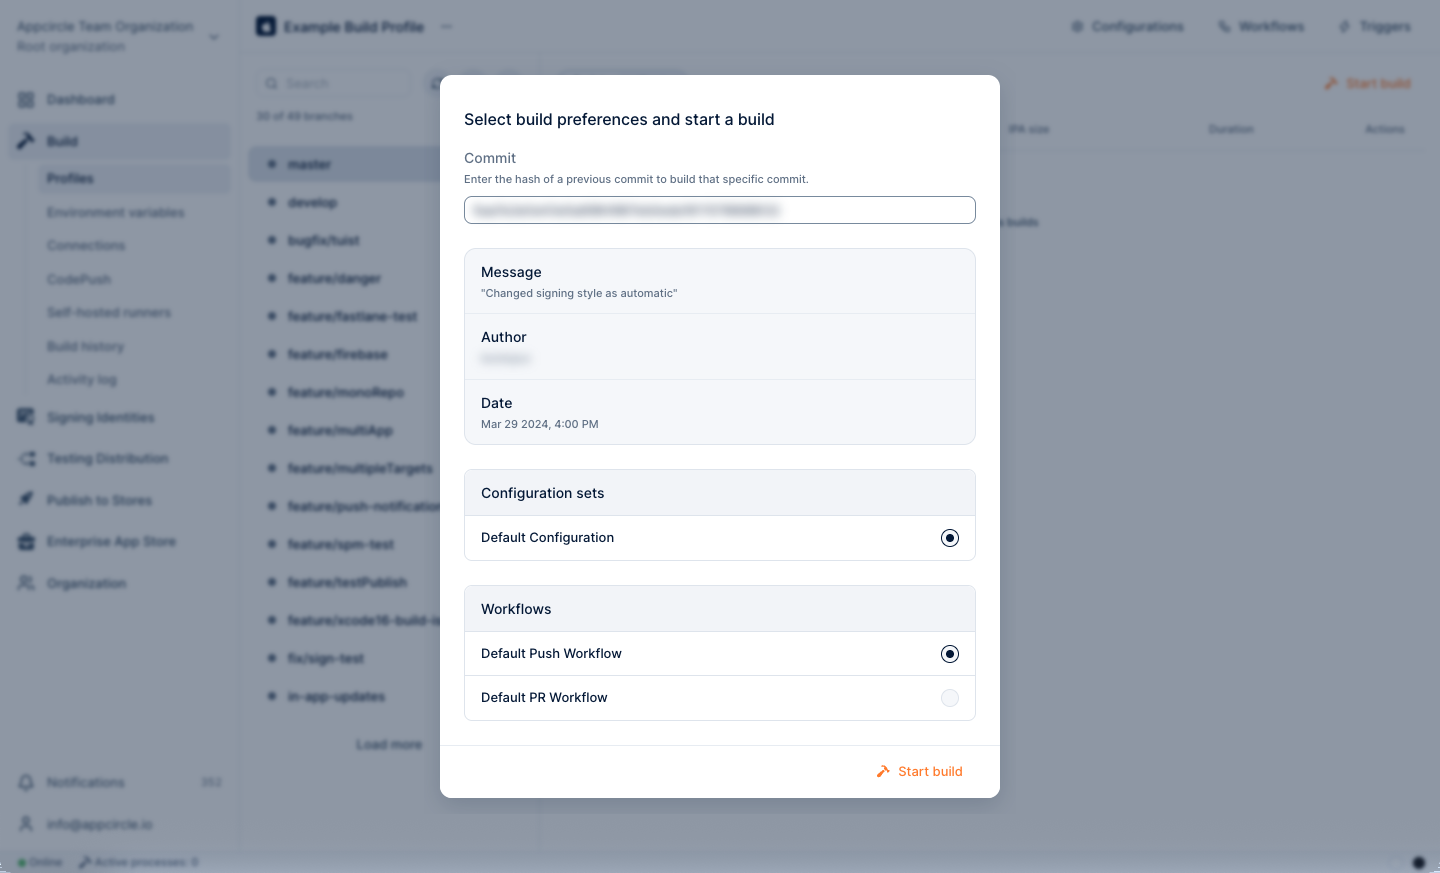
Follow the progress and the log of each step in real time. If a build waits before it starts, all build slots of your plan may be in use. The build starts when a slot is free.
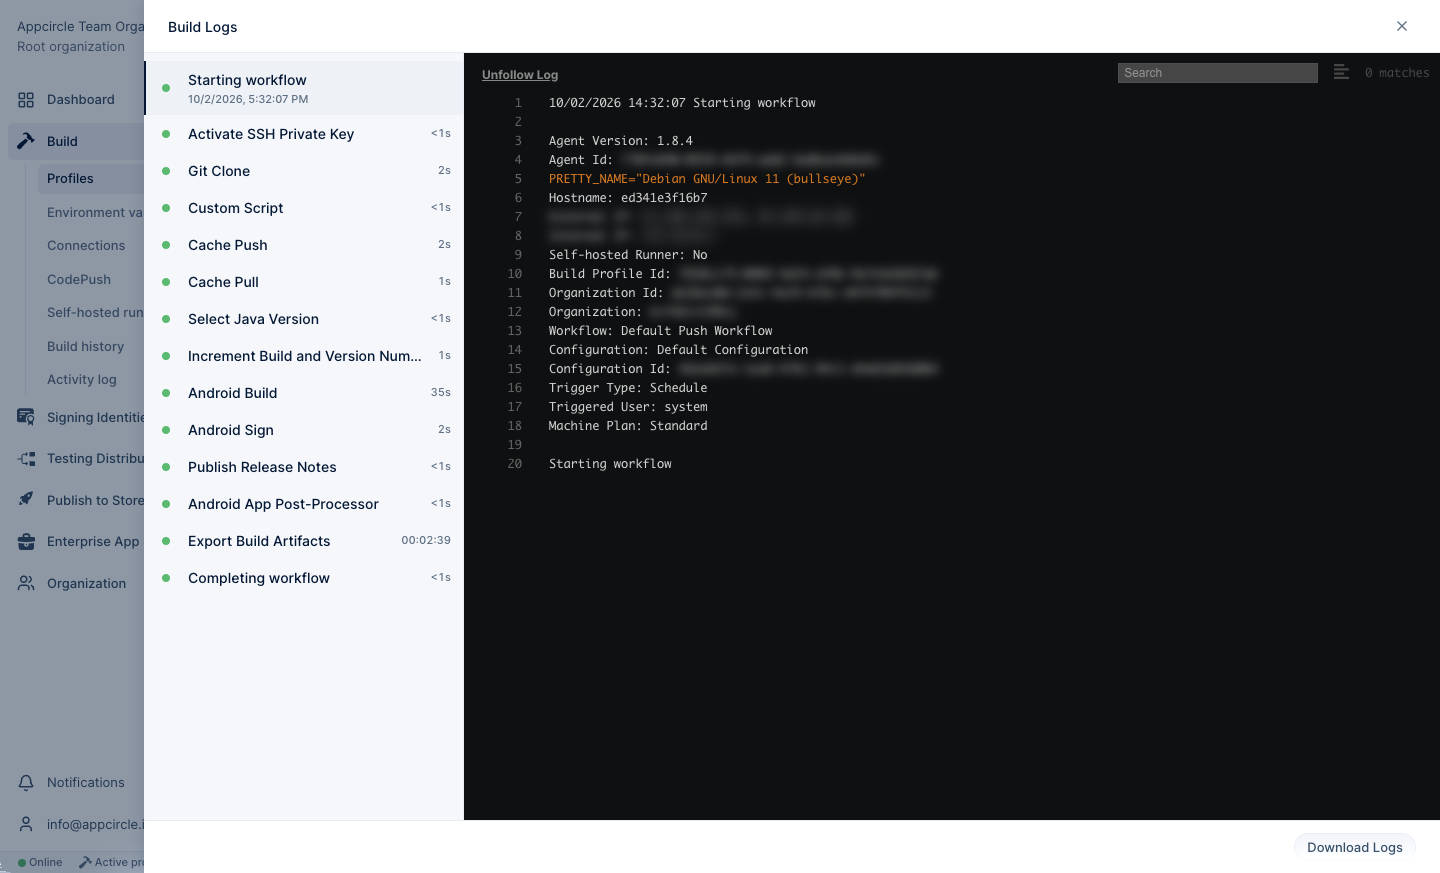 Manual Builds
Checkpoint: The build has started and the step logs are visible.
Step 8: Check the Build Result
When the build ends, it shows one of the following statuses:
- Success: All workflow steps finished successfully.
- Warning: A step that is allowed to fail failed, and all other steps succeeded.
- Failed: One or more workflow steps failed.
- Timeout: The build exceeded the timeout limit.
- Canceled: The build was canceled by a user or automatically.
If the build failed:
- Open the build logs and find the first step that failed. Later failures are often caused by the first one.
- Click Troubleshoot with AI in the Build Logs window to get the likely root cause and a suggested fix. See Build Failure Analysis.
- Check the FAQ of your platform build guide and the FAQ on this page for common first-build errors.
- Fix the cause and start the build again.
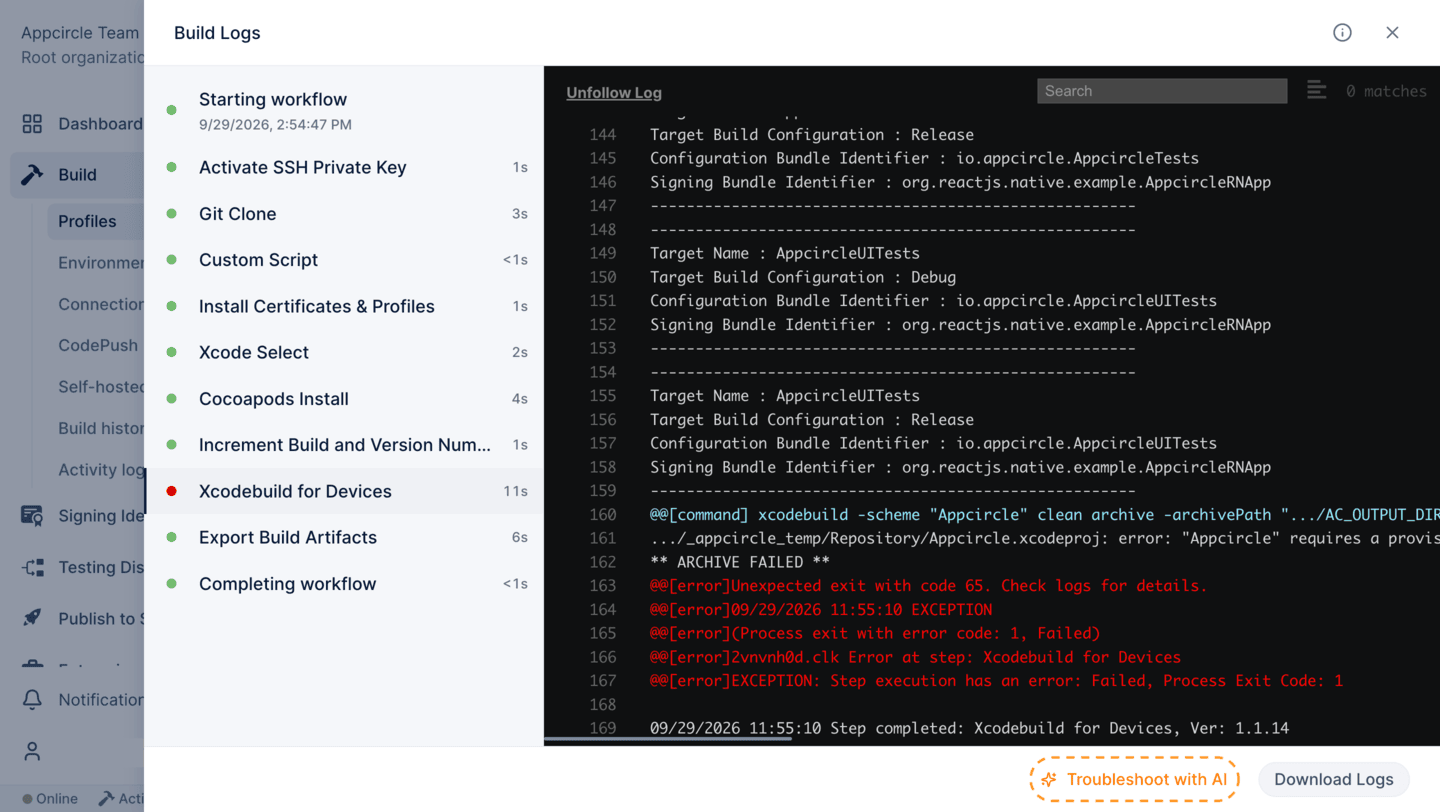
If the build succeeded, open the ... menu of the build to download artifacts, such as the .ipa, .apk, or .aab file, and the logs.
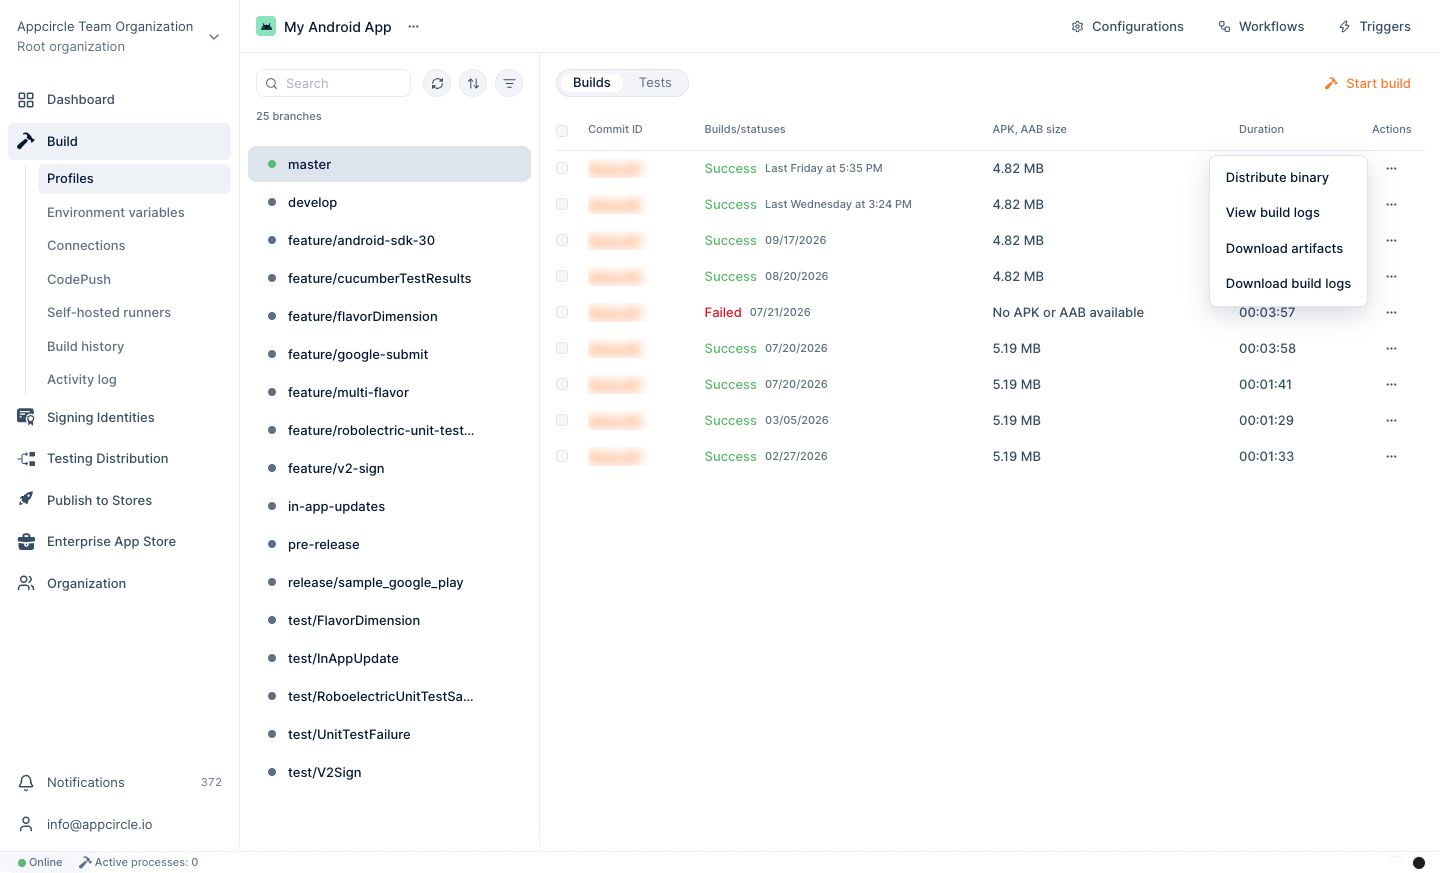 Binary Actions
Checkpoint: Your build ends with the Success status, and you can download a signed binary.
Step 9: Automate Builds with Triggers
Triggers start builds automatically, so every change is checked without anyone starting a build by hand.
- Click Triggers at the top right of the build profile.
- Select the tab for the event you want to build on:
- On Every Push: Build every push to the selected branches, for example
develop. - On Merge/Pull Request: Build a pull or merge request before it is merged, to catch errors early.
- On Tag Push: Build only pushes with matching tags, for example
release*. - Scheduled: Build at fixed times, for example every night.
- On Every Push: Build every push to the selected branches, for example
- Select the branch or tag pattern, the configuration, and the workflow, and save the trigger.
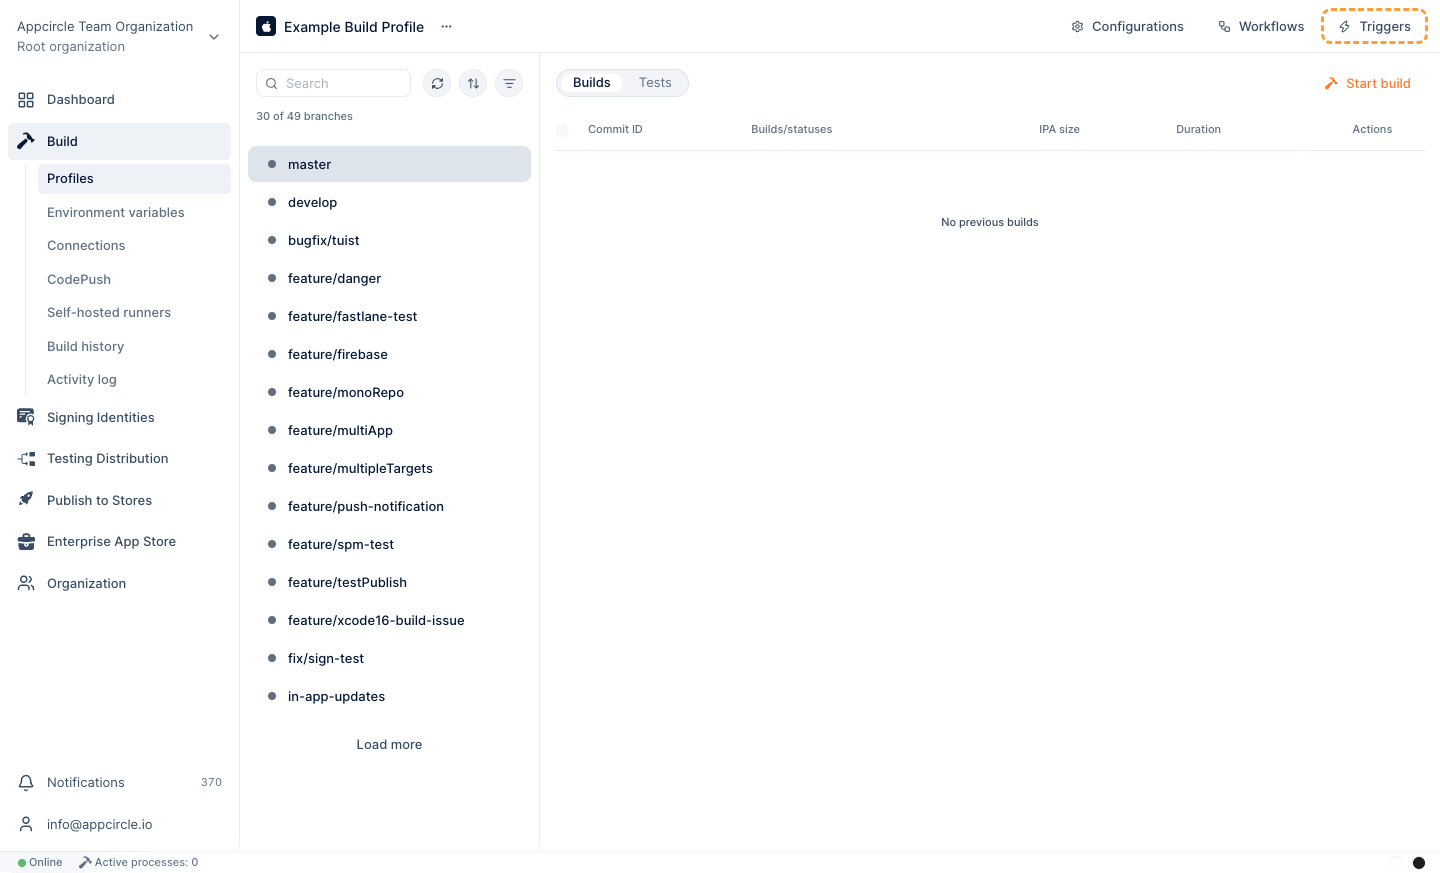
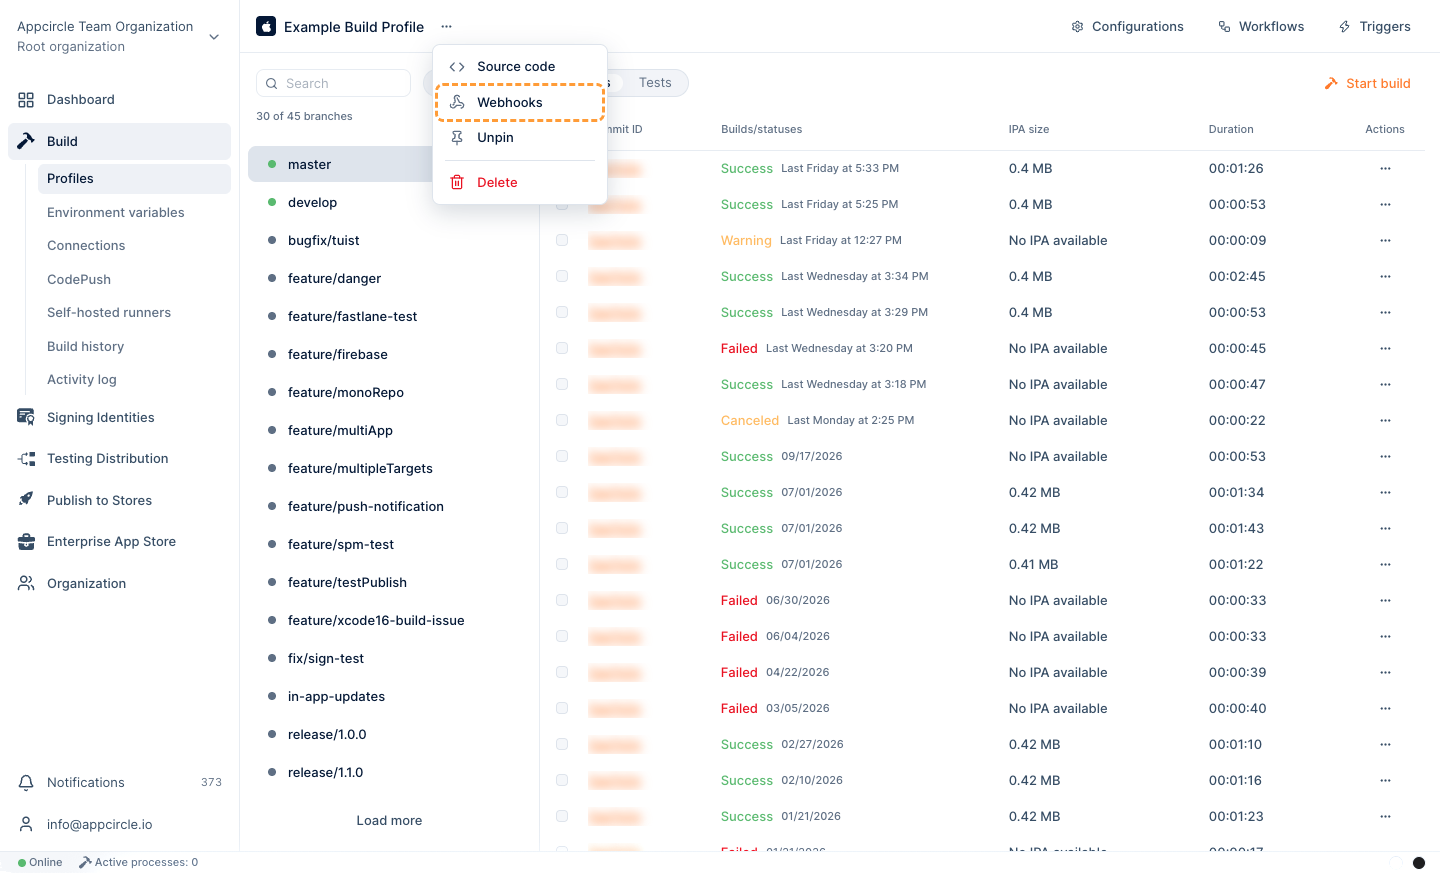
Event-based triggers need a webhook in your Git provider. For GitHub App, OAuth, and PAT connections, Appcircle tries to create it automatically. For SSH and public URL connections, or when the connected user or token has no webhook permissions, select Webhooks from the ... menu next to the profile name and add the webhook URL to your repository settings.
 Triggers
Checkpoint: Push a small commit to a branch that has a trigger. A new build starts automatically.
Step 10: Keep Your Team Informed
Notify your team on Slack, Microsoft Teams, or email when a build succeeds or fails, so failures are fixed quickly.
NotificationsUse the following reports to follow your builds over time and to audit changes:
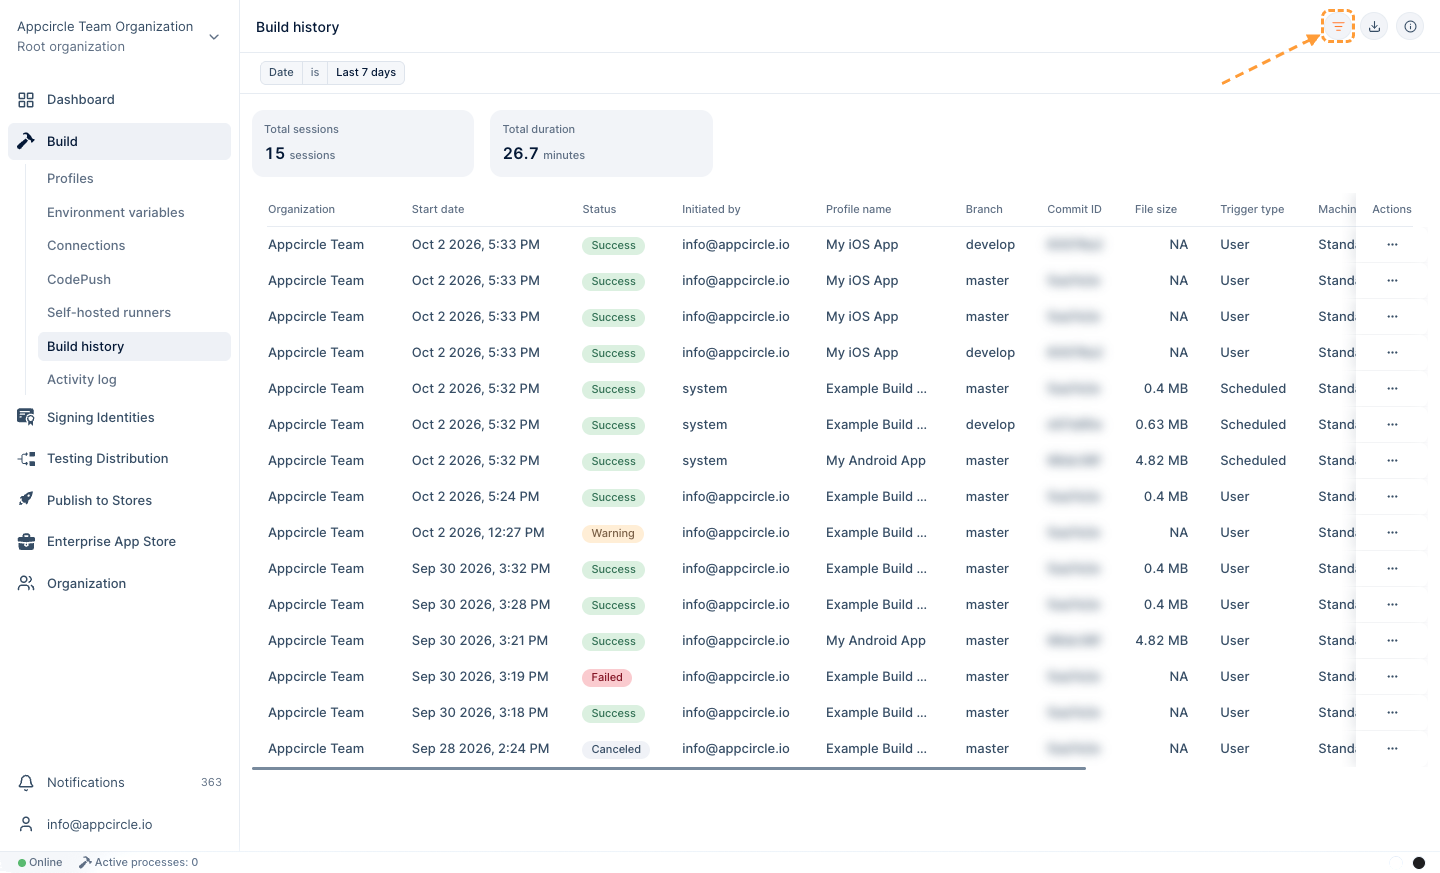
- Build History: All builds started in a selected time period, with their status and duration.
- Build Activity Log: Who changed build profiles, configurations, workflows, triggers, connections, and environment variables, and when.
Checkpoint: Your team receives a notification when a build ends.
Onboarding Checklist
Use this checklist to confirm that your Build module setup is complete:
- Your role allows you to create build profiles and configurations.
- Your project builds from a clean clone, with shared schemes (iOS) or the Gradle wrapper (Android) committed.
- Your signing identities are in the Signing Identities module.
- A build profile exists for each platform of your app.
- Each build profile is connected to your repository and lists your branches.
- Your environment variable groups contain all required values.
- A configuration with project details and signing is saved.
- Your first build ended with the Success status.
- At least one trigger starts builds automatically.
- Your team receives build notifications.
Next Steps
After your builds run automatically, connect the Build module to the rest of your release process:
- Share builds with testers: Create a Testing Distribution profile, then select it in the configuration's Distribution tab. See the Testing Distribution Walkthrough.
- Publish to app stores: Create a publish profile and select it in the Distribution tab. See Publish to Stores.
- Distribute internal apps: Send builds to your own enterprise app store. See the Enterprise App Store Walkthrough.
- Run tests during builds: Add unit and UI test steps to your workflow. See Continuous Testing.
- Automate from the command line: Start builds and download results from scripts or other CI tools. See Appcircle CLI.
FAQ
I cannot see the New profile or Configurations buttons. Why?
Your role does not allow you to change the Build module setup. Creating build profiles, configurations, workflows, and triggers requires the Owner or Manager role. Ask your organization Owner to update your role. See Role Management.
Autofill does not find my iOS scheme. What should I check?
Make sure that the scheme is marked as Shared in Xcode (Product > Scheme > Manage Schemes), and that the scheme files are committed and pushed to the branch you selected. See Xcode Scheme Errors.
My Android build fails because gradlew cannot be found. What should I do?
Commit the Gradle wrapper files (gradlew and the gradle/wrapper folder) to your repository. If gradlew is not in the root of your repository, edit the Android Build step in your workflow and set the project path to the folder that contains it, for example ./android for a React Native project. See the Building Android Applications FAQ.
Why is my iOS build output an .xcarchive instead of an .ipa?
The build was not signed. Select a certificate and a provisioning profile in the configuration's Signing tab, and make sure the signing step is active in the workflow.
Why does my push not start a build?
Check that a trigger exists for the branch, that the webhook exists in your Git provider, and that the commit message does not contain [skip ci] or [ci skip]. See the Triggers FAQ.
Do I need a separate build profile for iOS and Android?
Yes. A build profile targets one operating system. Create one build profile for each platform and connect both to the same repository.
Further Support and Resources
Build Walkthrough Appcircle Onboarding Best Practices Build Module Overview Platform Build GuidesNeed help?
Get help from Appcircle's support team, or see how others are using Appcircle by joining our Slack Channel.
