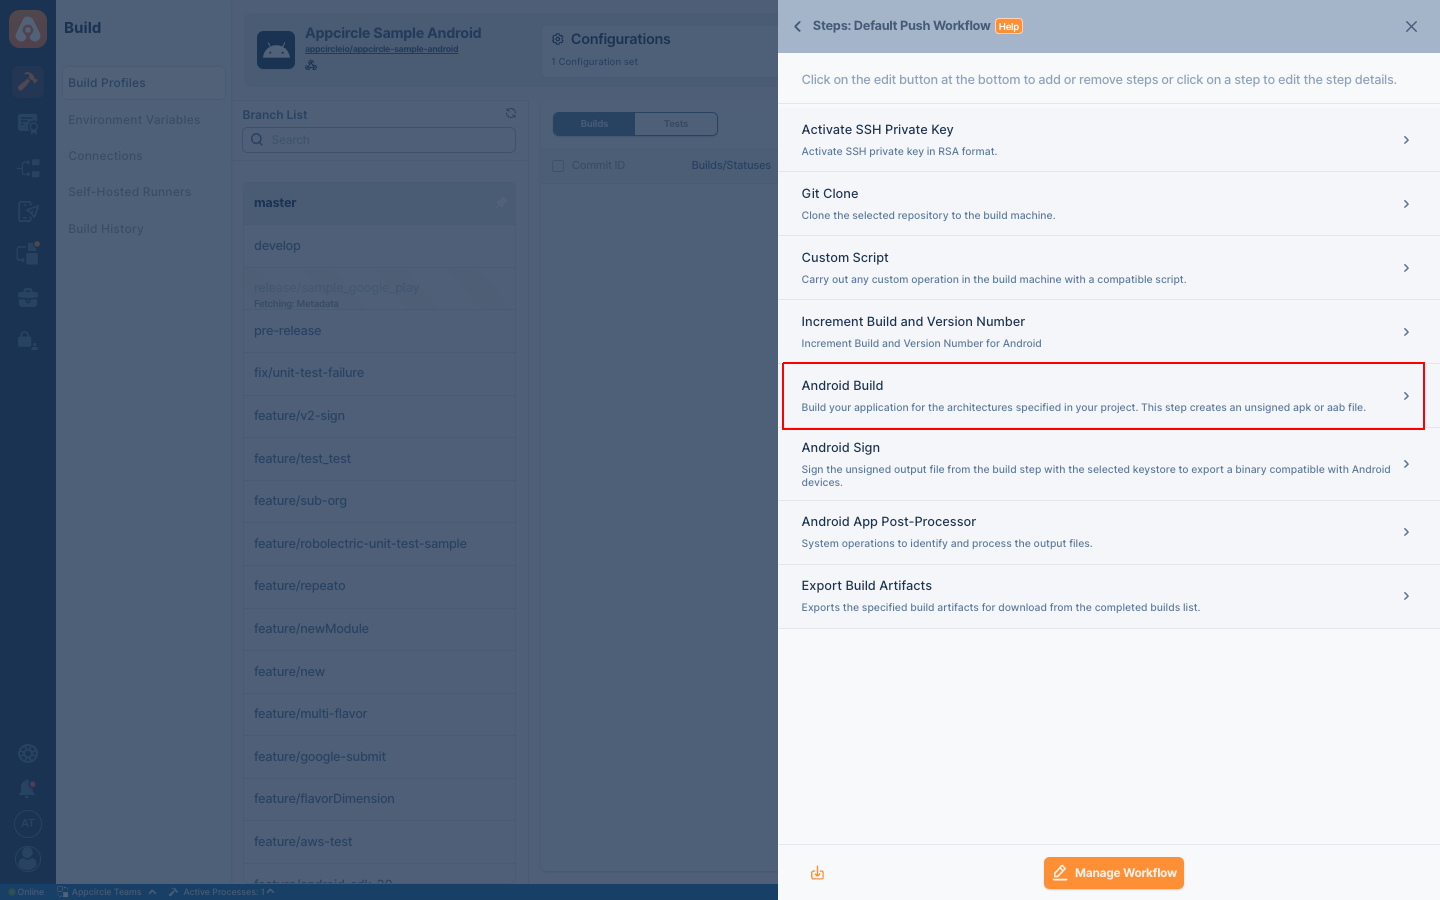
Android Build
The Appcircle Android Build step is designed to build your Android application for the architectures specified in your project.
Prerequisites
Before running the Android Build step, you must complete certain prerequisites, as detailed in the table below:
| Prerequisite Workflow Step | Description |
|---|---|
| Git Clone | To initiate the Android build process, the repository that needs to be built must be fetched from the branch. This is achieved as follows: Upon completion of the Git Clone step, it generates the $AC_REPOSITORY_DIR variable, which is then used as the input for the Android Build step. |
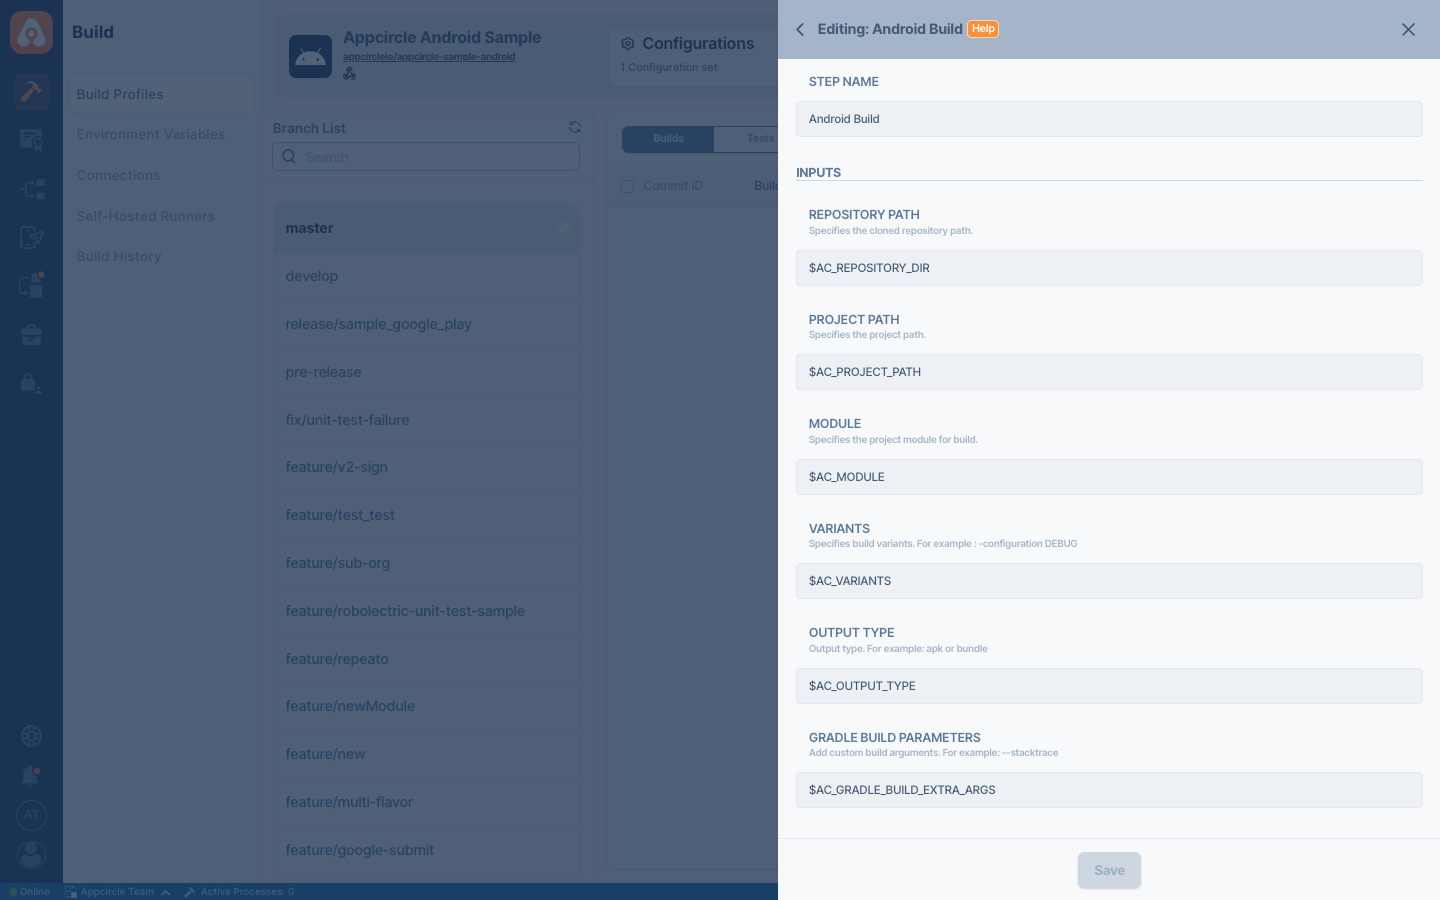
Input Variables
This step contains some input variable(s). It needs these variable(s) to work. The table below gives explanation for this variable(s).
| Variable Name | Description | Status |
|---|---|---|
$AC_REPOSITORY_DIR | This variable represents the path of the cloned Git repository. If this step runs after the Git Clone step, the variable will be automatically populated. | Required |
$AC_MODULE | This variable specifies the project module to be build. This variable can also be set via the build Configuration. In Android Studio, you can locate the available modules for your project. For more information, please refer to this Android document. | Required |
$AC_VARIANTS | This variable specifies the project variant to be build. This variable can also be set via the build Configuration. In Android Studio, you can find the available variants for your project. For more information, please refer to this Android document. | Required |
$AC_OUTPUT_TYPE | This variable specifies the output type for your build file (APK or AAB). This variable can also be set via the build Configuration. | Required |
$AC_PROJECT_PATH | Specifies the project path. If your project that needs to be built is not located in the root directory where it was cloned from Git, you should provide the subpath as a relative path. | Optional |
$AC_GRADLE_BUILD_EXTRA_ARGS | Extra arguments were passed to build task. For more information, please refer to this Gradle document. | Optional |
If you have filled in the necessary variables in the Configuration section, you will not need to redefine these variables again in the Workflow. For more information about configurations, refer to the Build Profile Configuration Overview document. The information you fill in the configuration will be used as input in the Android Build step. Please replace the example information with your own details:
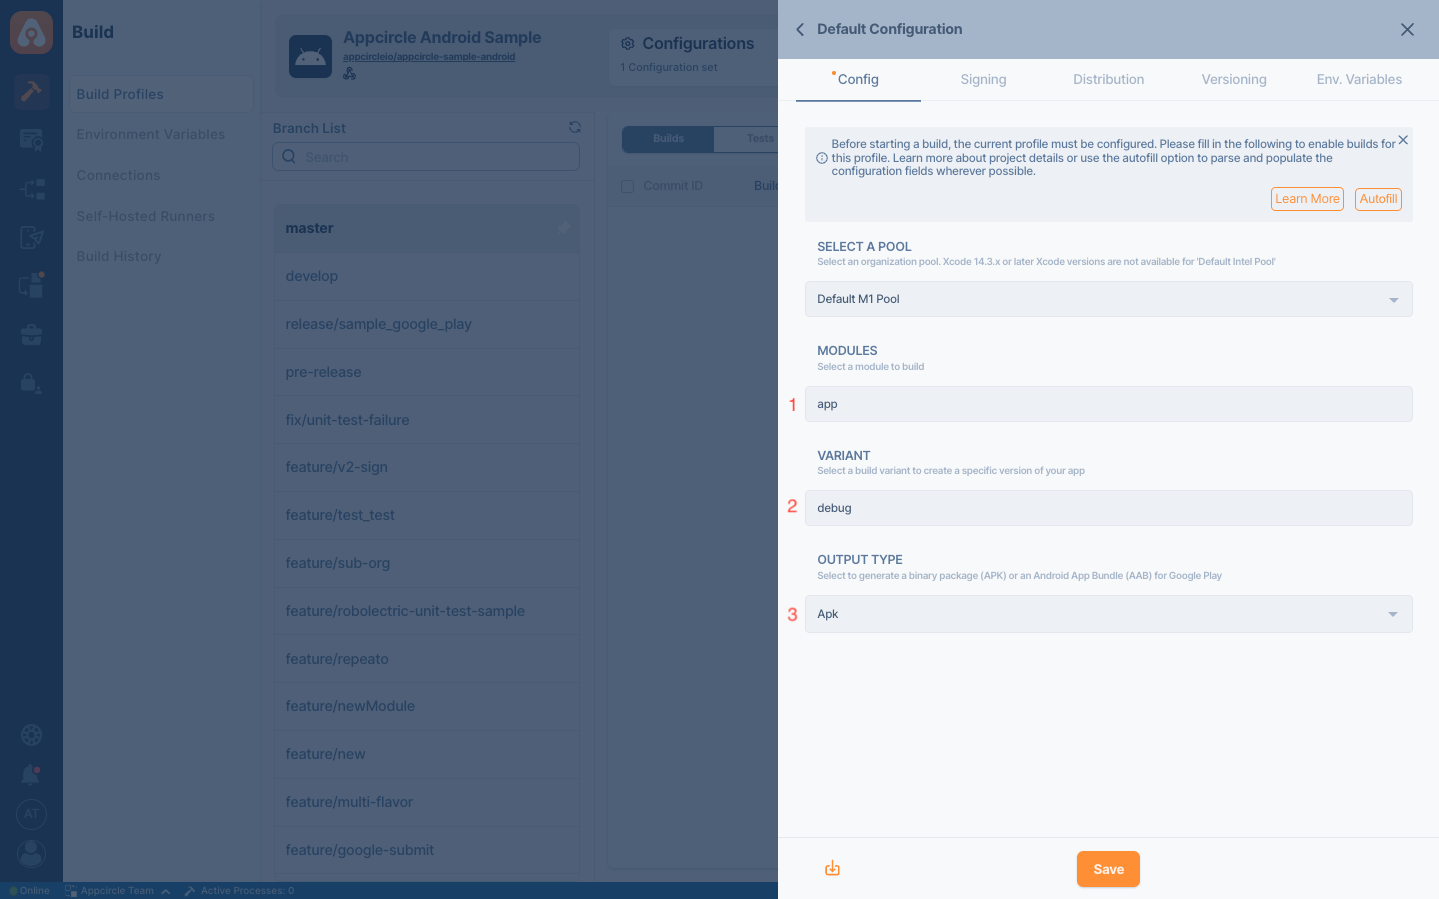
- The input corresponding to the 1st field:
$AC_MODULE - The input corresponding to the 2nd field:
$AC_VARIANTS - The input corresponding to the 3rd field:
$AC_OUTPUT_TYPE
If you are using Gradle 4.3 and above in your project, you can just use the --scan flag in the build step to enable build scans. For existing projects, you may need to add the Gradle Scan (Gradle Enterprise) plugin. For more information, please refer to ![]()
Output Variables
The output(s) resulting from the operation of this component are as follows:
| Variable Name | Description |
|---|---|
AC_APK_PATH | Path for the generated APK file. This path will be created after the Android Build step runs. |
AC_AAB_PATH | Path for the generated AAB file. This path will be created after the Android Build step runs and when AAB is selected. |
The resulting files will be either APK or AAB, depending on whether you choose the Android App in the project Configuration.
If your project has the signing configuration in Gradle, this step will generate a signed artifact.
If you do not disable the Android Sign step and your project has no signing configuration defined in Gradle, your artifact will remain unsigned.
So, in order to sign your app using the keystore selected in the build configuration, you should enable the Android Sign step after Android Build.
To access the source code of this component, please use the following link:
![]()
FAQ
How can I solve the Out of memory error: Java heap memory or set the heap memory during the build?
To resolve this issue, you need to adjust the Java heap size using the following parameters in the system properties:
-Xms:<size>, which sets the initial and minimum heap size-Xmx:<size>, which sets the maximum heap sizeFor example:
This starts up the JVM with a heap size fixed to 1 GB.
Please refer following documentation for more information:
![]()
You can implement this solution using one of the following methods:
Method 1: Using a Custom Script During the Build
If your project has varying heap size requirements, you can adjust the heap size during the build phase with a Custom Script before the Android Build step. Your script should include the following command:
echo "org.gradle.jvmargs=-Xms1g -Xmx7168M" >> $AC_REPOSITORY_DIR/gradle.properties
- Adjust the
-Xms1g -Xmx7168Mvalues according to your project needs. - Ensure the path
$AC_REPOSITORY_DIR/gradle.propertiesmatches your file's location.$AC_REPOSITORY_DIRrepresents the root project directory. - You can extend the command with additional parameters as needed. For example, for Kotlin, you might add:
"org.gradle.jvmargs=-Xms1g -Xmx7168M kotlin.daemon.jvm.options=-Xms700m -Xmx7168M"
Method 2: Modifying the gradle.properties File
If the heap size requirement is constant, you can directly add the following code to the end of your project's gradle.properties file. Feel free to modify this code to fit your specific project requirements:
org.gradle.jvmargs=-Xms1g -Xmx7168M
Also, if you want to solve this issue via Android Studio you can follow this documentation:
How can I generate an APK alongside an AAB?
To generate an APK alongside an AAB, you can use one of these two methods:
- Adding Another Android Build Step:
- Configure for AAB: Set up the build configuration to generate an AAB.
- Add another Android Build Step: Add an additional Android Build step, after the first Android Build step. To avoid confusion, you can add the generates file type to the step name.

- Modify Output Type: Change the
$AC_OUTPUT_TYPEinput variables of the second Android Build step to APK. Now your build will generate an AAB and APK file.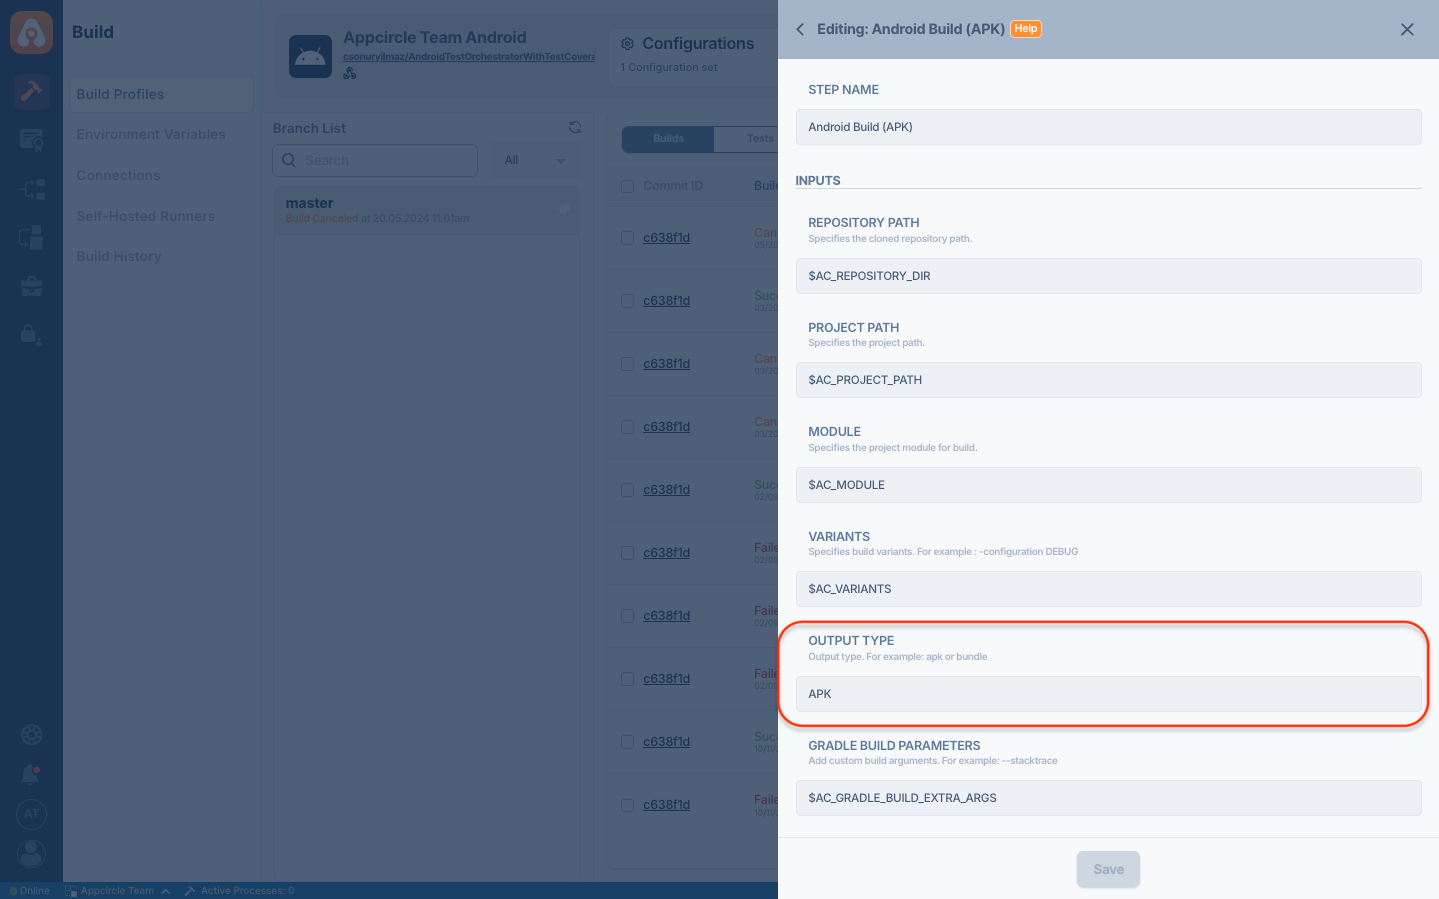
If adding two Android Build steps makes the build process too lengthy, you can use the following alternative method:
- Generating APK from AAB file:
- Configure for AAB: Set up the build configuration to generate an AAB.
- Add a Bundle Universal Apk Step: Insert the
Bundle Universal Apkstep in your workflow after the Android Build step. - Configure the Bundle Universal Apk Step: Complete the inputs for the Bundle Universal Apk step. To sign the APK via this step, you might need to upload your keystore file to the system if there is no uploaded.
- Convert AAB to APK: This step will convert the generated AAB into an APK.
These steps will ensure that both an AAB and an APK are generated during your build process.
How do I manage Android dependencies with artifactory repository manager?
Integrating an Artifactory repository manager into your Android build process is a robust approach to centralizing dependency management, improving build reliability, and ensuring reproducibility. Below, we’ll demonstrate this process using Nexus Repository Manager as an example in conjunction with the Appcircle Android Build workflow step.
For detailed instructions on integrating Nexus Repository Manager with Appcircle, see our Sonatype Nexus Configuration guide.
1. Set up Nexus repository
- Ensure your Nexus Repository Manager is properly installed and configured. For hosted installations, follow the official Nexus documentation to set up your Maven or Gradle repositories.
- Create a hosted Maven repository (or any repository format compatible with your project). Name the repository, for example,
android-repo.
2. Integrate Nexus into the Android project
In your Android project’s build.gradle (or settings.gradle if using Gradle Version Catalog), configure Nexus as a repository.
When configuring Sonatype Nexus, ensure that you use the https protocol for secure communication.
Although Nexus can technically be accessed over http, it is strongly recommended to use https, especially when authentication is involved or when accessing private repositories.
To fetch dependencies from a Nexus repository, add the following configuration to your Gradle file.
You can place this block in either the project-level or module-level build.gradle file, depending on your project structure.
If all modules in your project will use the same artifacts, it is recommended to place it in the project-level file:
repositories {
    maven {
        url 'https://your-nexus-url/repository/android-repo/'
    }
}
If the URL requires authentication for access, you can configure it as shown below:
repositories {
    maven {
        url 'https://your-nexus-url/repository/android-repo/'
        credentials {
            username = "your-username"
            password = "your-password"
        }
    }
}
To update your Gradle distribution URL with a Nexus repository, modify your gradle-wrapper.properties file and replace the distributionUrl value with the Nexus repository URL. Below is an example:
distributionUrl=https://your-nexus-url/repository/gradle-distributions/gradle-8.8-bin.zip
3. Run the build workflow
Trigger your build through Appcircle. The workflow will fetch dependencies from the Nexus repository as configured and compile the project with them. Logs will show dependency resolution status to confirm successful integration with Nexus.
It works on my machine. Why does it fail on Appcircle?
Question
The build works successfully on my local machine, but it fails when running on Appcircle. Why does this happen?
Answer
This difference is usually caused by environment cleanliness and caching behavior.
Appcircle provisions a completely clean machine for every build. Each run starts from a fresh environment with:
- No cached Gradle files
- No previously downloaded dependencies
- No leftover build artifacts
This is an even cleaner approach than a local clean build, which often still relies on cached data.
As a result, issues that are hidden by local caches may surface on Appcircle.
Why IDE Cache Invalidation Is Not Enough
Many developers rely on Invalidate Caches / Restart in Android Studio.
While this step can be helpful, it is important to understand its limitations:
- It clears Android Studio IDE caches only
- It does not delete Gradle caches
- The
~/.gradledirectory remains untouched
This means local builds may still succeed due to cached Gradle data, even though the environment is not truly clean.
Recommended Steps for a True Local Clean Build
To reproduce Appcircle’s clean environment locally, follow these steps.
1️⃣ Clean and Refresh Dependencies
This removes old build outputs and forces Gradle to re-download dependencies:
./gradlew clean build --refresh-dependencies
2️⃣ Clear Gradle Caches (for Major Gradle Updates)
If you upgraded Gradle significantly (for example, Gradle 7 → Gradle 8), you should also remove cached Gradle files:
# Linux / macOS
rm -rf ~/.gradle/caches/
rm -rf ~/.gradle/wrapper/
This ensures no outdated Gradle artifacts remain.
3️⃣ (Optional) Invalidate IDE Caches
You may still run Invalidate Caches / Restart in Android Studio as an additional step, but it should not replace the Gradle cleanup steps above.
4️⃣ Run a Full Clean Build Locally
From the terminal:
./gradlew clean
./gradlew build
Or from Android Studio:
- Build > Clean Project
- Build > Rebuild Project
Following the steps above will help you identify issues that only appear in clean CI environments and reduce discrepancies between local and Appcircle builds.