Ostorlab Security Scan
Ostorlab is a mobile application security testing platform. The Ostorlab Security Scan step uploads the app your workflow has built, an APK, an AAB, or an IPA, to your Ostorlab organization and starts a security scan on it.
The step can also wait for the scan result and break the pipeline when the scan risk rating is too high, so a release with a critical finding stops before it reaches testers or the stores.
Because it scans the built app rather than the source code, the step works on Java / Kotlin, Objective-C / Swift, React Native, and Flutter projects alike. It follows the Run Ostorlab as a Workflow Step guide of Ostorlab: it installs the Ostorlab CLI in a Python virtual environment and runs ostorlab ci-scan run.
Ostorlab can also scan your builds through a webhook. Use either the webhook or this step for a build profile, not both. Otherwise, every build is scanned twice.
Prerequisites
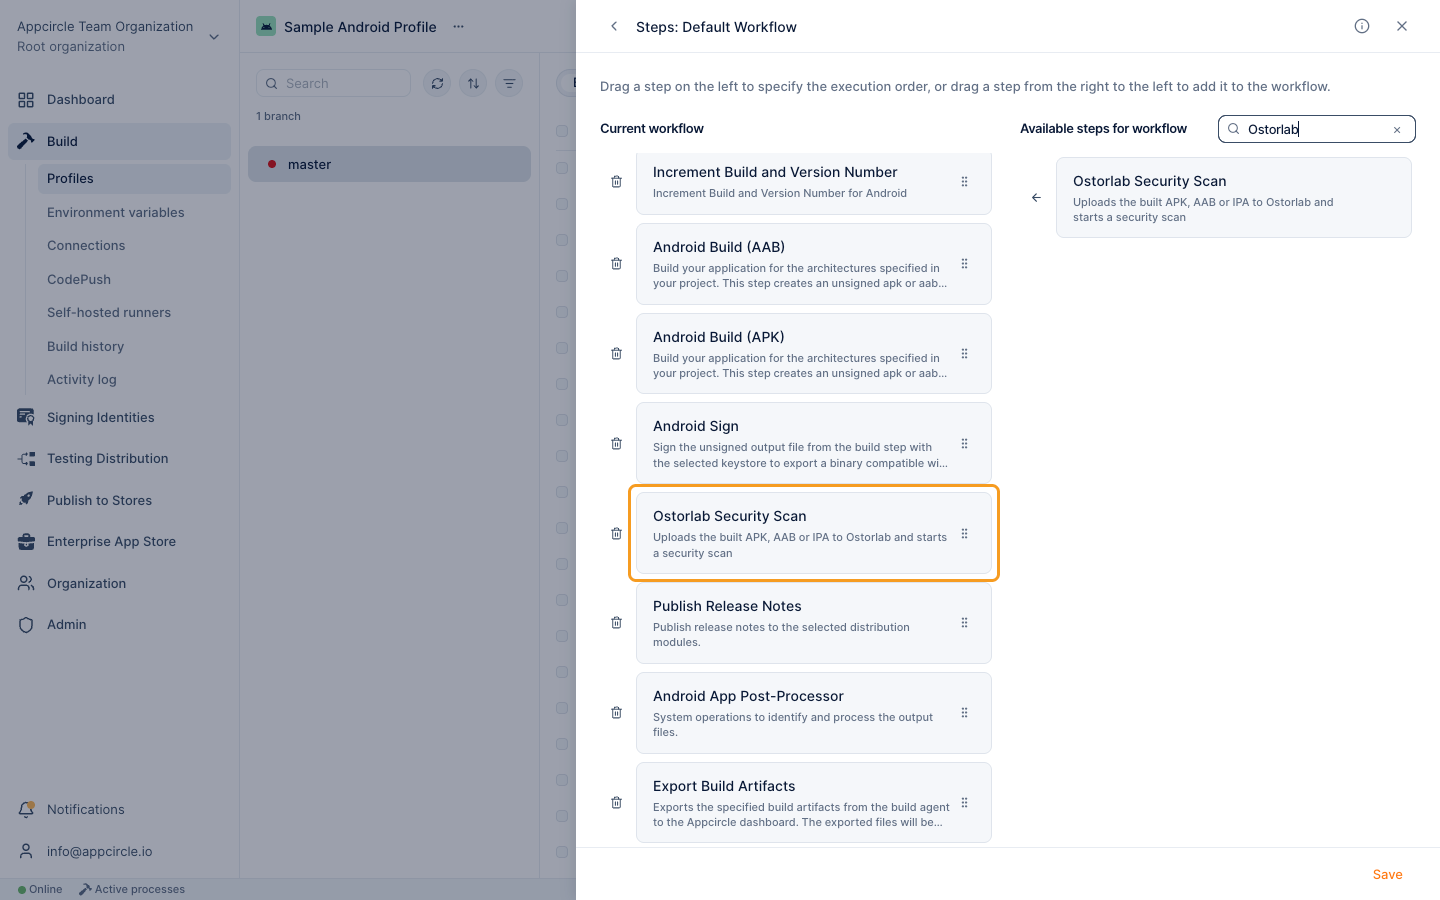
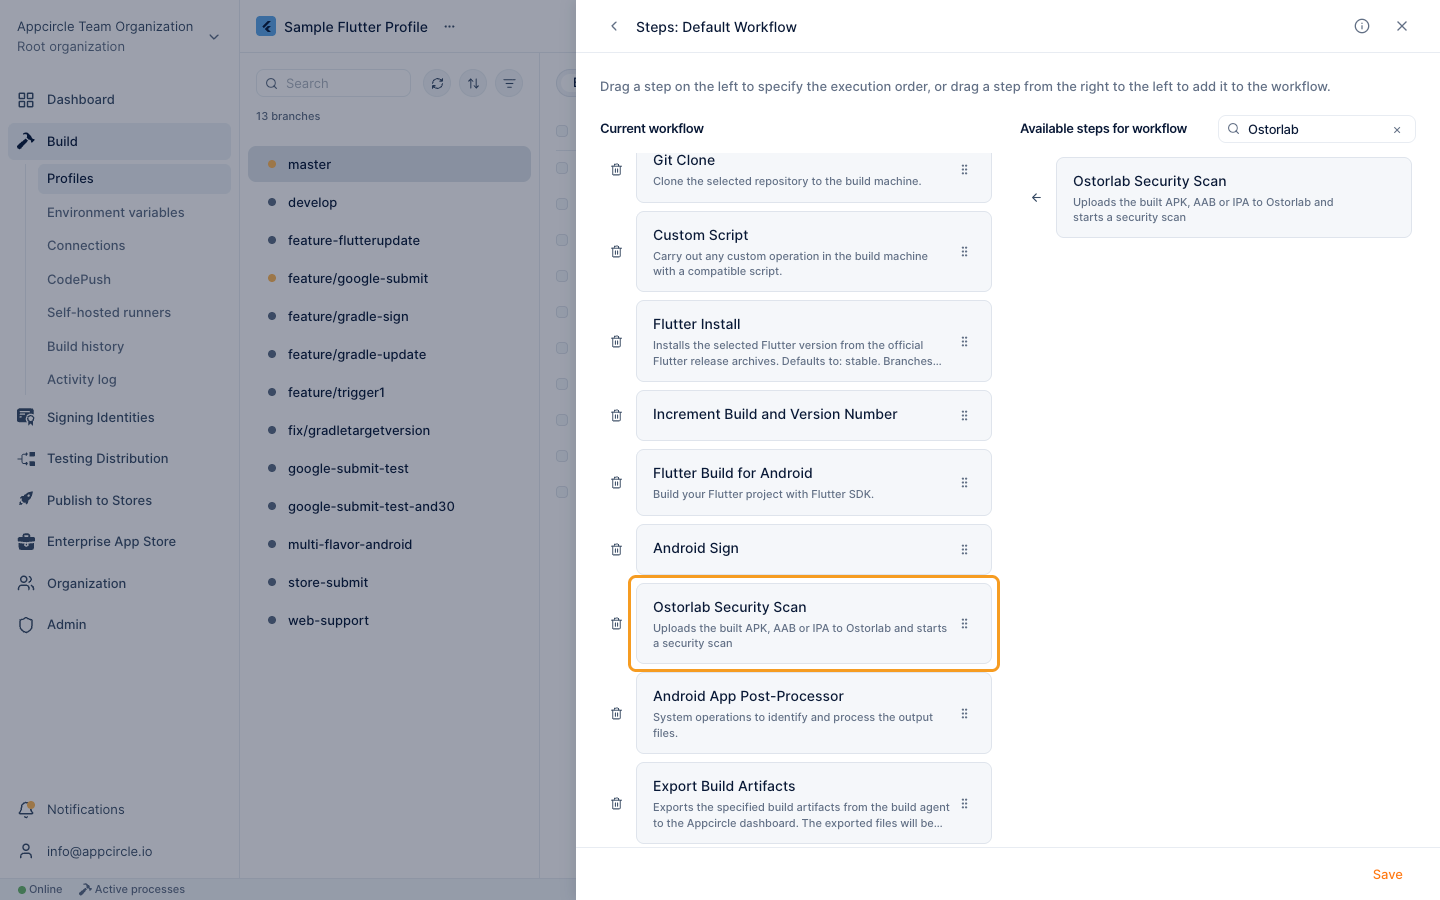
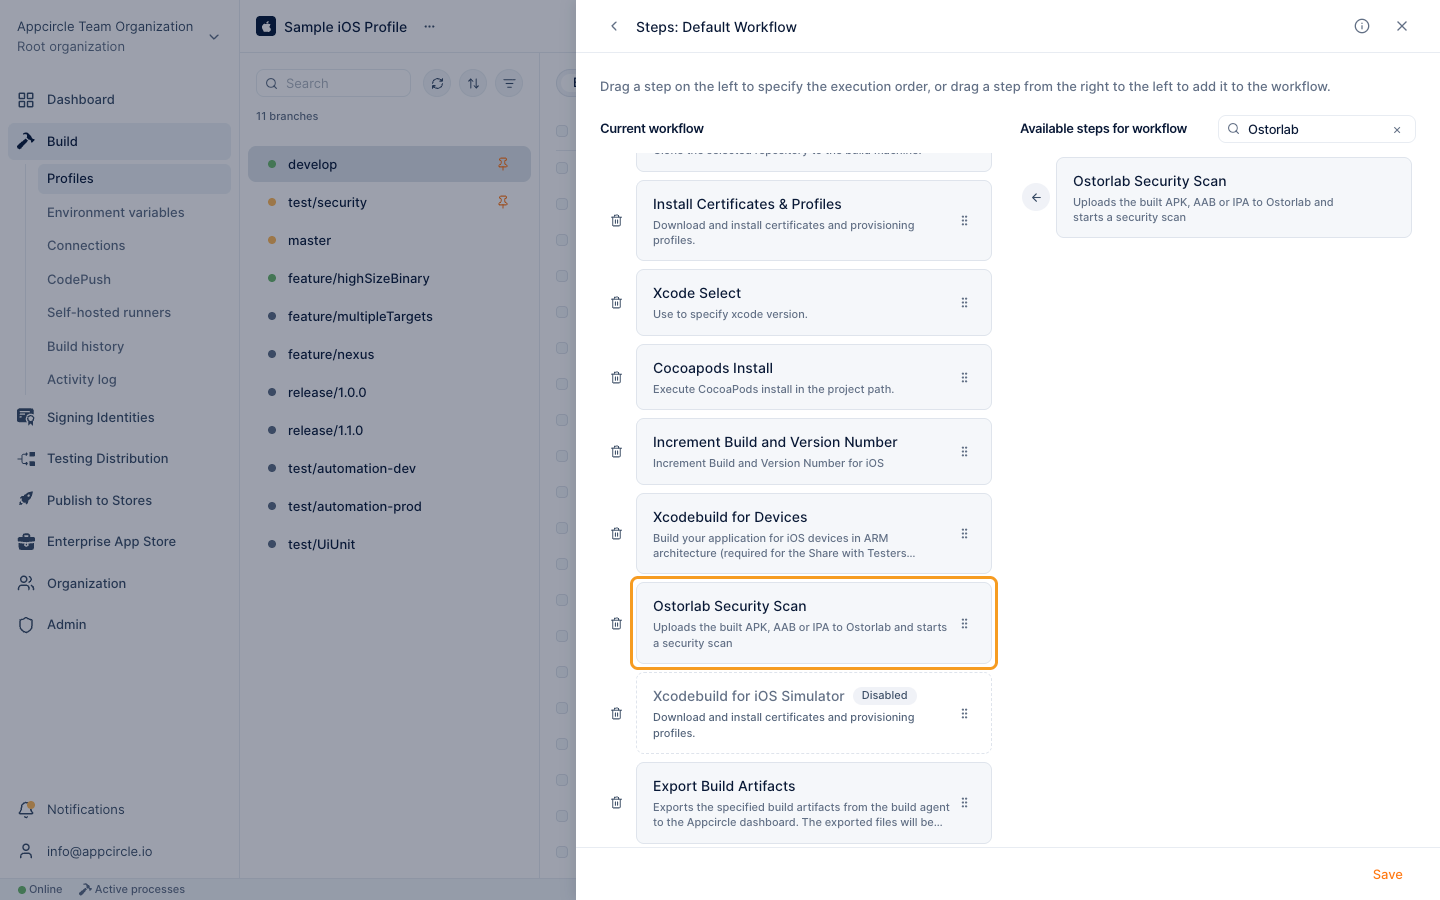
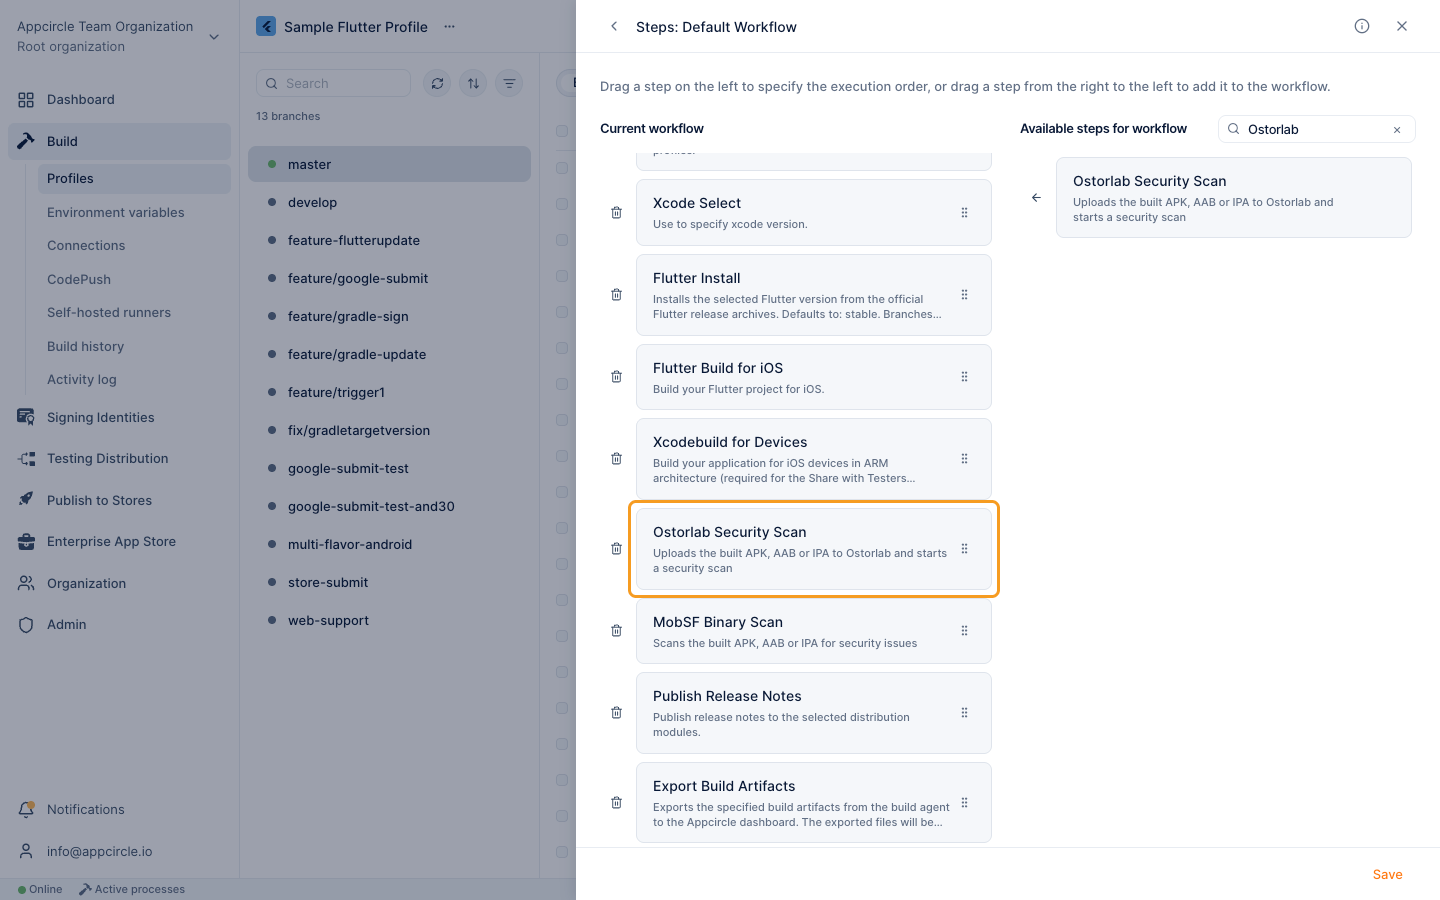
Before running the Ostorlab Security Scan step, you must complete certain prerequisites, as detailed in the table below:
For Android (Java / Kotlin and React Native)
| Prerequisite Workflow Step | Description |
|---|---|
| Android Build | Generates the app (APK or AAB) required for the Ostorlab Security Scan step. |
| Android Sign | Signs the app (APK or AAB). If the app is already signed, this step can be skipped. |
For Android Flutter
| Prerequisite Workflow Step | Description |
|---|---|
| Flutter Build for Android | Generates the app (APK or AAB) required for the Ostorlab Security Scan step. |
| Android Sign | Signs the app (APK or AAB). If the app is already signed, this step can be skipped. |
For iOS (Objective-C / Swift and React Native)
| Prerequisite Workflow Step | Description |
|---|---|
| Xcodebuild for Devices | Builds the application in ARM architecture and generates an IPA file. |
For iOS Flutter
| Prerequisite Workflow Step | Description |
|---|---|
| Flutter Build for iOS | Prepares the Flutter project for the iOS environment and builds it using the Flutter SDK. |
| Xcodebuild for Devices | Builds the application in ARM architecture and generates an IPA file. |
The step needs an Ostorlab API key. In Ostorlab, open Integrations/API → API Keys, select New API Key, and copy the key.
- In Appcircle, create an environment variable group, for example
OSTORLAB. - Add a variable with the key
OSTORLAB_API_KEY, paste your Ostorlab API key as its value, and select Secret. - In the configuration of your build profile, select the
OSTORLABgroup on the Environment Variables tab.
The $AC_OSTORLAB_API_KEY input defaults to $OSTORLAB_API_KEY, so the step picks up the key without any other change.
The Ostorlab CLI requires Python 3.13 or later. The macOS Sequoia 15.4.1 and later stacks provide it. The Debian Bullseye and macOS Sonoma stacks have an older Python, so select a newer stack or set $AC_OSTORLAB_PYTHON_PATH to a Python 3.13 or later. For the Python version of each stack, see the iOS Build Infrastructure and Android Build Infrastructure pages.
On self-hosted runners, the runner must also reach api.ostorlab.co to upload the app and pypi.org to install the Ostorlab CLI.
Input Variables
This step contains some input variable(s). It needs these variable(s) to work. The table below gives explanation for this variable(s).
Please do not use sensitive variables such as Username, Password, API Key, or Personal Access Key directly within the step.
We recommend using Environment Variables groups for such sensitive variables.
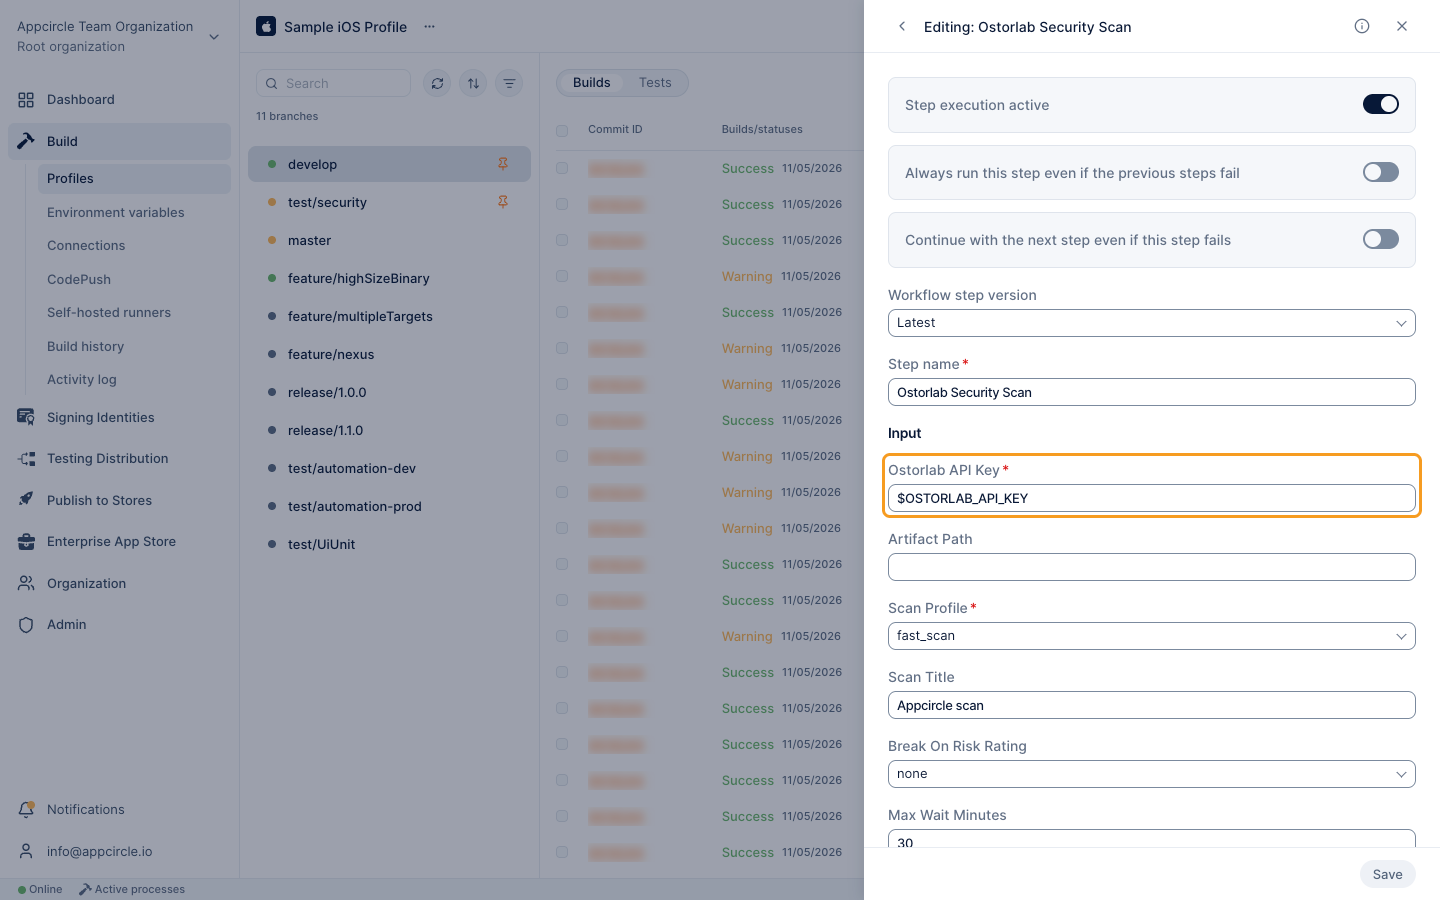
| Variable Name | Description | Status |
|---|---|---|
$AC_OSTORLAB_API_KEY | The Ostorlab API key. Default: $OSTORLAB_API_KEY. | Required |
$AC_OSTORLAB_ARTIFACT_PATH | Path of the APK, AAB, or IPA to scan, or of the folder holding it. On Android, use $AC_SIGNED_APK_PATH or $AC_SIGNED_AAB_PATH from the Android Sign step. On iOS, use $AC_EXPORT_DIR from the Xcodebuild for Devices step, because iOS builds do not expose the IPA path as a variable. A folder must hold exactly one APK, AAB, or IPA. The step does not pick an artifact on its own. | Required |
$AC_OSTORLAB_SCAN_PROFILE | The scan profile. fast_scan runs static analysis only. full_scan runs static, dynamic, and backend analysis, so it takes longer. Options: fast_scan, full_scan. Default: fast_scan. | Required |
$AC_OSTORLAB_SCAN_TITLE | The scan title shown in Ostorlab. Default: Appcircle scan. | Optional |
$AC_OSTORLAB_BREAK_ON_RISK_RATING | Waits for the scan result and breaks the pipeline when the risk rating is higher than the selected value. For details, see Risk Rating. Options: none, high, medium, low, potentially, hardening. Default: none. | Optional |
$AC_OSTORLAB_MAX_WAIT_MINUTES | How many minutes to wait for the scan result when $AC_OSTORLAB_BREAK_ON_RISK_RATING is set. The step fails when the scan does not finish in time. Default: 30. | Optional |
$AC_OSTORLAB_TEST_CREDENTIALS_LOGIN | The username the full scan uses to sign in to your app. Set it together with the password. | Optional |
$AC_OSTORLAB_TEST_CREDENTIALS_PASSWORD | The password the full scan uses to sign in to your app. Keep it in a secret environment variable, for example $OSTORLAB_TEST_PASSWORD. | Optional |
$AC_OSTORLAB_UI_PROMPTS | Natural language instructions that tell the scanner how to navigate your app, one per line as name: action. For an example, see the FAQ. | Optional |
$AC_OSTORLAB_EXTRA_ARGUMENTS | Additional arguments for the ostorlab ci-scan run command, for example --test-credentials-role admin --sbom sbom.json. | Optional |
$AC_OSTORLAB_CLI_VERSION | The Ostorlab CLI version to install, for example 2.22.14. When empty, the latest version is installed. | Optional |
$AC_OSTORLAB_PYTHON_PATH | Full path of a Python 3.13 or later. When empty, the step tries python3.14, python3.13, and python3 on the PATH. | Optional |
Output Variables
The output(s) resulting from the operation of this component are as follows:
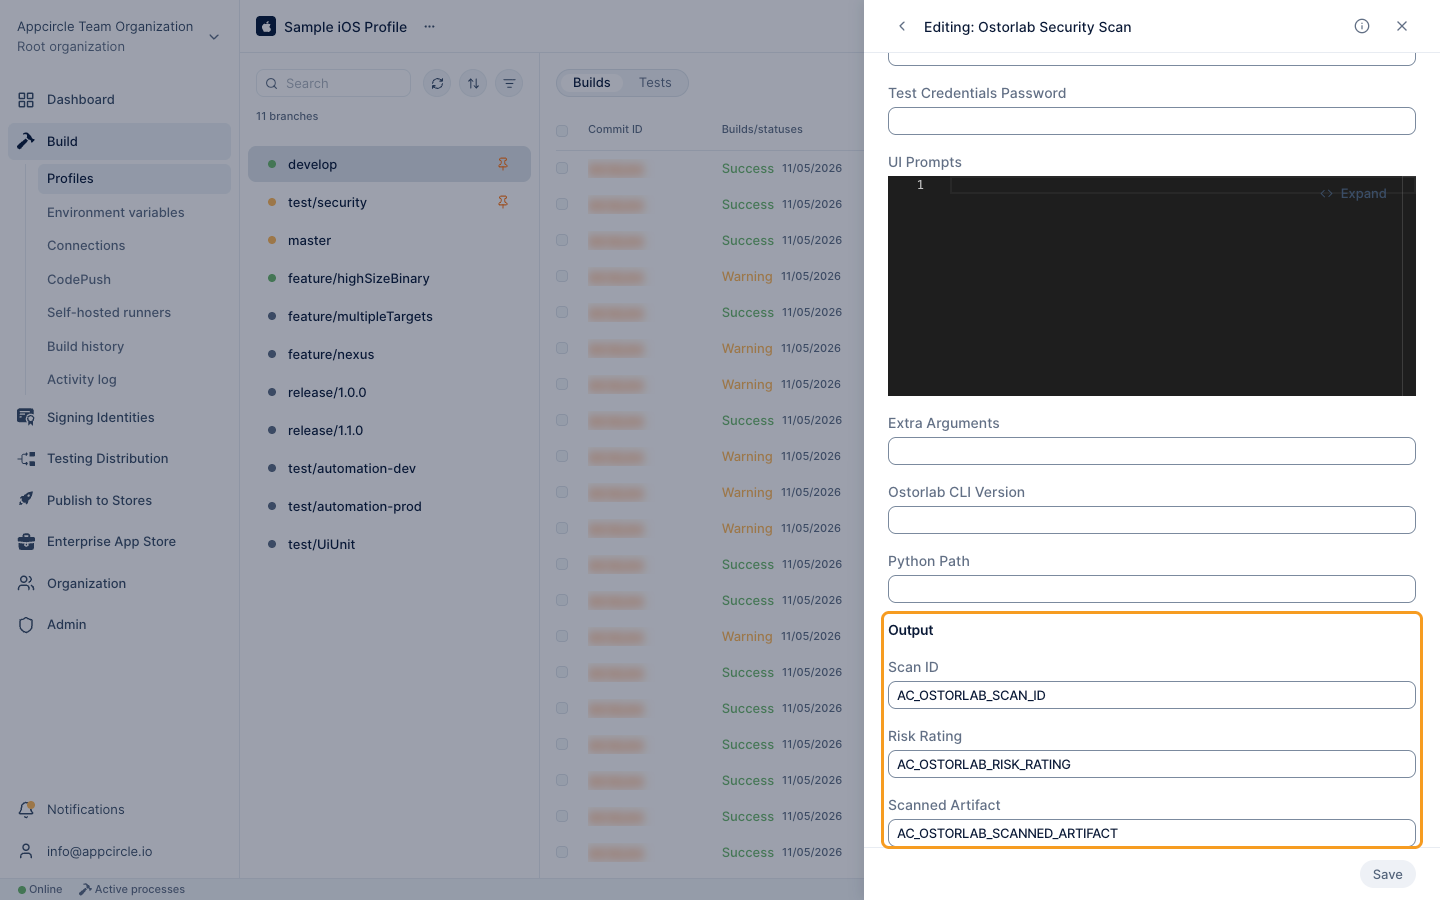
| Output Variable | Description |
|---|---|
AC_OSTORLAB_SCAN_ID | The ID of the scan created in Ostorlab. |
AC_OSTORLAB_RISK_RATING | The risk rating of the scan, for example High. Empty when the step does not wait for the result. |
AC_OSTORLAB_SCANNED_ARTIFACT | The artifact that was uploaded to Ostorlab. |
The step sets these variables even when it breaks the pipeline, so the following steps can still use the scan ID.
Risk Rating
Ostorlab grades every scan with a risk rating. From the most to the least severe, the ratings are Critical, High, Medium, Low, Potentially, and Hardening.
When $AC_OSTORLAB_BREAK_ON_RISK_RATING is none, the step creates the scan and continues without waiting for the result. You can follow the result in Ostorlab.
Any other value makes the step wait for the result and break the pipeline when the rating is higher than the selected value:
| Break On Risk Rating | The pipeline breaks on |
|---|---|
none | Never. The step does not wait for the result. |
high | Critical |
medium | Critical or High |
low | Critical, High, or Medium |
potentially | Critical, High, Medium, or Low |
hardening | Critical, High, Medium, Low, or Potentially |
The selected rating itself does not break the pipeline. To stop a release on a High rating, select medium.
When the risk rating is too high, this step fails and breaks the pipeline. To prevent pipeline interruption, enable "Continue with the next step even if this step fails" toggle.
To access the source code of this component, please use the following link:
FAQ
What is the difference between the Fast Scan and Full Scan profiles?
fast_scan runs static analysis on the uploaded app. full_scan also runs the app to perform dynamic analysis and checks the backend it talks to, so it takes longer and finds issues that only appear at runtime. Your Ostorlab subscription determines which profiles you can use.
Which file formats can this step scan?
An APK, an AAB, or an IPA. The step selects the Ostorlab asset type from the file extension. An .xcarchive is not accepted, so export the .ipa file first with the Xcodebuild for Devices step.
Where can I see the scan findings?
In your Ostorlab organization. The build log shows the scan ID and, when the step waits for the result, the risk rating. The step does not add a report to the build artifacts.
How can the full scan get past the sign-in screen of my app?
Set $AC_OSTORLAB_TEST_CREDENTIALS_LOGIN and $AC_OSTORLAB_TEST_CREDENTIALS_PASSWORD to a test account. When your app needs a few taps to reach its main screens, also describe them in $AC_OSTORLAB_UI_PROMPTS, one prompt per line as a short name, a colon, and the action:
accept-terms: Scroll down and select the Accept Terms checkbox.
login: Tap the Login button and sign in with the test credentials.
Why does the step fail with a message about the artifact path?
The step scans only the artifact set in $AC_OSTORLAB_ARTIFACT_PATH. It fails when the input is empty, when the variable it refers to, for example $AC_SIGNED_APK_PATH, was not exported by an earlier step, or when the folder it points to holds more than one APK, AAB, or IPA. Place the step after the step that signs your app, or set the input to the full path of the file to scan.
Why does the step fail with a message about the Python version?
The Ostorlab CLI requires Python 3.13 or later. Select a stack that provides it, such as macOS Sequoia 15.4.1 or later, or set $AC_OSTORLAB_PYTHON_PATH to a Python 3.13 or later on your self-hosted runner.
Why does the step fail with a message about my Ostorlab subscription?
Your Ostorlab subscription does not cover this app or the selected scan profile. Contact your Ostorlab account manager.
Why does the step report that the scan could not be started?
Ostorlab rejected the request. Check that the OSTORLAB_API_KEY variable holds a valid key and that its environment variable group is selected in the build profile configuration. The lines above the error in the build log show the reason Ostorlab returned.
Why does the step fail when the scan takes too long?
When $AC_OSTORLAB_BREAK_ON_RISK_RATING is set, the step waits at most $AC_OSTORLAB_MAX_WAIT_MINUTES for the result, and a full scan can take longer than the default 30 minutes. Increase $AC_OSTORLAB_MAX_WAIT_MINUTES, or set $AC_OSTORLAB_BREAK_ON_RISK_RATING to none and follow the scan in Ostorlab.
Why does the step fail while installing the Ostorlab CLI?
The runner could not download the Ostorlab CLI. On self-hosted runners, check that the runner can reach pypi.org.